I’ve been encouraged to write freely this week, so here we are! At first I wanted to discuss travelling in the current climate since I just went down to Baltimore, MD for a workshop (delightful, ended up with some strange plots and more questions than I went with!). I’ve been travelling internationally alone for the last decade or so, and it hasn’t always gone smoothly. Typically my travel related posts have to do with taking care of plants while I’m gone, this time is no different. Except it has a few additional critters in the mix (Exhibit A: Figure 1).
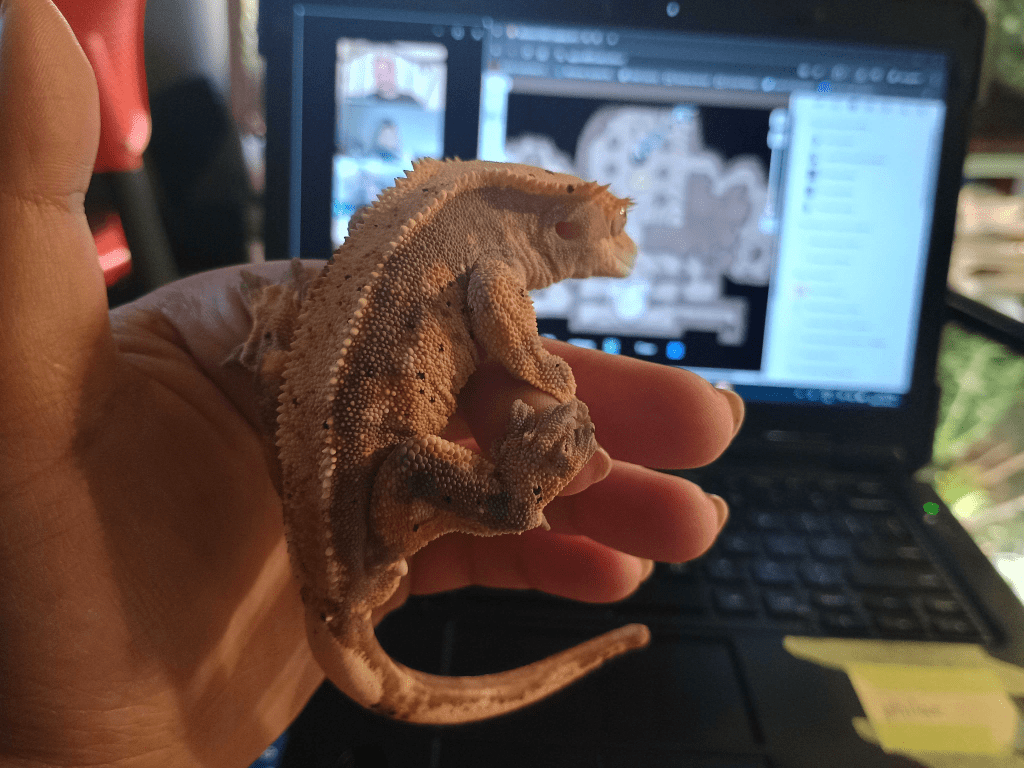
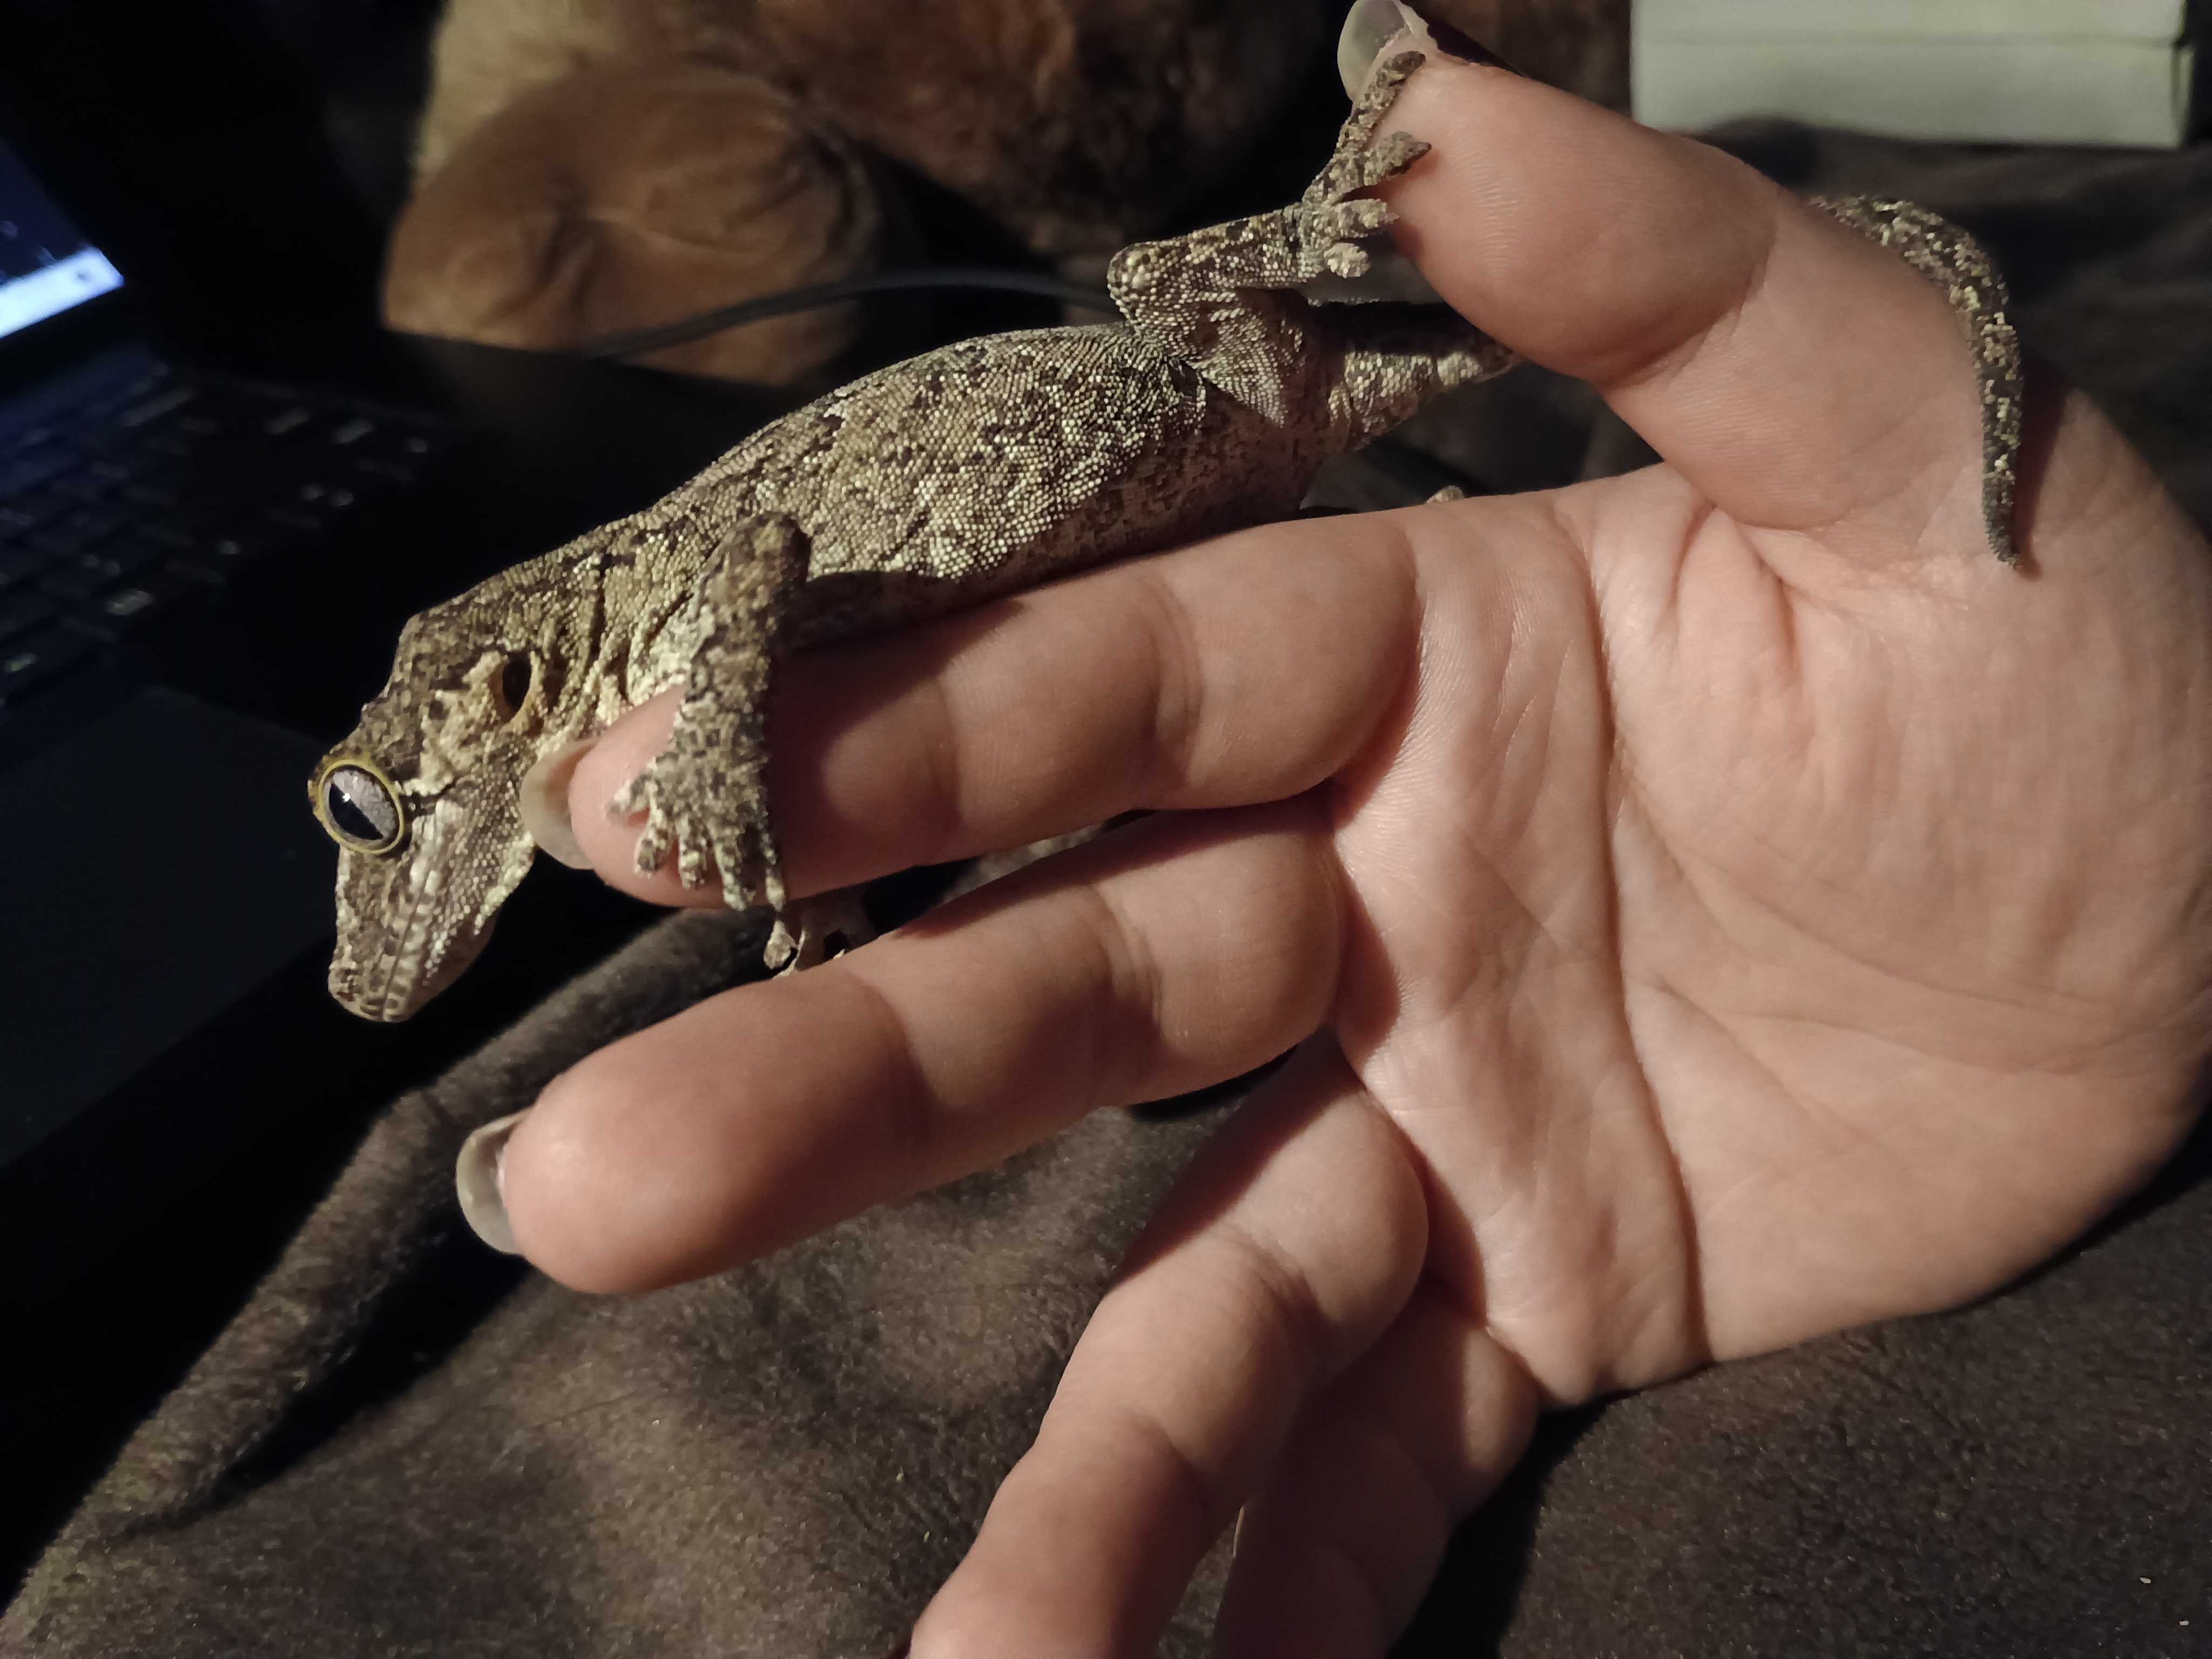
Shortly after I returned from my trip in South Korea, I decided to acquire a single crested gecko. I had some time to dial in the terrarium that I had built for my plants to survive my time away, and build a second one just in case I got a very small gecko. There’s no real compelling reason to put a very small gecko in a smaller enclosure, but I figured it would be better for me to keep an eye on the health of a very young animal in an easier to scan through enclosure for a while before upgrading it as it grew larger. In the back of my mind, I was looking for a high-contrast gecko with long, fluttery lashes. On an aesthetic level, I was looking for a red and white pattern. After quite a bit of research however, I concluded that all crested geckos were cute (except for the ones with genetic problems from bad breeding, looking at those is somewhat distressing) and I’d be happy with a patternless one as well. My goal was to have a happy and friendly gecko that was not opposed to being held from time to time (Figure 2 is an example of an endlessly smiling gecko that is very relaxed when hanging out. So relaxed that he tends to go to the bathroom on people once settled in).
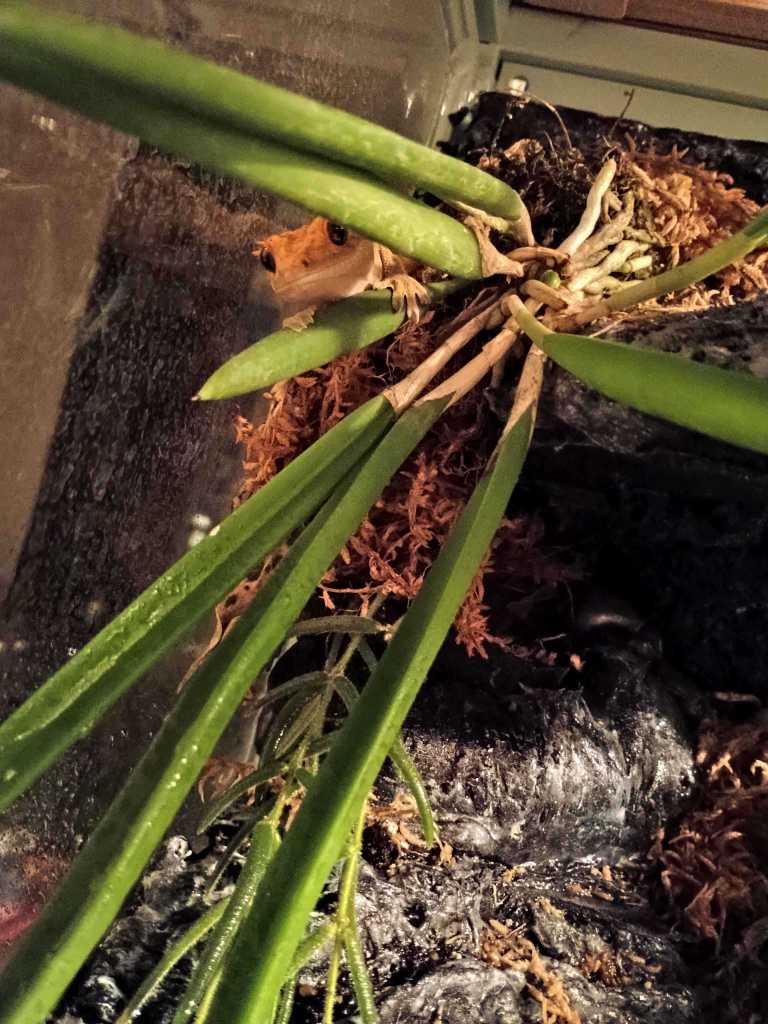
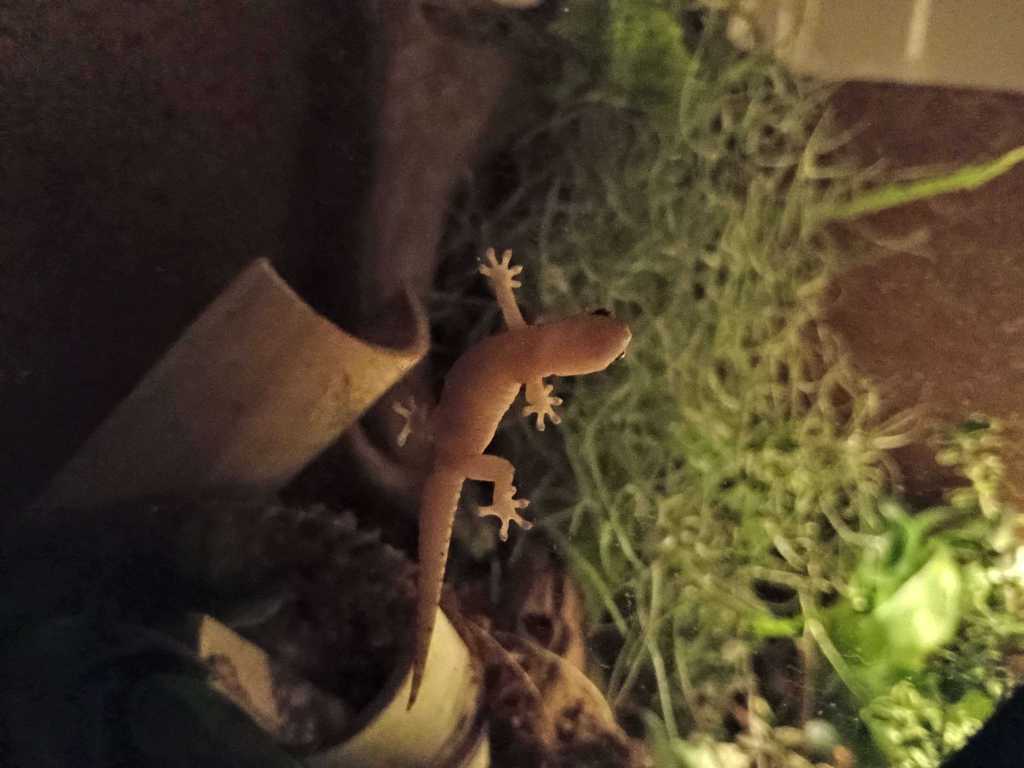
Anyhow, I ended up with two after visiting a local breeder (Xavion – 32.7 g to 38.6 g, and Spicy Cream Cheese Wonton – 13.5 g to 23.7 g, respectively, see Figures 1 and 2). Not too long after, I acquired a gargoyle gecko in relatively poor health (Frogfoot Meteor, 11.9 g to 30.1 g, Fig. 3). She was somewhat underfed, and terrified of humans. I’m happy to report that she’s doing much better now and lives in a far larger enclosure than what the breeder insisted was her “upgrade”. She’s put on a healthy amount of weight and is significantly less skittish than before.
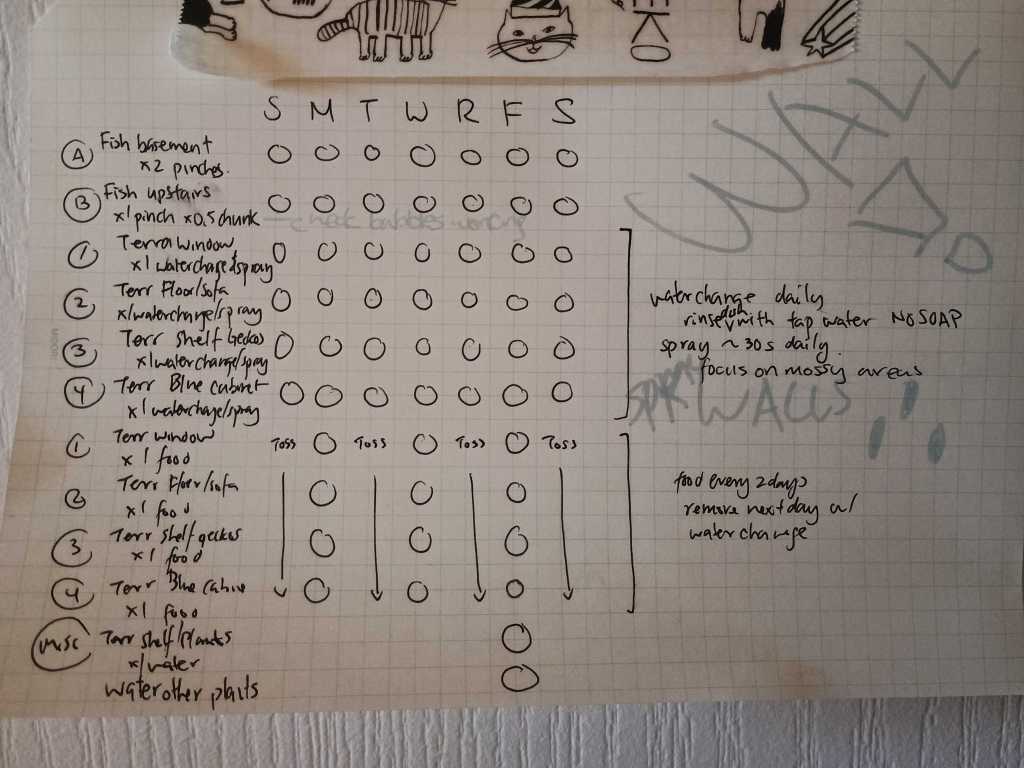
A few months later, I helped out with some folks who were undergoing a legal dispute over their housing situation by rehoming a few of their mourning geckos (Katana and Wheelbarrow, Fig. 4). At this point, there are 5 additional animals to take care of. Perhaps surprisingly to the reader, this takes about 3 – 5 minutes of my day most days. I would also argue that it can’t take much less, since fresh water is a necessity and its important to have a bowl of water readily available all the time. This can’t quite be replaced by an auto-mister unless I also add in a way to sterilize the water bowls. A “self-cleaning” water system wouldn’t work either, as it would have to be large enough that its presence would present a drowning risk or required some form of UV sterilization (impractical). Feeding has mostly moved from once every 2 days to once every 3 days for all but Spicy.
Why am I listing all of this down? Mostly I think they’re cute, but I also wanted to note the care requirements. That is, they need to be interacted with ideally every 24 hours, with 48 hours somewhat pushing it.
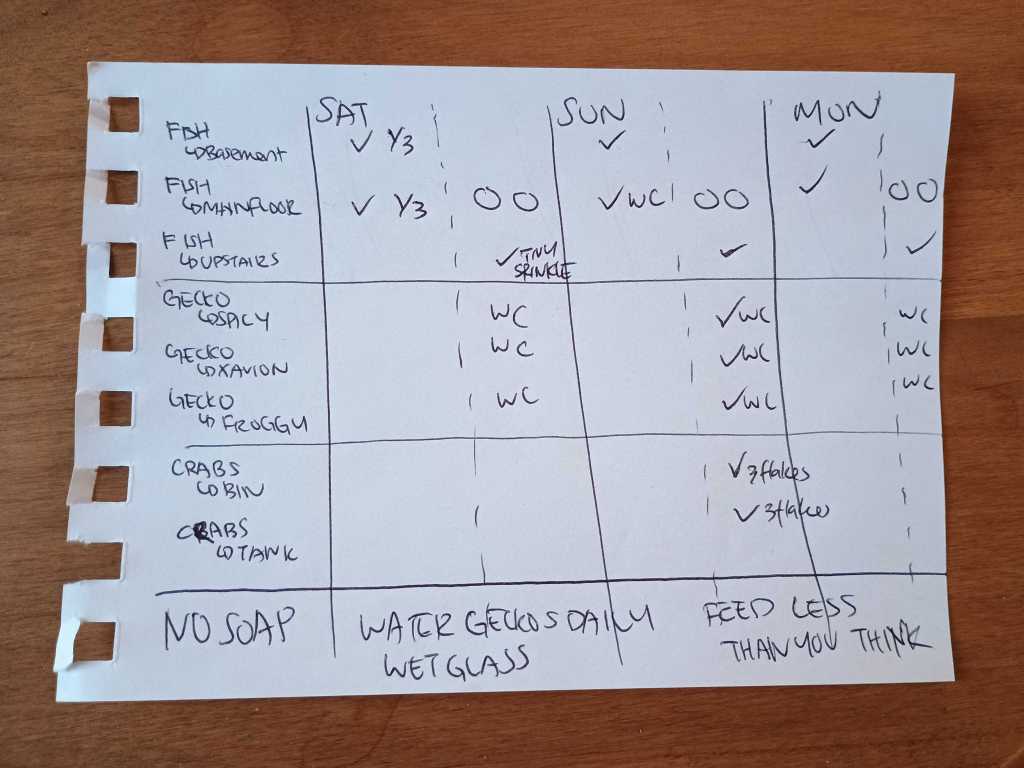
I listed all these details to make the point of: Do not acquire pets that require regular care unless you have a solution for their care when you are gone. For the less than 72 hours I was away, I had someone spray down the enclosures and change out the water bowls daily (Fig. 5). They were fed once during this time with food I had pre-made. The animals are well taken care of, and the chances that they are overfed or go without critical needs is negligible.
This was quite unlike my plants, which I left no instructions for other than to optionally water my carnivorous plant bowl with rain water if so desired, it is quite important to leave detailed care instructions and run them through the caretaker prior to departure.
The Circle of Life
Okay so, I mentioned feeding and watering, but what about bedding changes? and cleaning?
The short answer is, there is none to do! While there may be quite a few water stains that are unsightly, the enclosures are self-cleaning for the most part. During the daily watering and spray down, excess food and waste are washed to the base of the enclosure, where my secondary pets live. I have a full cleanup crew in each of the gecko enclosures. They breakdown waste to be further decomposed and eventually converted into fertilizer, and the plants in the enclosure take up the nutrients to keep growing. The more complex and the more layers and redundancies added to this cycle, the less something is likely to go drastically wrong in a short amount of time.
I use the same principle for my aquariums. Generally, I’ve set everything to be reasonably self-sustaining, with plants uptaking waste that might otherwise be toxic, and critters at the bottom level that break down food and waste into ammonia. Periodically, I check for signs of nutrient imbalance and correct them before the living standards decline. For my fish tanks, this might be as simple as a water change and removing some mulm from places that do not get a lot of water flow. If I were running more high-tech tanks, this might also mean dialling in the CO2 flow and light levels. As it is, I skip the use of aqua soils and opt for either an organic mix that is then topped heavily by sand to minimize leaching into the water, or a highly porous substrate mixed with sand. The denizens at the bottom of the tanks snuffle about looking for food, and push the small waste particles into the sand until they eventually breakdown further and get added to the base level. I have algae eaters to pick at spots that get a little too much light or have low water flow.
For terrariums, they operate similarly. There is a drainage layer that stays consistently damp so that plants have theoretically unlimited access to water should they need it. The substrate is designed to hold plants, moisture, and maintain some void space for oxygen. Isopods roam the lands, breaking up leaf litter and chunks of waste that make it to them. Springtails scrub up inaccessible corners to prevent mold from growing in high humidity and low airflow environments. The things I check in on are how often I spray the tank and water the plants directly, how much airflow the tank gets, and where things are placed with respect to lighting (and gecko trampling). Periodically I may need to supplement the soil layer with more organics and airy components to prevent it from compacting (which the isopods delay when they burrow).
There is an old adage that goes, “the bigger the better”. This is generally true to an extent. For example, I would go no smaller than 10 gallons for a fish tank as a “first fish tank” unless you are doing an exceptionally niche project such as caring for brackish shrimp or raising scuds and have quite a lot of time to commit to doing water changes as the tank stabilizes. For a terrarium that is meant to house an animal, 12x12x18 (inches, barbaric, I know) is the smallest I would consider if I want to have the full cycle of cleanup running, and only if the animal is very small and doesn’t move much in nature.
If you are just considering raising plants in either scenario, 1.5 gallons for a tank is excellent for plants, though you may need to manually remove a lot of algae and a fast growing plant will require a lot of trimming. Alternatively, go up a bit larger and you can include a few snails to help break the surface tension and get some movement into the tank to prevent stagnant sections. Similarly, for a terrestrial based terrarium, you can go much smaller, though you’ll ideally include a culture of spring tails to prevent mold, and ensure that you can give it periodic airflow. You will also likely want your plant looking nice, so that may mean quite a bit of light and heat. Less condensation will block your view if you do allow for airflow, which means finding the minimum size enclosure to maintain moisture in the system as well. I’d recommend at least a 2 L container for your first time if you want it to last a long time.
It’s still on my to-do list to put up a guide to set up a terrarium. But here’s a short version for now!
Beginner’s guide to a sub-tropical to tropical terrarium
Materials:
- container, at least the minimum size for what you plan on housing.. Should have a lid with ventilation
- mesh/drainage barrier. I like weed blocking fabric, but any synthetic material that will not decompose or rust when wet will work
- drainage layer. LECA is my recommendation. Lightweight, relatively cheap, lots of surface area
- growing media. Mix of peat OR coco coir, orchiata OR coco husk, spaghnum moss (dried, shredded), activated charcoal chips, perlite OR pumice OR vermiculite OR LECA OR your preferred highly porous, rocky material. Bark and husk are to provide aeration, but they degrade over time to your cleanup crew. Due to the elongated shape, they also provide some irregular sturcture in the media, unlike the more sperical inorganic components. Inorganic porous material also gives aeration, but can very in weight and expense. Perlite is also very ugly because it is a very bright white and tends to “float” towards the top with how light it is. Charcoal acts as a filter for smells, growing media for spring tails, and also acts as aeration. Spaghnum moss (dried, shredded) adds humidity to the mixture without being soaking. Lastly, leaf litter may or may not be optional depending on what you are planning on housing. Rainwater or distilled if you plan on misting the enclosure and don’t like water marks
- lighting. Optional but highly useful if you can control the lighting since the enclosure walls will filter out most of the usable light spectrum as is
- circulation. Can be a fan, regularly opening the enclosure, or built in fentilation. Remember that it is unlikely you will perfect the gas exchange processes in one shot, and plants produce carbon dioxide at night, so let fresh air in
- slim pipette. Scale up depending on the size of the terrarium and how much water the drainage layer can hold.
- Set up your drainage layer. 1 in minimum is a safe amount
- Cover it with your drainage barrier
- Place your growing media overtop to a thickness of at least 1 inch (likely want more depending on the growth pattern of your plants)
- Plant in your plants!
- Add springtails
- Gently water in
- Set in a place with light and provide air flow and top up water as needed. The growing media should not be sodden, and excess water should drain into the drainage layer. Under warm conditions, some of the water should recirculate upwards and never be entirely flooded. If it does become flooded, use the pipette to pull out some of the water from the bottom layer
If you are opting for a more designed terrarium, add in a step 3b. Include hardscape that builds a story using either natural (e.g. rocks, wood, bones) or man made materials that will take a long time to degrade to create a framework. This can build up height and mounting places for plants. This can also create shaded areas that might allow for lower light plants to stay compact with minimal growth (and trimming). If you’re anything like me, the building many worlds process can kind of run away from you (Fig. 6), but eventually you’ll work out a good balance for the time you have and the commitment you can make to care for things.