-
Grad Life: Scheduling Resources
A list of the planning and scheduling resources I use intermittently or all the time. I’ll update this periodically. Currently I use a mix of Google Calendar, a Weekly Planner, and a Daily Planner/large notebook.
Google Calendar
Nothing new here! I have several calendars that I’m subscribed to and use. The top three that I pay attention to are:
- my lab calendar (x2). We update our extended out of office dates, shift dates, group meeting times, and events that may be of interest to others here. I usually use this to check when the next group meeting is, if I’m on the hook for anything to share at a meeting, and if anyone is out of town/busy
- my personal calendar. I schedule things like game nights, personal meetings, and events I’d like to attend here
- my personal work calendar. This is shared with my supervisors. When I need to get a lot of work done in a short amount of time, or I have huge swaths of work hours I can leverage, I plan out detailed tasks that help me accomplish larger goals with “Target” dates in which I send completed writing tasks to my supervisors/labmates/coauthors for review. I also put in major timeline checkmarks here
Weekly Planner
For those who have been subject to my love of the Hobonichi Weeks, let it be known that I moved into a Midori because their cat covers (and the price jump on the Weeks) convinced me. The weekly planner is a slim, vertical layout, with 2 pages per week. On the left side is M-S broken up vertically throughout the page, and on the right side is a blank graph page. I tend to carry this around all the time to mark in
- 3-5 tasks I want to complete for the day, and
- any scheduled appointments/meetings I have that day.
The graph side is for notes, impromptu ideas, tracking granular details, etc. There are overflow pages at the end, but this isn’t suitable for taking many notes.
Daily Planner
This is where I log meeting notes, plan things in detail, and use as an adhoc planner for whatever it is I need at the moment. (Previously I did this in the Hobonichi Weeks, but I found that the slim format was actually a detriment and I needed more horizontal space). I’ve used everything from a blank notebook, gridded notebook, sticky notes, and tip-ins from scrap paper for this. This year I’m using a Hobonichi Cousin because there is a lot I want to get done and its nicely formatted for me. I use this to
- set monthly goals/tasks on one page per month
- take meeting minutes
- use as scratch paper! Currently it’s arranged so that it’s one day a page. If I overflow the date, I just flip back to the last empty page and jot down the “date/page” I continue on. I often write down equations in these pages when I’m trying to do unit analysis and I need to get away from my code for a moment, scribble out plots and graphs that I think should appear and compare to what I see on a computer screen, or outline things such as my weekly plan, my thesis structure, jot down who I want to reach out to for whatever topic, write down short summaries of papers I’ve read, etc. This is also where those extra random stickers I accumulate throughout the year often end up…
My goal with this format is to actually develop an index this year. If there are key writings that I want to go back to, I don’t want them lost. Last year I just stuck in book marks, but it eventually got overwhelming. This year I want to take advantage of the “year at a glance” page and write down a brief header in those spots so I know where to go looking for when I want to check on the contents of a meeting I had.
This could easily be replicated in something likeOneNote or any other note taking software, but I’ve found I never really used those, and spending the extra few minutes to write down important things from a paper I want to remember works better than trying to dig up my highlights in my reference manager!
Bonus: Google Forms
Sometimes it’s just too much work to trawl through your calendar and fill out a tracker. To track things that take up my time, I use Google Forms! I write out a 3-4 question form for something I want to keep track of all in one place, and I know that I won’t want to do on paper/keep flipping to. The major use of this one is my Teaching Assistant duties. I keep track of my hours in 15-30 minute chunks and classify my tasks. This has come in helpful when discussing expectations and remaining hours in my contract. Its also useful for profs to know how to better assign hours to their TAs for the following year! I create one of these forms each year, and sometimes a more detailed one for certain courses I’m assigned to. I have my phone out all the time, so I might as well use it when I’m feeling guilty that I’m not doing work!
Questions in the form are:
- What course is this for?
- What tasks did you do? (eg. marking, proctoring, communications, prep work)
- How many hours did it take?
- Notes (more details, for example, noting that it was Assignment 1 that I was working on, or if it was an unexpected conversation that was course relevant)
Bonus: Check-ins
All of these tools are useless if you don’t use them. I typically review my calendar 2-3 times a day (and have noticed I’ve missed meetings because it’s muted, so I’m workig on a solution to that!), my weekly planner once in the morning and once at the end of work + whenever I need to jot down an appointment, and my daily planner daily-ish if I want to use all that extra space.
-
Sketchy Science: 2D Memories
Back in the days when it was socially acceptable to admit to owning a Nintendo Wii (no U to be seen back then), I was a huge fan of playing Super Paper Mario when I could borrow it from a friend (Fig. 1). The storyline was typical, Mario and friends travel through a number of dangerous worlds, defeating baddies, collecting goodies, and facing off the final boss at the end. I confess I never defeated the game (but no spoilers here!), as the save system was in such a way that I would persistently load into the final play-through with minimal health and entirely forget the controls each time I tried. Perhaps the smart thing would have been to restart all over again. But this is not important.

Figure 1. Super Paper Mario game cover. Anyone else remember this game? Super Paper Mario was a game that let you flip between 2D and 3D. This flipping ability let’s the player access an additional layer of the world that previously was hidden. You could make changes in the 3D world that affected the way the 2D world worked, by moving things in and out of the plane, and sometimes seeing passages that prevently didn’t exist. The 2D and 3D worlds were intimately related. This is my convoluted and off the cuff explanation for Fourier transforms (I’ll find out after this once I reread the Wikipedia entry for the umpteenth time).

Figure 2. Completely unrelated to this post, but I once made some fanart of this scene in highschool for an art project. I found the art style to be very charming. I want to say it was for an illustration class, but had I done it again, I think I would have done a 3D installation for this recreation. Imagine you’re dealing with this convoluted passage way, trying to navigate your way to a Pure Heart. You flip into the 3D space and you see that there is a frequency, a regularity, or perhaps everything is just a little lower than you’d like. You bonk some blocks with your head, dodge some goombas, and flip back into 2D. There it is! A straight path to the exit. It was there all along, but you had to move things in the 3D world to access it.
In my world, this is exactly what Fourier transforms are for. You take a signal that seems rather confusing, and want to see some of it’s characteristics in the frequency domain. Once you’ve flipped into frequency space, you can see all the details that make up your time signal. This might give you some clues to your final destination. But you also might need to tweak a few things to clean up the interpretation. By applying a function that can only be done in the frequency space, you have affected your time domain as well. You can see the results of your work by flipping back into the time domain.
Fourier transforms can be applied to more than time signals, and work for any sort of complicated situation you have. Say you want to recreate a complex squiggle in 2D, but want to make it exclusively out of single curves in 3D, you can do that. There’s more to it, but let’s say I have a strong itch to find a second-hand Wii and give Super Paper Mario another shot. Bleck!
-
Summer of 2024 – The Building of Little Worlds
Exposition
Some time ago last year, I wrote up a blogpost on how to increase the likelihood of having your plants mostly survive when you’re out of town for an extended period of time. Whether that’s conferences, or field work. Things have changed a little since then, and my environment is now different. The room where my plants mostly reside is hot, very hot during summer months. This means watering some of my plants nearly every day to keep up with their requirements and the methods I had come up with in the past wouldn’t quite cut it. If I was gone for more than a week, I was sure to have casualties with the way things were currently set up. What was the solution?
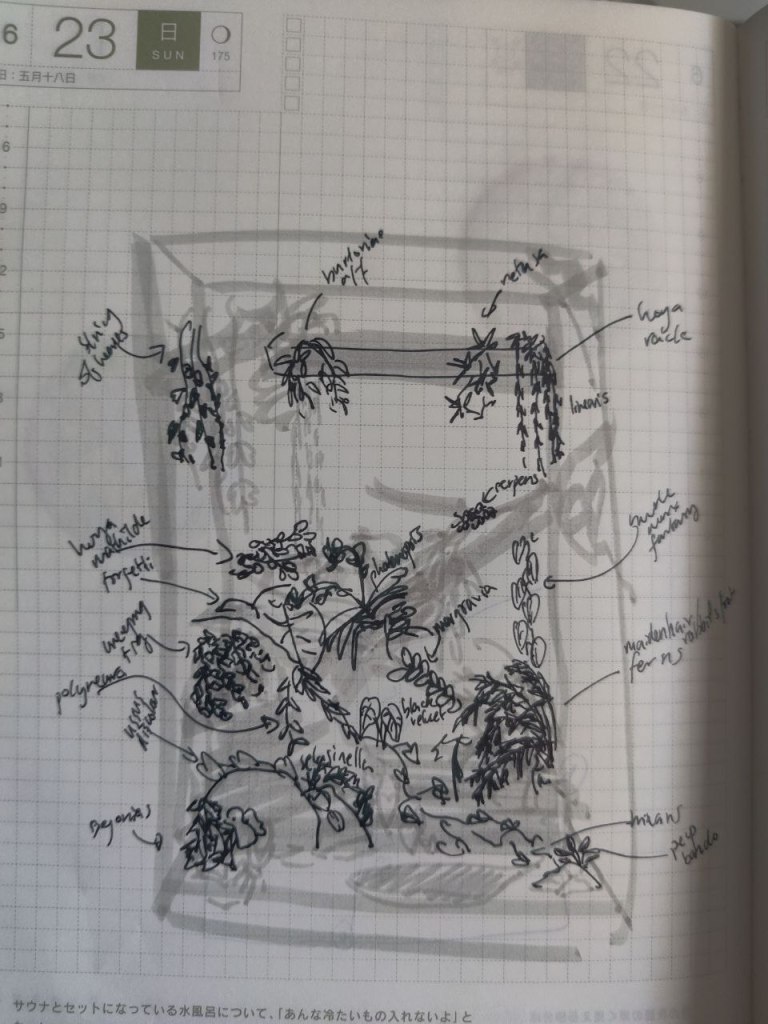
Figure 1. My grand plan for where all my plants would go, with some hopeful new plants to add in! Rising Action
Apparently, it was to purchase a large glass box and build a terrarium. I also wanted to make it bio-active, with little critters eating all the mold and decay that was sure to happen in a partly enclosed, high humidity environment. Some of the materials I had already, which is why I felt it was perfectly reasonable to go ahead with the idea with a little over a week to spare. I was able to put together all the components together in a couple of hours, and the next day after the silicone had cured, I dumped in my drainage layer, added some weed blocking fabric, sprinkled some charcoal, and topped it all off with the weirdest soil mix I have ever put together. It didn’t actually work out exactly this way, as I vaguely remember digging up parts and trying to stuff in more drainage a few days later after purchasing some additional parts after I had already set up part of it (see Figs. 2 and 3).
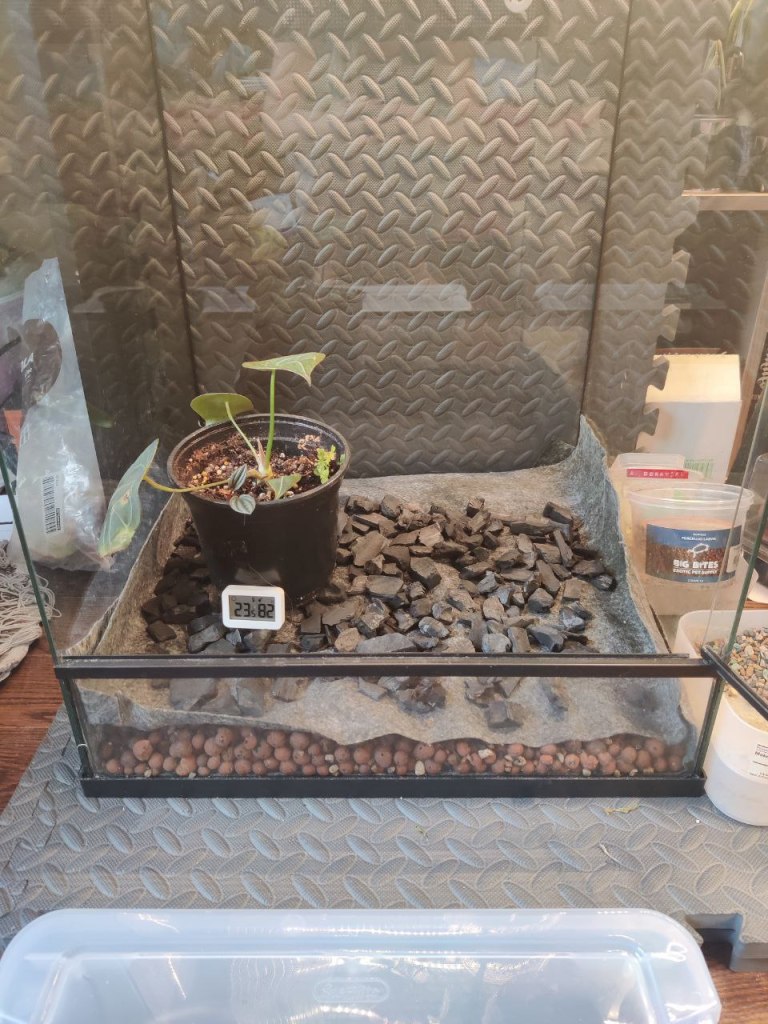
Figure 2. A quick test run to see how humidity would hold up. I was about to start dumping soil in when I decided that I didn’t have enough of a drainage layer. This was addressed by a trip to Provision Garden Supply, a store that sells lightweight expandable clay aggregate (LECA) in bulk, and has a huge variety of soil bases available. After the structure and soil had been put in, it was time to add some “hardscape” (Fig. 3). That is what “scapers” refer to as the chunky elements that guide the overall composition of a scene (scape). In this case, I had a pile of miscellaneous rocks I had collected over several years, and some corkbark flats that I had purchased by the pound. Then I stuck in all the plants and fussed over their placement in proximity to the light source and soil depth over the next few days while figuring out precisely how frequently they needed to be watered.
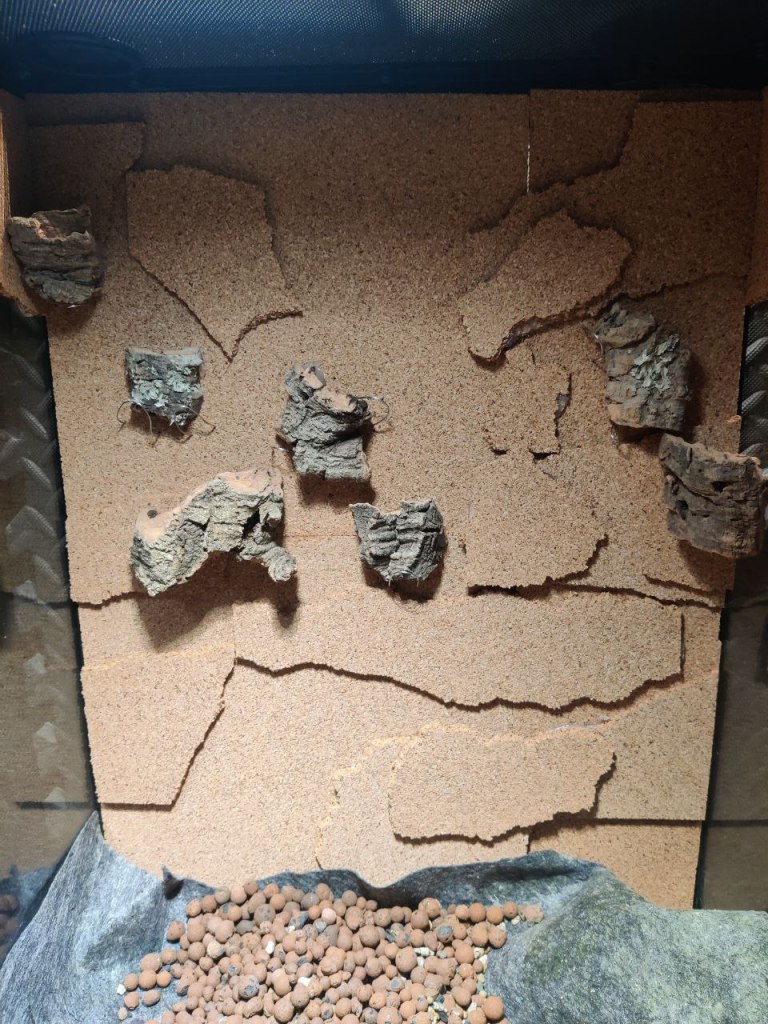
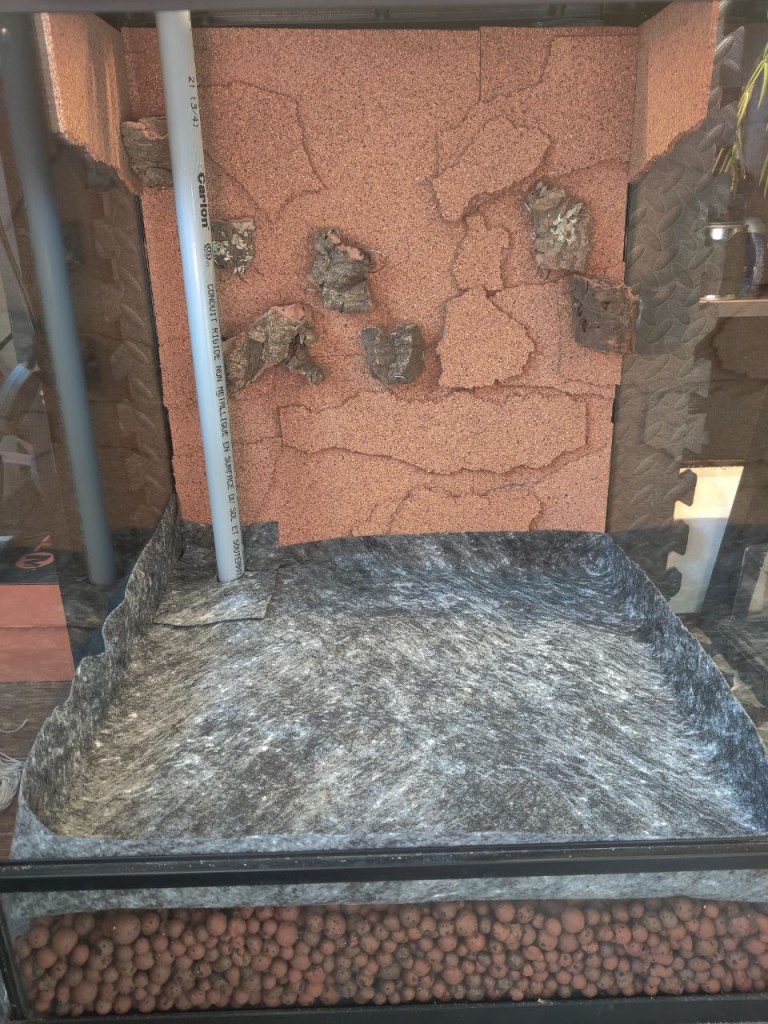
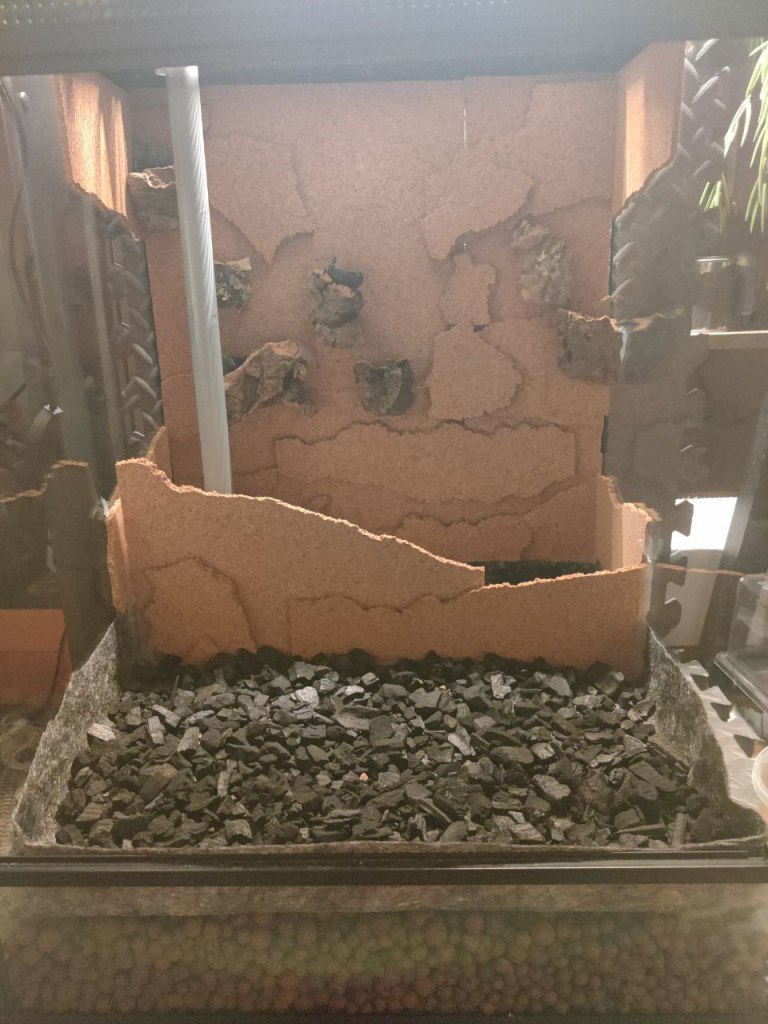
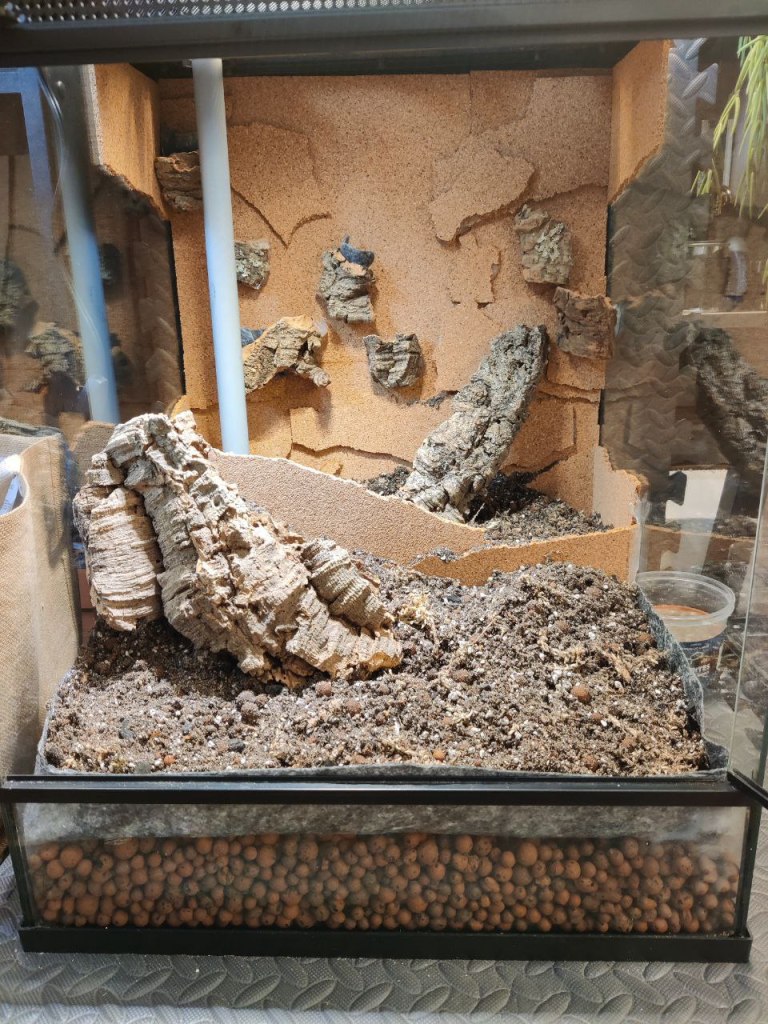
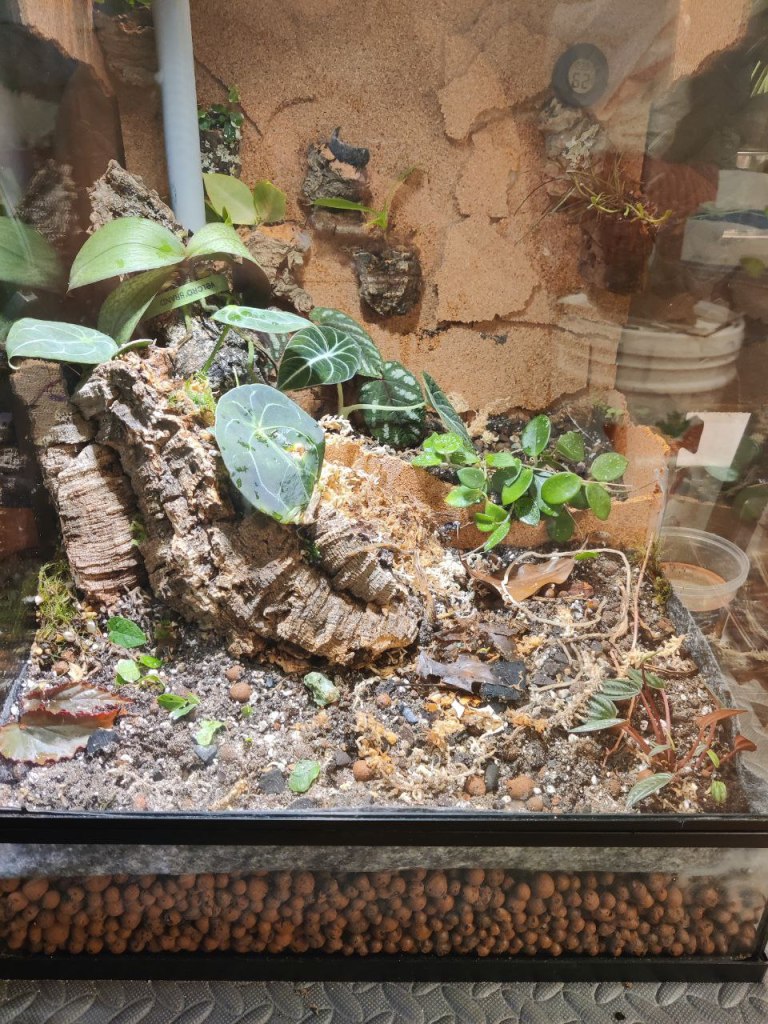
Figure 3. Build progression over a few days after I aquired the materials. This PVC pipe was taken from my previous aquarium living wall. In retrospect, I didn’t need one that spanned the whole length and out of the exit hole in the top of the frame. I later found that it also impeded opening of the top frame because it was a hinged mechanism. Things were going well, I knew the watering schedule, and I knew that there would be family members who could check in fairly regularly rather than leaving everything in darkness for 2 weeks.
Climax
I came back and… not too bad. There were only a few casualties, a spider mite boom, and some very happy isopod colonies. I spent my first full day back cleaning and inspecting the plants in between unpacking and seeing what I had missed while I had been gone.
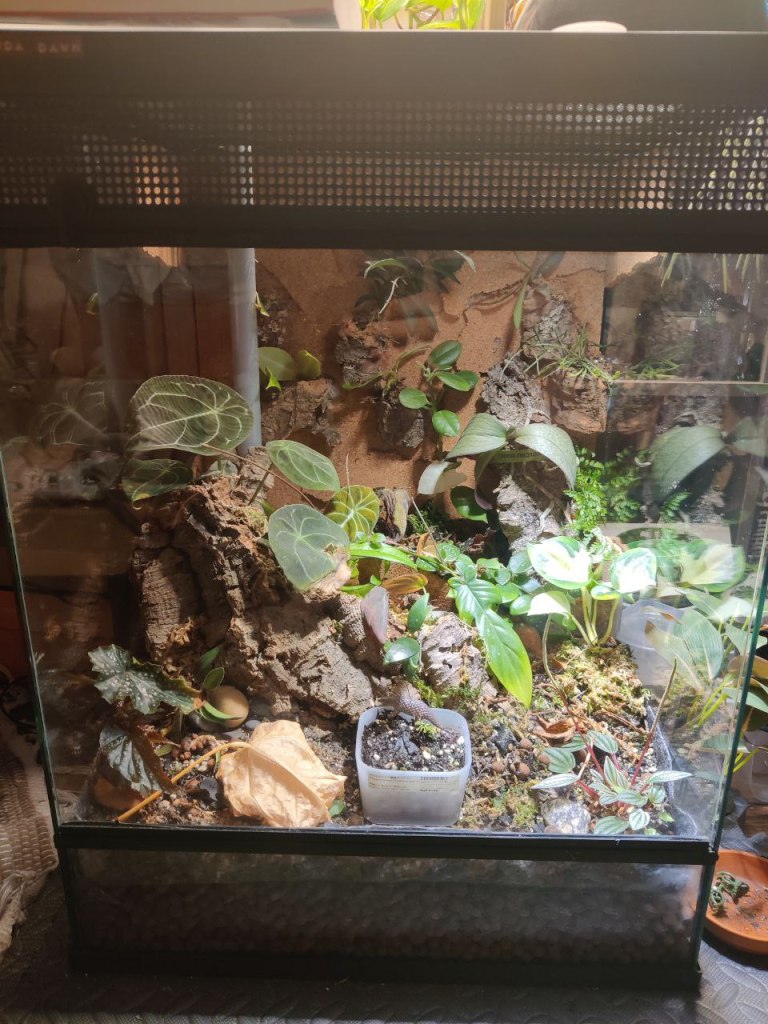
Figure 4. You may be able to spot a very yellowed alocasia black velvet kicking around in the back there. Also my attempt at fungas gnat control with carnivorous plants did not take. Fortunately this hasn’t been a real issue. In the foreground is a mix of scattered dead leaves and some algae from my fish tanks that act as food sources for the little critters when I’m not feeding them something fancier. Falling Action
Life moved on, I had work to catch up on, and I was happy that most of my plants were stable. It was highly convenient to be able to water the vast majority of them all at once! Naturally, I also purchased some terrarium specific plants to add in once I saw that everything had been established and was growing in (Appendix, section B). I felt like things were about wrapping up in this terrarium, and as time progressed, I relocated some of my remaining shelf plants into the terrarium.
Then, just this weekend, I went to a plant swap in Toronto. The event has been on my radar for the last couple of months, and I even had a hopeful wishlist of things I would love to find. I brought 8 plants with me to give away, and took home 10 or so. While I did side-eye the health of a few of the plants, I gave everything an intense blast with water and stripped most of them down to the root. No obvious pests. So… I recklessly placed some of them inside as well (Fig. 5). I was feeling pretty comfortable about the whole situation.
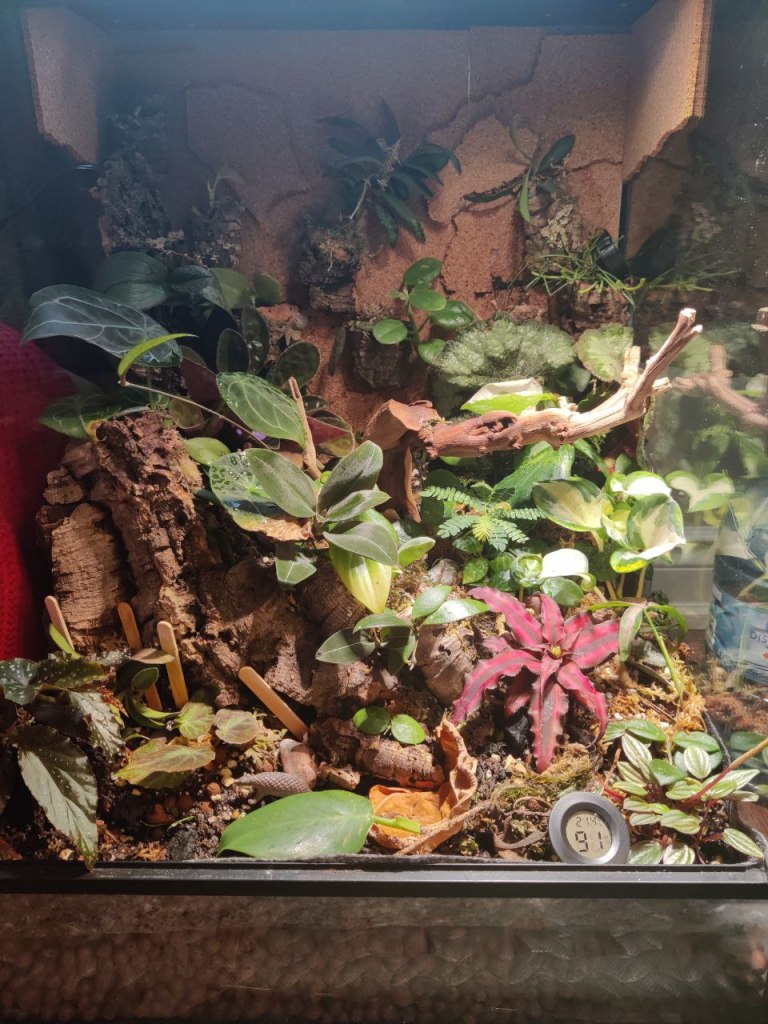
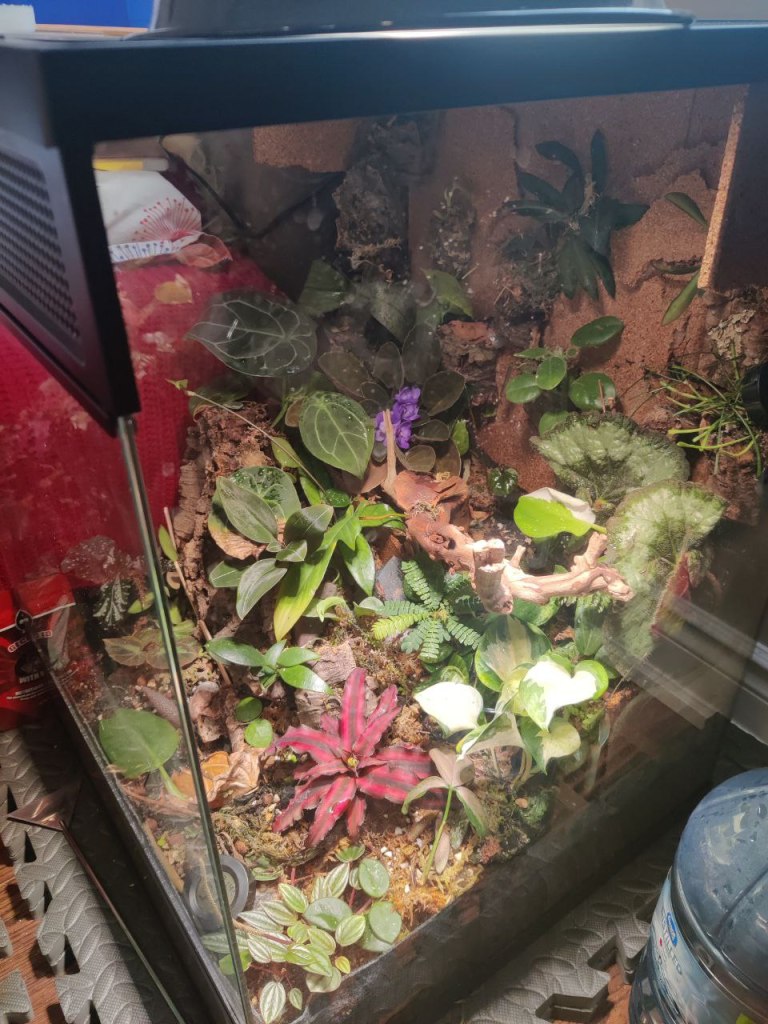
Figure 5. New plants acquired and added! The big red one is a cryptanthus that I actually purchased, The extra branch was something I picked up on my way back as well. You may notice some popsicle sticks added in, those are for support in case I get a sudden tumbling of material from all the new added weight. The second image shows my usual view when I swing around my desk chair looking for a distraction. Denouement
Is the plant care optimization and acquisition adventure over? Probably not. I’m planning on going to a Plant Expo later this year, so chances are I may come across something that I fancy. I might also be able to harvest some of the alyssum seeds out of my potted plant container from outside and see how they fare indoors. This also means, I probably need to look into building more enclosures. The current set up is almost a little too easy to take care of, and its been taking out some of the fun and enjoyment out of plant care and maintenance. I’ll be looking into building an automated watering system, which sounds like it could be the next big adventure. Depending on how things progress, I may also need to look into adding some mini fans to help circulate air and dry out the terrarium faster.
Reflections Upon Return
Despite some losses while I was away, having a main set up has definitely a time saver when it comes to watering and general care. I’d argue that I’ve already earned back the time spent sourcing parts and constructing the entire enclosure. Plus its nice to see all the plants placed so closely together, in comparison to pots dotted about.
While I still like watering my potted plants at weird intervals, daily spraying is a far easier task. It usually ranges between 70 – 90% humidity in there if I’m watering twice a day (trying to get into the habit in case I go forward with the plan of acquiring a gecko, though I would open up the ventilation more for it to drop quite a bit before adding more water!). I also happen to have a pressure sprayer that holds 4 L of water from a whiles back when I was doing preventative spray downs of my plants so watering is extremely quick. I’ve been filling it up with rain water and using it for just about everything.
Mind you, it’s not just watering I have to do. Since it’s a bio-active setup, I still have to feed the critters from time to time. They get any of the following: crushed egg shells for extra calcium, special Soilent Green from Repashy, select dried leaves from elsewhere in my room, and piles of algae and duckweed from my aquariums. So much duckweed. I don’t think they’re big fans to be honest, but it is very nutritious, so they’ll just have to deal. Definitely one of the more fun projects for the summer though. As for the other “worlds”, I’m waiting on them to establish well enough to share any successes and failures.
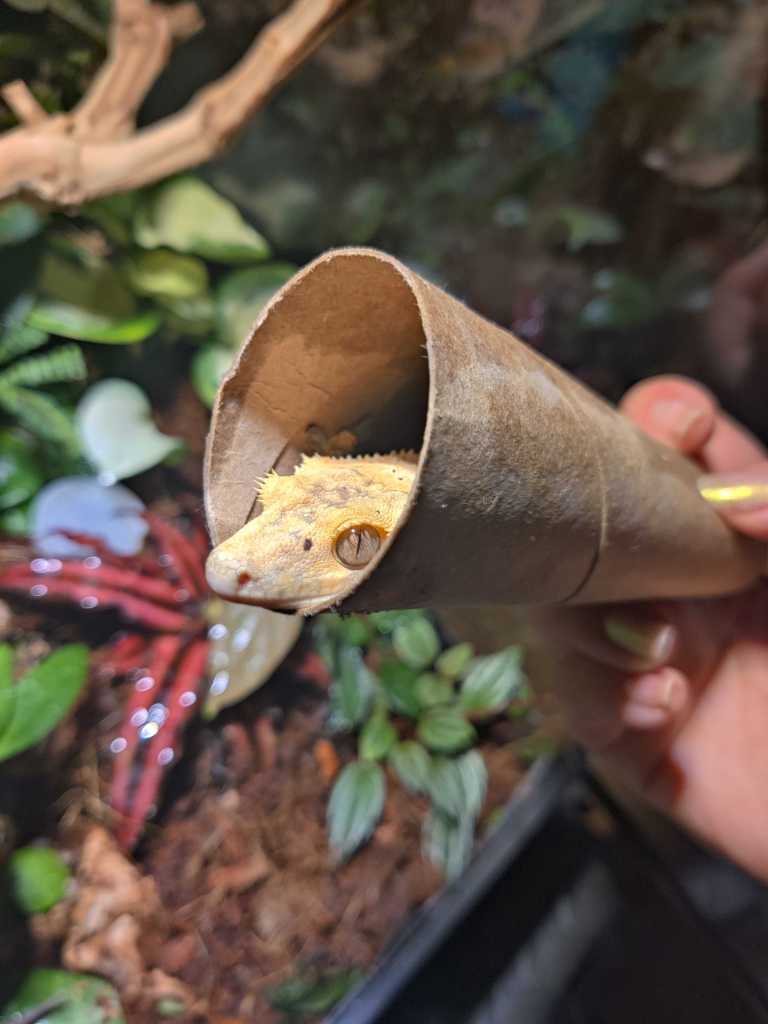
Figure 6. A little spoiler of the new occupant in this world! He’ll be joining a squad of springtails and isopods. Depending on his activity levels and whether he continues sizing up, this may only be a temporary home while I set up something a little more suitable for him. Only time will tell. Appendix!
A – Initial Setup
Approximate cost breakdown of the terrarium (initial setup) in CAD:
- $100 tank (second hand, 18”x18”x24”)
- $20 cork bark (by the pound)
- $11 wood
- $15 silicone (caulking gun was borrowed)
- $10 spring tails (culture from much earlier in the year)
- $15 isopods (dairy cow isopods on sale, it’s possible to get them for cheaper and much more)
- $0/$50 weed fabric barrier (from a previous project)
- $2/$60 spaghnum moss (I’ve been using the same bale for nearly 2 years! I’m finally running out)
- $10 lamp (this is the cost of the LED bulb, the lampshade came as part of a store display set)
- $10 peat moss/perlite mix (wrong choice by the way, I later topped this off with $5 of coco coir bits)
- $3/14 biochar
- $5/$60 LECA
- $3/$15 mineral magic (pon-like blend)
- $5 perlite
Plants that I jammed in there (some of these were added much later when I returned though!):
- plant species (personal):
- alocasia black velvet (melted away, this sucked since my backup plant dried out while I was gone)
- anthurium forgetii
- anthurium dorayaki
- begonia lynda dawn
- cissus discolor (pinky leaves! Though most of it melted away)
- davallia fajeensis (rabbit’s foot fern)
- ficus pumila green (dried to a crisp!)
- hoya crassipetiolata
- hoya GPS 7240
- hoya mathilde
- hoya retusa (finally growing!)
- pepperomia bando
- phalenopsis (of some spotted leaf variety)
- philodendron florida ghost
- philodendron micans
- pothos manjula
- Added after I got back:
- begonia fannie moser
- begonia escargot
- hoya burtoniae aff
- hoya coroniae (red)
- hoya fitchii
- hoya memoria
- hoya polyneura
- hoya rebecca
- hoya sigillatis
- maranta var
- philodendron white princess (ish)
- pothos global green
B – Additions to the Terrarium
Plant species (purchased for terrarium):
- begonia burkilii
- biophytum sensitivum (I don’t recommend purchasing this one, it seems to just pop up on its own if you purchase other terrarium plants!)
- cryptanthus (very pink!)
- ficus pumila quercifolia
- selaginella sp “Pachitea Dark” (I’m not sure if this is alive and growing or totally dried out)
- selaginella uncinata (sold as peacock club moss)
Plant species (plant swap/gifted):
- ludisia discolor var. nigrescens (jewel orchid)
- monstera lechleriana
- syngonium pink spot
- hoya nova ghost
- dischidia hirsuta (?)
Crested gecko:
- 2 year old male crested gecko with minor spinal deformity
C – Reviews
Provision Garden Supply – I went to the one in Newmarket and have gone a few times in the past. Usually I’m looking for something specific, like fertilizer or a soil replacement. This time I was looking for a few types of soil, biochar, and LECA. The staff was really helpful in narrowing down the best base “soil” for a terarrium that might one day host a live creature. He pointed me to Lamberts since they had a claim about being entirely organic, though wasn’t convinced it meant all that much. I appreciate the candor though!
JOMO Plant Studio – I’ve shopped from JOMO a few times in the past, and attended one previous plant swap event. It is a store that targets people interested in plants for aesthetic, but has been slowly moving into trendy plants that are often priced pretty high in comparison to their older pricing that was mostly scaled on the size of the plant. The swap event itself was fairly well organized, with drinks and 3D printed freebies as well. It also stayed remarkably on schedule. I have mixed thoughts on the health of their plants, but I have never once seen pests upon arrival. I seem to have bad luck with the few things I’ve gotten from them though.
Understory Enterprises – the source of my terrarium plants (and an ill-advised decision on fruit flies, my fault, not theirs). They were quick to email back on an inquiry for local pickup, it was easy to organize, and the plants were healthy. All are still doing well at this moment!
The Gecko Hub – April at The Gecko Hub responded to my immensely sketchy Instagram message with a lot of grace and let me visit her residence to interview the geckos. She selected 5 based on what she thought I was looking for, and also let me look around the breeding room while chatting about general gecko care and husbandry (and pointing out other geckos that I might be interested in! She was right). I was pretty impressed by her professionalism and knowledge base, as well as her firmness on which animals would be “pet only” due to concerns over passing on unhealthy traits.
-
Sketchy Science: Do Impulsive Events Cause Aquarium Blowouts?
Pre-amble
This was a late night (4 am) writing exercise inspired by some online discussion I had been privy to. All mistakes are my own. Math is likely incorrect. There are MANY ways in which to improve upon this work, only some of which are addressed below. Please excuse the lack of equation formatting, turns out LaTeX plug-ins require upgrades! Minor edits may be ongoing!
Abstract
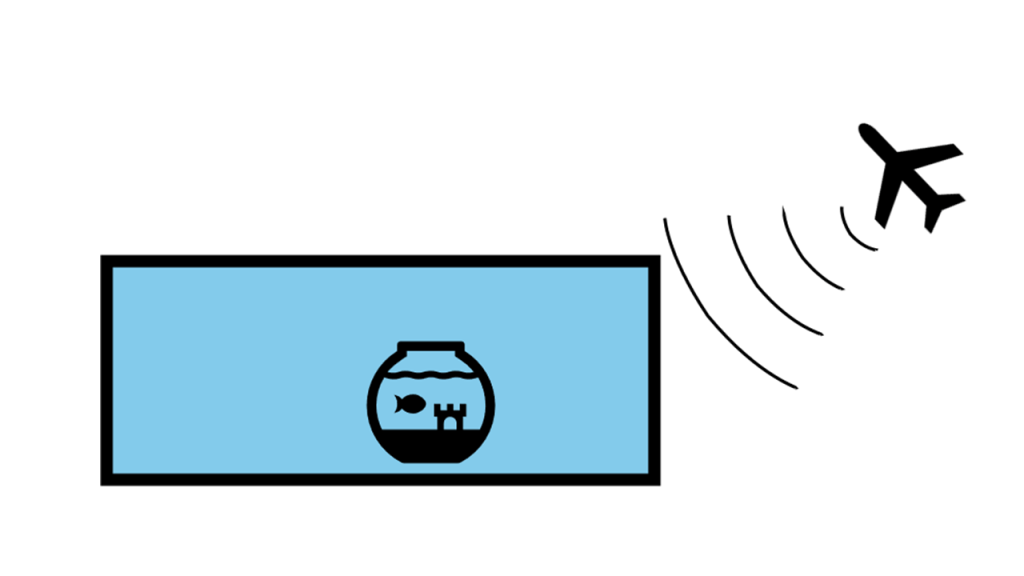
I investigate the effects of shockwaves and in light of aquarium hobbyists concerns regarding impulses potentially damaging glass tank walls. I compare the potential peak pressure experienced by the aquarium walls in the case of a manmade object travelling at 3 km/s at 0.1 km altitude to the theoretical strength of the glass walls and find that failure is unlikely to occur if the glass ratings are reliable. However, the silicone seams may be a point of weakness. Additionally, I did not evaluate the compound effects on glass strength from other damaging sources such as scratches, casual impacts, and long-term use. Suggestions to minimize the impact include the use of diffusion (reflecting barriers) and absorption (highly porous material converting kinetic energy to heat), though their efficiency is not evaluated. Lastly, I note some of the short-comings of this work.
Introduction
Impulsive events occur on a daily basis, of which the common aquarium is hopefully designed to withstand these bumps and knocks. For larger events such as meteor impacts and the passing of fighter jets, it is difficult to believe that the various aquarium manufacturers take these factors into account when setting out safety standards and designing their warranties. Recently, an innocent question was asked online, “How to protect my aquarium from shock waves caused by sonic booms?” (u/WassufWonka, 2024). This sparked a brief discussion that was rapidly quelled, though subsequent posts were made (u/memerobbin, 2024; u/laced1, 2024) and others discussing moderation. Before it concluded, some points were brought up, including the relative pressure caused by shockwaves from passing fighter jets, equilibrium pressure inside and outside of the aquarium, and whether aquarium glass was sufficiently strong enough against said pressures. Suggestions for limiting the impact including foam mats as padding, tape in cross designs, and transferring fish to buckets for the time being. A brief reassuring post from u/sldomingo (2024) appeared explaining how the shockwaves would be absorbed by water and not to worry before promptly being removed.
In this article, I briefly investigate the potential source of impulse, describe the range of pressures from the shockwave as it encounters the aquarium glass, and consider whether standard aquarium glass is sufficient to withstand these impulsive events. I also discuss the various ways in which an aquarium can fail from other events, and how one can mitigate the effect of shockwaves on glass with a brief note on the strength of silicone seals.
Methods
Source
Impulsive sources impacting aquariums can vary, including repeated finger tapping on the glass, a young toddler wrecklessly scratching glass with a set of keys while an absent-minded parent looks on, to the sonic booms from fighter jets overhead. Sonic booms are generated when an object moves faster than the speed of sound, causing a stacking of pressure waves “breaking the sound barrier”, a shockwave. This shockwave and can come from natural sources, such as incoming meteors, and manmade sources, such as space shuttle return or fighter jets.The shockwave that is released travels at speeds higher than the speed of sound for several wavelengths, before relaxing and continuing to travel at the local speed of sound (ReVelle et al, 1976). The shockwave can be approximated as a cylindrical source. At sufficiently far distances, it can be approximated as a line source with one main overpressure event. We can estimate the range of overpressures from the shockwave using the generalized steps:
- Estimate the source energy available for sonic boom
- Convert source energy to overpressure at the surface
For expediency, I will use existing data on manmade hypervelocity objects. The return of Stardust suggests maximum overpressures of 1.153 +/- 0.096 Pa including several delayed infrasonic arrivals with equipment sampling frequency of 100 Hz (ReVelle and Edwards, 2007). Estimates of source energy range from 1.557E-6 to 2.437E-5 ktTNT (1 ktTNT = 4.185E12 J) for the first instance of infrasound arrivals with a distance of 32.6 km and height of 42.7 km. Secondary arrivals have a maximum overpressure of 0.207 Pa with around a 10 s delay, and estimated energies of 6.275E-7 to 1.206E-5 ktTNT when Stardust was at a distance of 26.1 km and a height of 32.07 km. Stardust had an initial return velocity of 12.9 km/s with simulations estimating a mean velocity of 3.0 km/s (ReVelle and Edwards, 2007).
Siber et al. (2024) also provided data on the OSIRIS-REx capsule return. For a point of reference, station A05 from the Gems station was located closest (~13 km away, height unknown), with a maximum amplitude recorded at around 1.5 Pa (Fig. 7). They found that the shuttle was travelling at approximately 2.9 km/s based on the seismic data. Notably, the shuttle achieved a theoretical maximum of Mach 45.6 at 95 km altitude, and the shockwave was estimated to be produced at 80 km altitude.
Theoretical Fighter Jet
Let us consider a theoretical fighter jet, capped at Mach 9.6 (3.3 km/s) per a google investigation. This is sufficiently close to the case of the estimated Stardust return. We now estimate the potential distance of a fighter jet passing by over a home in Beirut, Lebanon, let’s say 0.1 km (or 100 m). Considering the mountainous environment, lower flying does not seem particularly sensible, though certainly feasible. Let us also consider this the slant distance, as it is possible a plane would be flying directly overhead.Scaling Laws
We can now use some of the existing scaling laws to estimate the total overpressure that may be experienced 0.1 km below a passing jet if we can assume scaling laws apply (I should probably find references for this, but I’ve been reasonably assured below 100 km this is not too silly to do), then del(p_1)/d_1=del(p_2)/d_2, which can be rewritten as del(p_2) = del(p_1)*(d_1/d_2)For the first arrival, I found an overpressure of 619.2 Pa, and for the secondary arrivals, 85.6 Pa. For a point of reference, atmospheric pressure is 101325 Pa. The pressure exerted by water in a full tank can be estimated using an example of a 33 gal standard aquarium with dimensions of 48’’ x 13’’ x 12’’. Assuming the 12’’ dimension is the base, the area of the outwards facing walls are approximately 0.4 m2 and 0.1 m2 respectively. The pressure in the tank can be calculated using force, F=rho*g, with rho=1000 kg/m3 as the density of water, and g=9.8 m/s2, gravitational acceleration on Earth. For the respective faces, the pressure exerted by the water in the tank is 24500 Pa (24.5 kPa) and 98000 Pa (98.0 kPa, or 0.098 MPa) respectively. Thus, the arguments that the pressure within the tank are greater than the impulsive events appears to hold.
Note that the pressure from the sonic boom in this case is within the blast radius, before viscous relaxation. The blast radius is ~3.0*R_0 (Ceplecha et al., 1998), where the characteristic blast radius R_0=1.05*M*d_m where M is the Mach number, and d_m is the diameter (ReVelle, 1976). Let’s say the blast radius is then 3*1.05*9.6*13.7 m = 414.3 m, greater than our hypothetical case of 100 m altitude. At a more realistic Mach number 3, the blast radius is 129.5 m. This suggests that our pressure estimations may be underestimations for this particular case.
Let us assume that the source of the shockwave from the OSIRIS-REx return was at a distance of ~81 km (assuming 80 km altitude), this corresponds with 1215 Pa at a distance of 0.1 km. Thus, we have a general range of overpressures, between 85.6 Pa and 1215 Pa from a shockwave. On the higher end of the estimated overpressures, this is about 8% of the pressure of water exerted on the long face of the tank.
For a 5 mm thick tempered glass pane, I found an average of 19800 psi compressive strength (I have misplaced this reference, Wikipedia suggests 10000 psi for a 6 mm pane), with Wikipedia giving glass a tensile strength of 1000 psi (Tempered Glass, n.d.; Strength of Glass, n.d.). Say the average tempered glass is 4x stronger than regular glass, this gives us a tensile strength of 1000 psi (6.8 MPa), several times stronger than the overpressure effect from a sonic boom (though later Wikipediaing suggests tempered gl. This suggests that there is no immediate concern that a single sonic boom from a nearby fighter jet travelling at Mach 3 will be of immediate concern.
Discussion
Contradictions
This is odd, many horror stories abound about surprise aquarium blowouts, or an accidental hit from a bb gun might be up to 0.5 kg of force over a 4 mm diameter pellet at 20 ft is actually around 3 MPa, half the compressive force glass can withstand. It’s not like we’re tearing around our aquariums either so tensile force doesn’t necessarily come into play. One consideration might be the strength of the silicone seals. Tensile strength of silicone sealant is around 0.5 MPa. Oh.Now lets assume the glass may have some imperfections. A quick google shows that nickel-sulfide inclusions can be found in 1-2/100,000 6 mm tempered glass panes. An inclusion can result in localized tensile stress as high as 860 MPa (Glass Breakage – Nickel Sulfide Inclusions, n.d.), resulting in microfractures that are easily recognizable. These are primarily a concern in tension zones (say, the center of a pane for a long, starting to bow out aquarium).
Repeated microfractures can cause the weakening of a pane of glass. While I was unable to find the values of strength drop, a microfracture review with repeated loads found that cracks in glass follow progressive stages, with cracks formed by the procedure continuing to produce lateral cracks for hours afterwards (Zakiev et al., 2020). Overall, initiation and propagation of cracks are accelerated by the presence of water (a concern for those of us who scratch up glass with hardscape from the inside).
Minimizing the impacts of sound waves
Outside the blast radius, one can assume that waves propagate at the speed of sound, approximately 343 m/s. One can think of either reflecting the wave, or diffusing it rapidly over a short distance prior to the delicate glass. To destroy the incoming waves, it would be necessary generate acoustic waves constantly, in hopes that they would cancel out the incoming waves by means of perfect destruction. Alternatively, one can apply an acoustic panel, which purportedly absorbs sound by conversion into heat energy. I found that a 1-inch foam acoustic panel has a noise reduction coefficient of 0.4 on average (where 0.0 represents a surface that completely reflects sound), though I have not read the ASTM to review the power levels they evaluate (ASTM C423-23). Generally, the more porosity for a given area, the more reflections can take place in a short amount of time. Alternatively, one can diffuse the sound waves by strategically placing a number of flat panels in an attempt to reflect and stagger the effects. An interesting thought would be to place a curved reflector surrounding the aquarium, such that sound waves coming in from every direction would be reflected as evenly as possible.Conclusions
Despite the very real threat of sonic booms occurring in certain places in the world, preliminary work shows that the failure of aquarium glass for hobbyists is likely to come from pre-existing damage, or repeated events. A single blowout for a relatively new, unstressed aquarium from a passing fighter jet appears unlikely (note that this is not advocating lack of caution!). However, points of failure include the silicone seams, and the aquarium is at greater risk if it has been exposed to prior stressors, thus unquantified. Diffusing or absorbing shockwaves may be possible, though the specific reductions in terms of energy translation and thereby impulsive pressure waves are not quantified in this work. Subsequent studies modelling these specific effects are under consideration, as is generating the impulsive source directly, rather than use of a scaling law, and accounting for cumulative effects such as secondary shockwaves, and ground shaking.
References
u/WassufWonka, (2024). https://www.reddit.com/r/Aquariums/comments/1em8e77/how_to_protect_my_aquarium_from_shock_waves/
u/memerobbin, (2024). https://www.reddit.com/r/Aquariums/comments/1enlnxg/how_do_i_keep_my_fish_safe/
u/laced1, (2024). https://www.reddit.com/r/Aquariums/comments/1enqlns/looking_to_protect_my_fish_from_loud_fireworks/
u/sldomingo, (2024). https://www.reddit.com/r/Aquariums/comments/1envm6l/why_aquariums_might_survive_a_sonic_boom_were/
ReVelle, D. O and Edwards, W. (2007). Stardust—An artificial, low-velocity “meteor” fall and recovery: 15 January 2006. Meteoritics & Planetary Science 42(2). pp. 271-299. DOI: 10.1111/J.1945-5100.2007.TB00232.X
Silber, E. A., Bowman, D. C., Carr, C. G., … (2024). Geophysical Observations of the 24 September 2023 OSIRIS-REx Sample Return Capsule Re-Entry. Accepted for publication in the Planetary Science Journal. DOI: 10.3847/PSJ/ad5b5e. arXiv: https://doi.org/10.48550/arXiv.2407.02420
Ceplecha, Z., Borovička, J., Graham, E. W. (1998). Meteor phenomena and bodies. Space Science Reviews 84(3-4). pp 327-471. DOI: 10.1023/A:1005069928850
ReVelle, D. O. (1976). On Meteor-Generated Infrasound. Journal of Geophysical Research 81(7). pp 1217-1230. DOI: 10.1029/JA081I007P01217
Tempered Glass. (n.d.) https://en.wikipedia.org/wiki/Tempered_glass. Retrieved Aug 9, 2024.
Strength of Glass. (n.d) https://en.wikipedia.org/wiki/Strength_of_glass. Retrieved Aug 9, 2024.
Glass Breakage – Nickel Sulphide Inclusions. (n.d.). http://www.sunshadeblindsystems.co.uk/wp-content/uploads/2014/04/Heatsoaking-brief.pdf. Retrieved Aug 9, 2024.
Zakiev, I., Gogotsi, G. A., Storchak, M., and Zakiev, V. (2020). Glass Fracture during Micro-Scratching. Surfaces 3(2). pp. 211-224. DOI: 10.3390/surfaces3020016
Standard Test Method for Sound Absorption and Sound Absorption Coefficients by the Reverberation Room Method – ASTM C423-23 (2023). https://www.astm.org/c0423-23.html. Retrieved Aug 9, 2024.
-
Salaciously Sketchy Science: Hand Pollination of Hoya Blooms
Another day, another adventure.
Background
A hoya blooming to completion for me was a first! I’m not typically one for blooming plants, but this one promised dark purple flowers, and so I was intrigued. The plant was acquired with two sets of leaves back in 2023, and has since put out another 3 sets of leaves in the intervening time. That’s something like 150% growth! More importantly, during early May, a peduncle started forming. This signifies the potential the plant is starting to push out a cluster of flowers if it doesn’t “blast” off, like my linearis did last year. I was pretty excited to see these “black” blooms, but wasn’t holding my breath. Over the span of another two weeks, the blooms slowly got larger and showed their “waxiness”. I missed the moment where they unfurled, but I came back one day to full on flowers (Figs. 1 and 2).
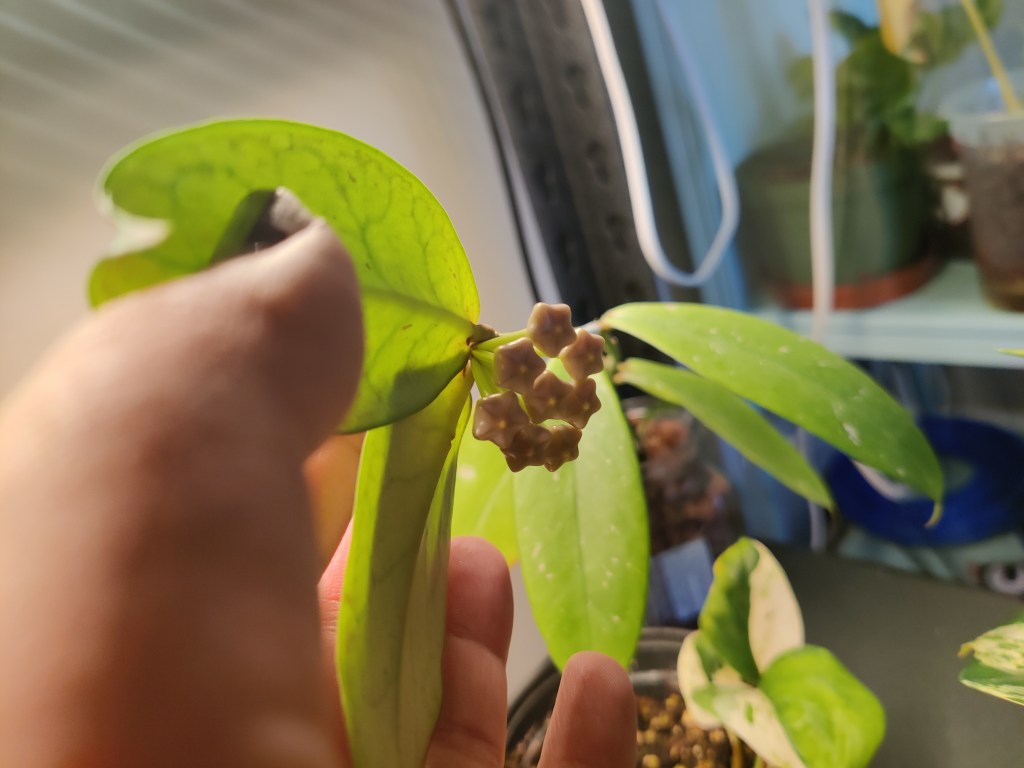
Apr 21, 2024 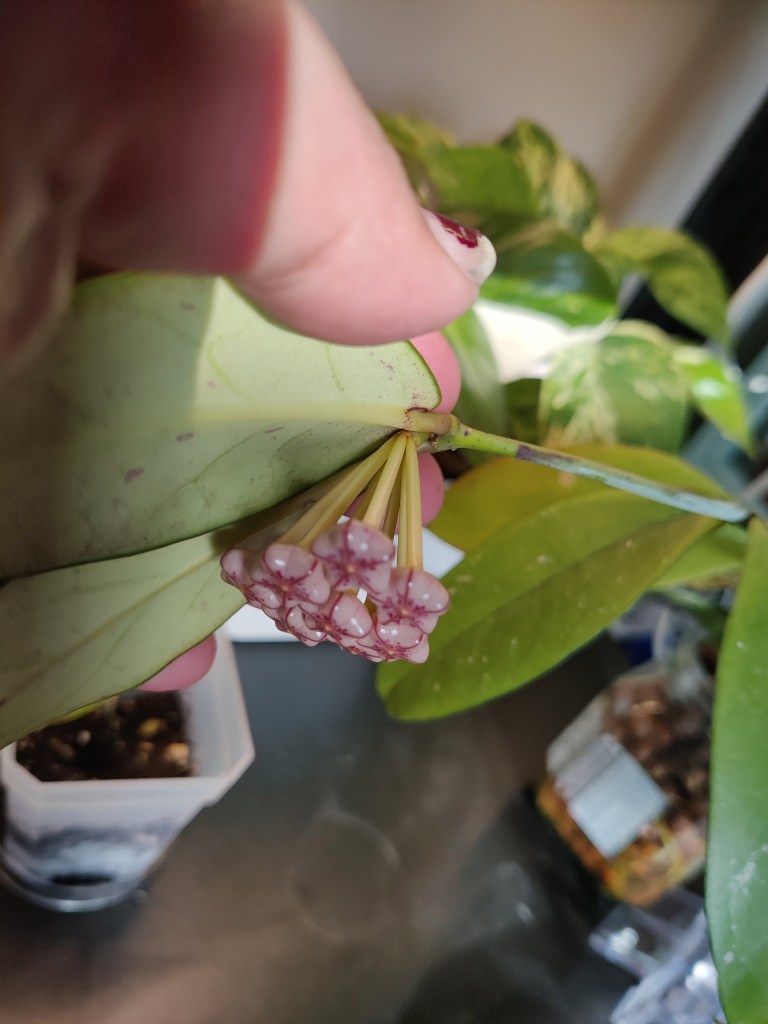
Apr 27, 2024 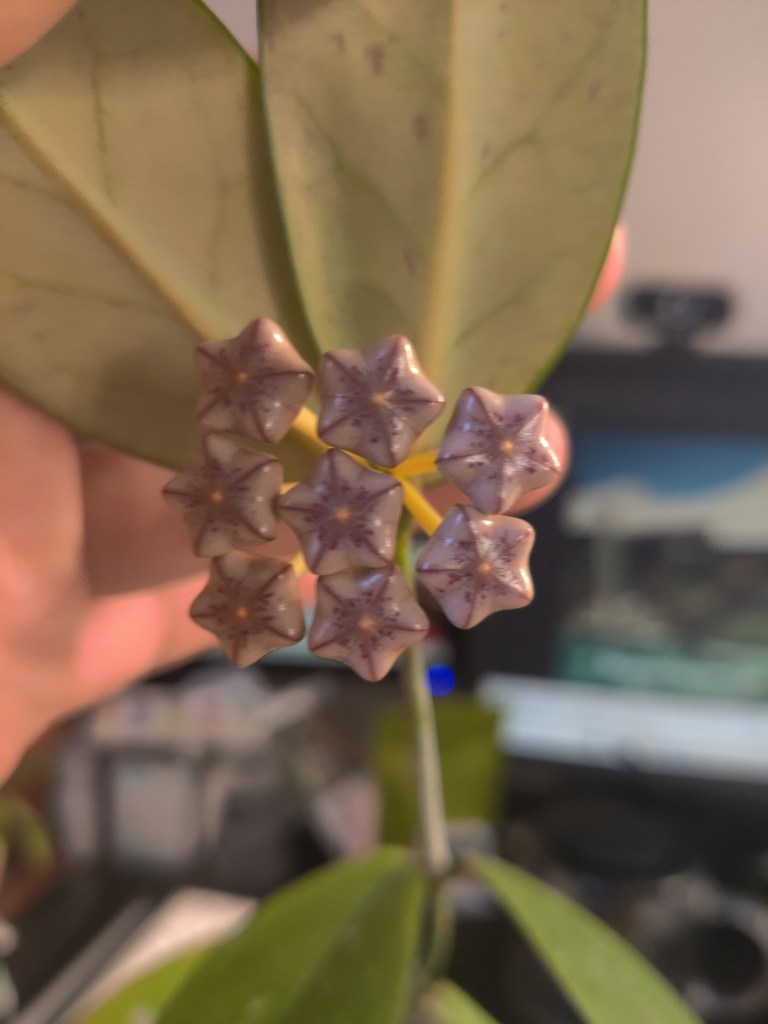
Apr 28, 2024 Figure 1. Left to Right, progression of hoya blooms over a week. 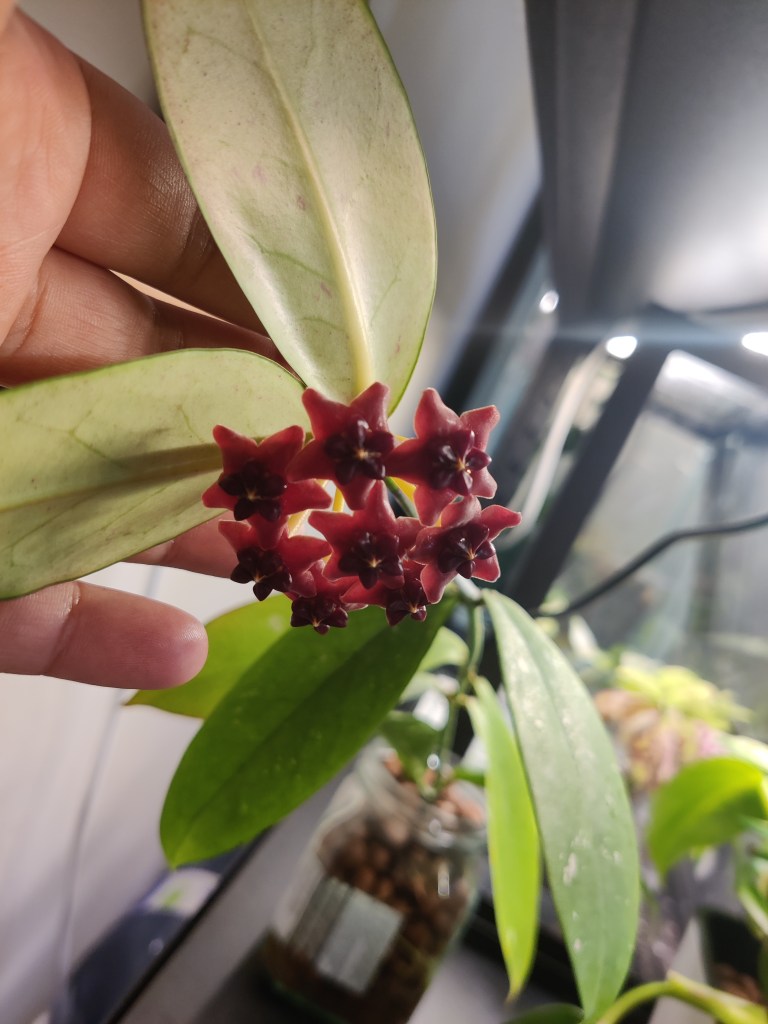
Figure 2. The flowers all open! Picture taken Apr 30, 2024. Also check out that cute olive jar it lives in. Surprisingly hasn’t shown any signs of needing a larger vessel yet! Yellowing is almost certainly from getting too much light. Flower and Plant Review
The bloomed didn’t smell particularly strong, but there was a faint sweetness if I got very close. Admittedly, I didn’t think through the fact that this plant lived on a shelf, and the blooms were well below my face height while sitting. So to see the blooms, I had to either jam my face in at an awkward angle, or pull out the plant to admire. Anyhow, the plant bloomed, I was happy, but not entirely convinced it was worth the wait. The leaves aren’t particularly charming, and unless it’ll be regularly in bloom, it doesn’t do much as a décor piece. It also made a mess after the pollination, leaving behind nectar blobs that had dripped off onto the shelf. A minor amount of drippiness can be seen in Figure 4.
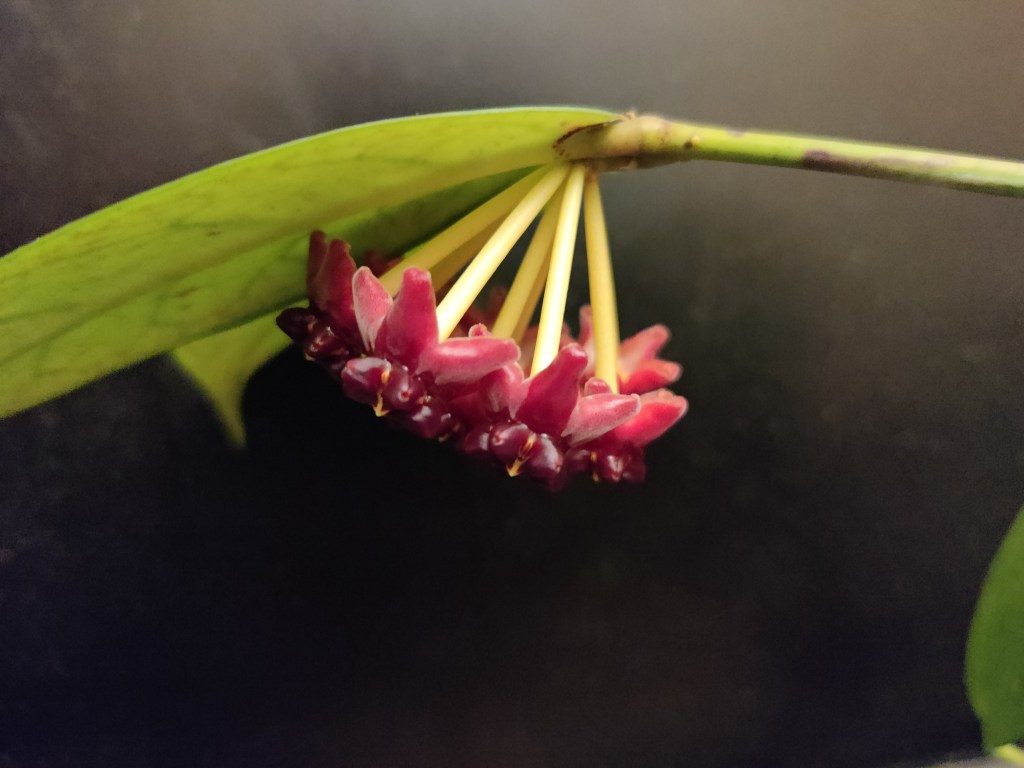
Figure 3. Hoya blooms early in the morning on May 2, 2024 at 5:09 AM. The nectar can be seem in where the fuzzy petals are slightly darker. The Response
With that in mind (the plant being rather boring), I tried to go to bed. At some absurd hour, I decided that it might be worthwhile pulling out the information I had on trying to pollinate the plant. I vaguely recalled that I had downloaded a few articles on the procedure, but being in bed, it was easiest to pull out my phone. Here are the two sites I landed on:
- https://www.theplantdom.com/blog/pollinating-hoya-blooms
- https://www.houzz.com/discussions/3793437/for-adult-eyes-only-making-hoya-babies
I also found a less than useful, but often looked at YouTube resource for pollination and a Reddit thread wishing the poster luck: https://www.reddit.com/r/hoyas/comments/ghng1f/pollinating_hoya_blooms/. The main issue I found was somewhat low resolution images and unclear arrow directions in the diagrams. Even though everything was labelled, looking up the respective parts of the hoya flower across different flower types was quite difficult. Here are the steps with the best interpretation I could make.
- Identify the respective components. Hoya blooms tend to be in clusters, though some form single blooms. The flowers are typically 5 sided, forming star patterns. To pollinate, the parts of interest are near the center of the flower, where activity takes place
- Pick your weapon
- Pull out the pollina by sliding along the surface slit, gently pushing down, hooking the dark joint (corpusculum), and lifting it out. The pollina consists of two pollinium attached by a corpusculum
- Identify your target and hold your breath
- Slide the pollina into and through the “stigmatic lock”, also known as the ”staminal slit”. The goal is to get the pollen in the pollina to contact the inner walls of the lock
- Repeat
I reluctantly rolled out of bed after realizing I wouldn’t be able to sleep unless I tried the pollination out myself. From what I could tell, the goal is simply to readjust the location of the pollen source further up.I took some photos for reference (Fig. 4), then decided to also take the internet’s advice on repeated trials. I balanced juggling my phone, trying to read instructions, while trying to perform the procedure on a single cut flower (Fig. 5). If I could pollinate while it was stably fixed in place, then maybe I’d have an alright shot trying to balance a wobbling plant too.
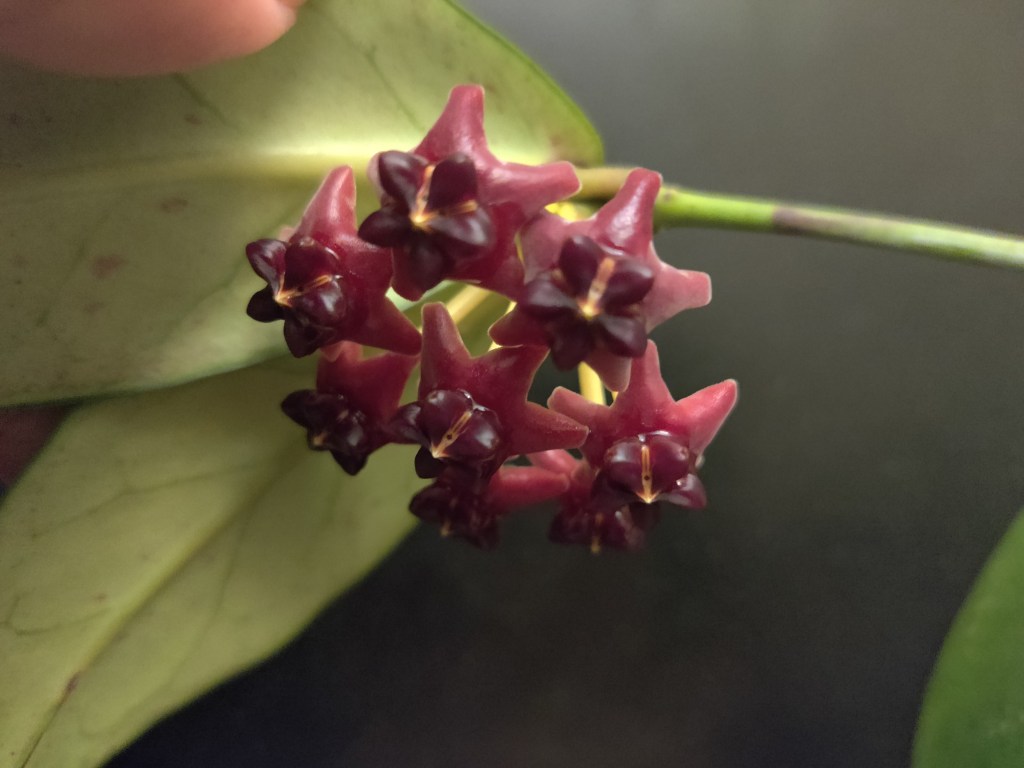
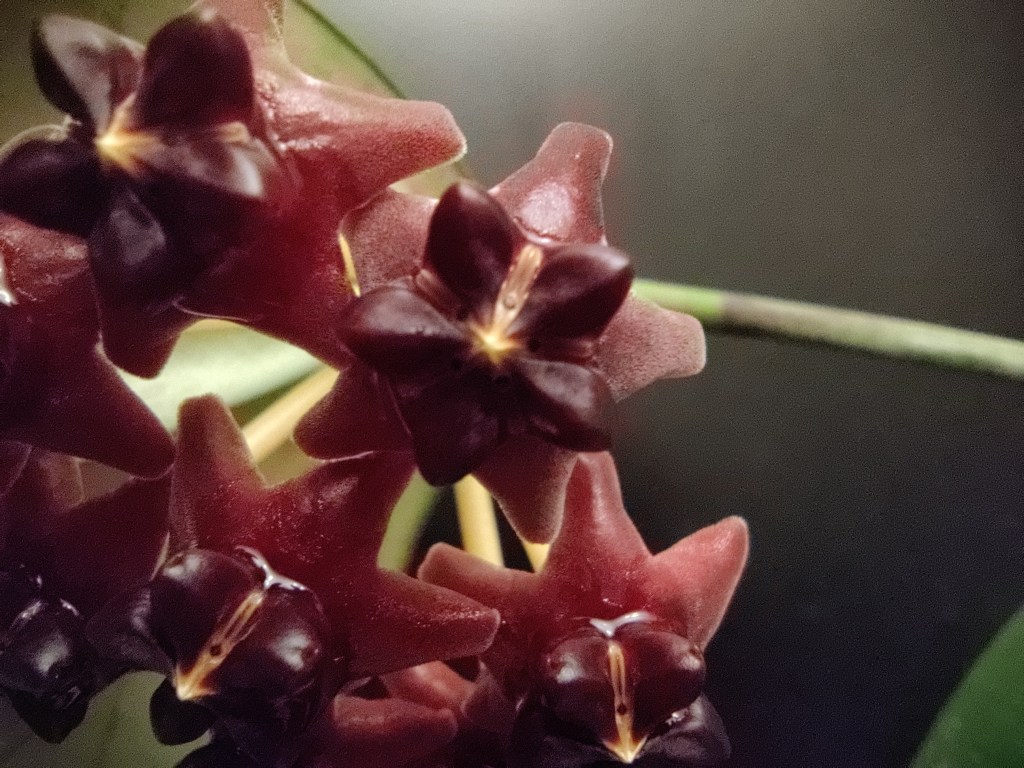
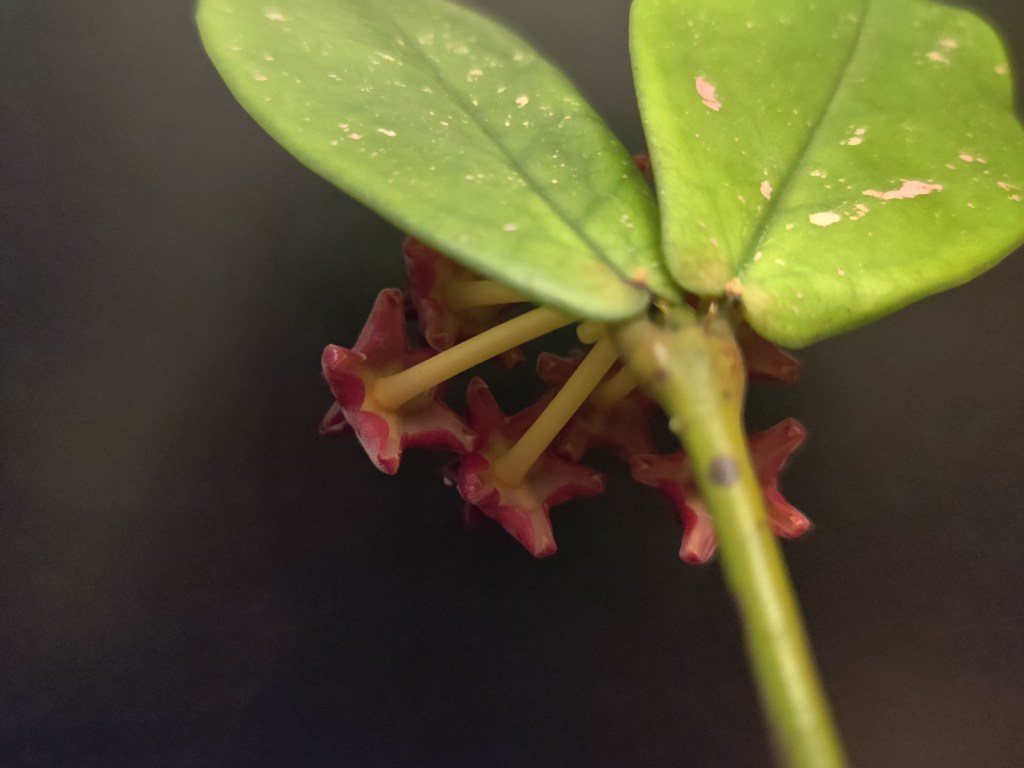
Figure 4. May 5, 2024. Detailing on the flowers, they are quite dark! Also a fun back shot for more detail. The leaves have cute pink speckling. 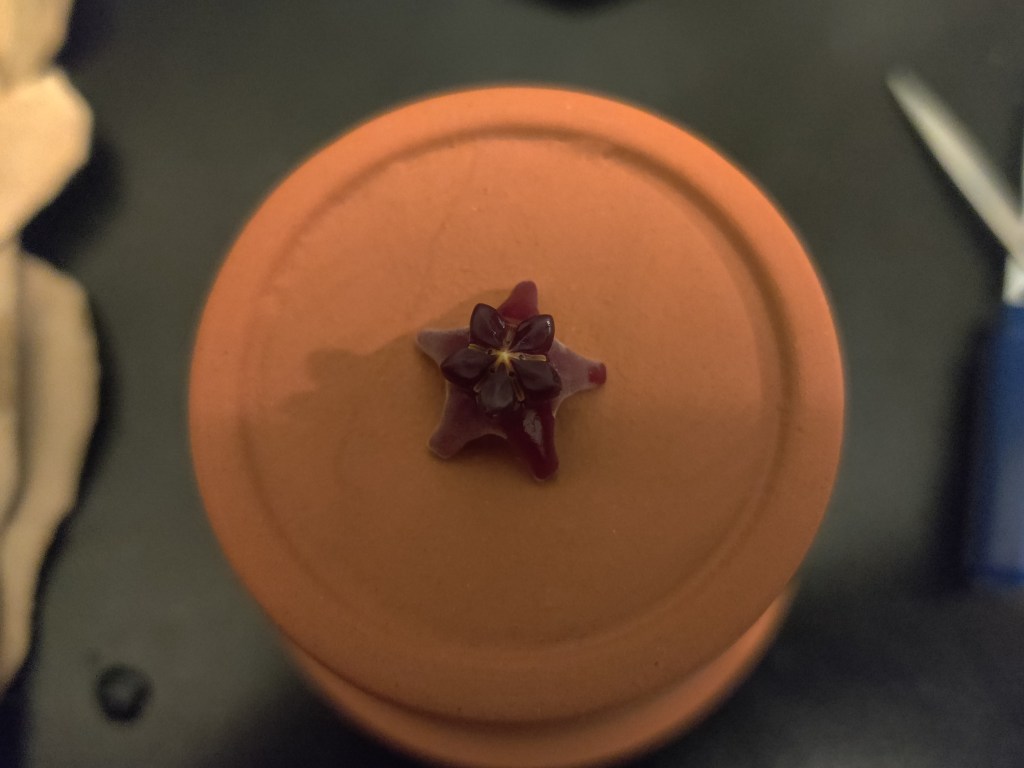
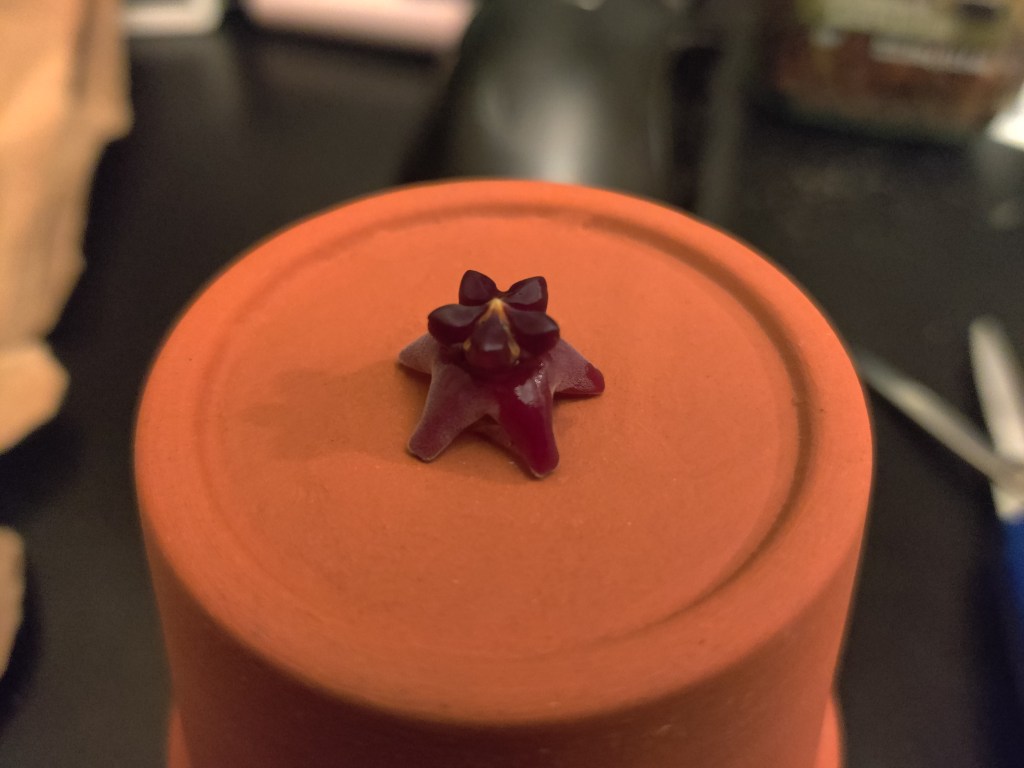
Figure 5. The test bloom. Isolated and slotted into the base of a terracota pot since that’s what I had on hand. Procedure
There are “optimal” times for pollination, and I’m not sure the crack of dawn was it. I found it fairly difficult to get the insertion correct, despite this flower having a very simple and accessible structure. This could have been because it was 4:30 am and I was all bleary eyed, or I didn’t have the right tools. The internet recommends a cat whisker (I left mine behind), but I only had a horse hair on hand. I decided to stick with the fresh X-ACTO knife blade gave me the best balance between control and width after the horse hair proved itself too difficult to be used. (Figs. 6 and 7) Note, if you use a utility knife like I did, you’ll find that the flower also bleeds sap!
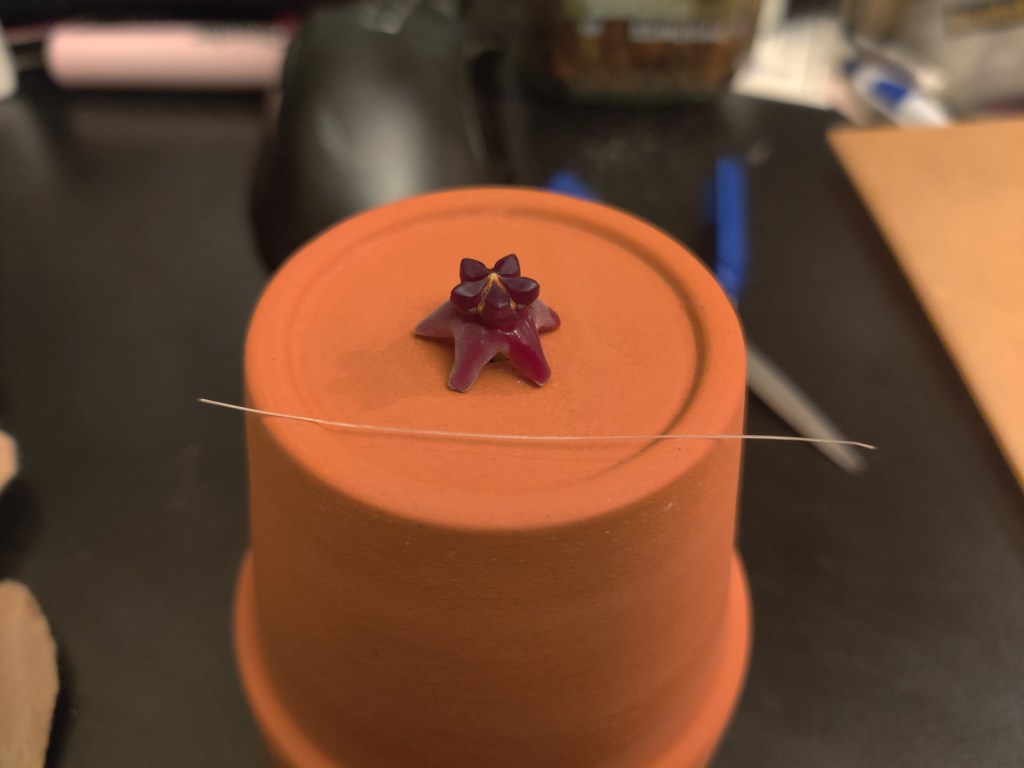
Horse hair 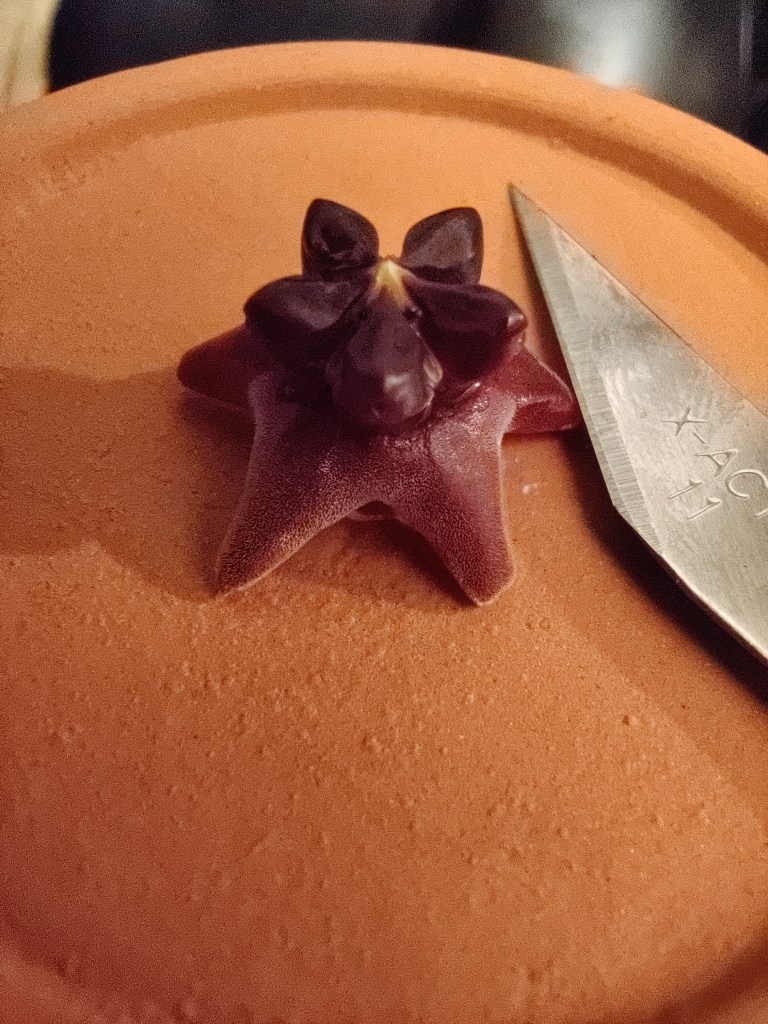
X-ACTO blade Figure 6. The weapons of choice 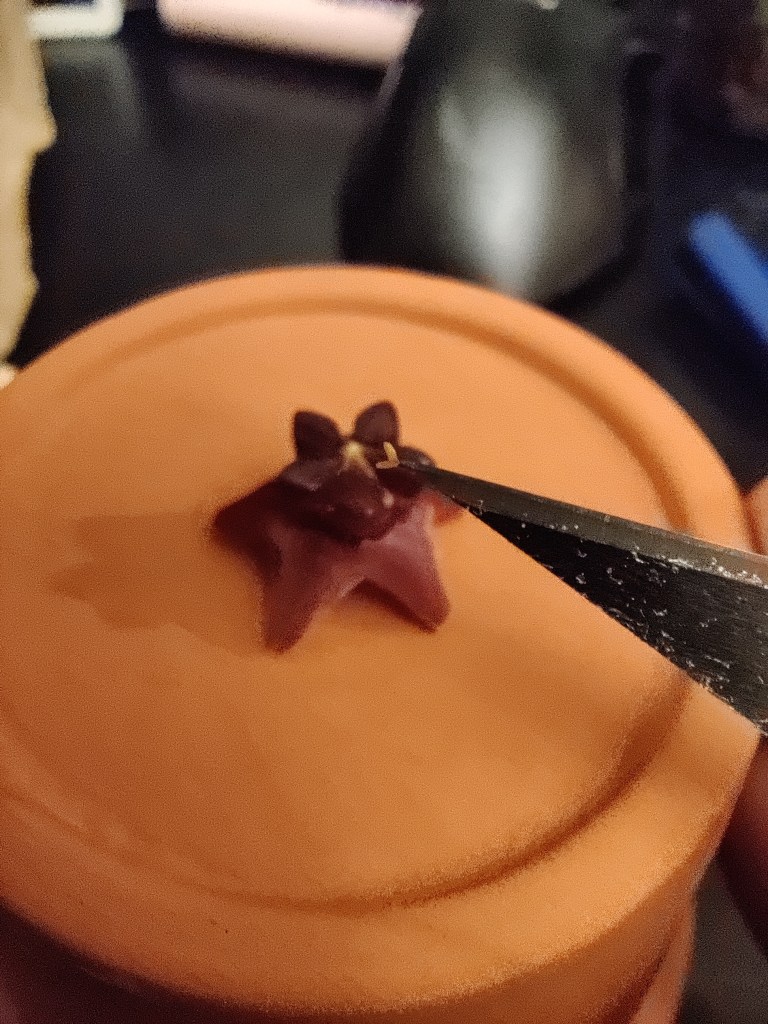
Picking out the pollina 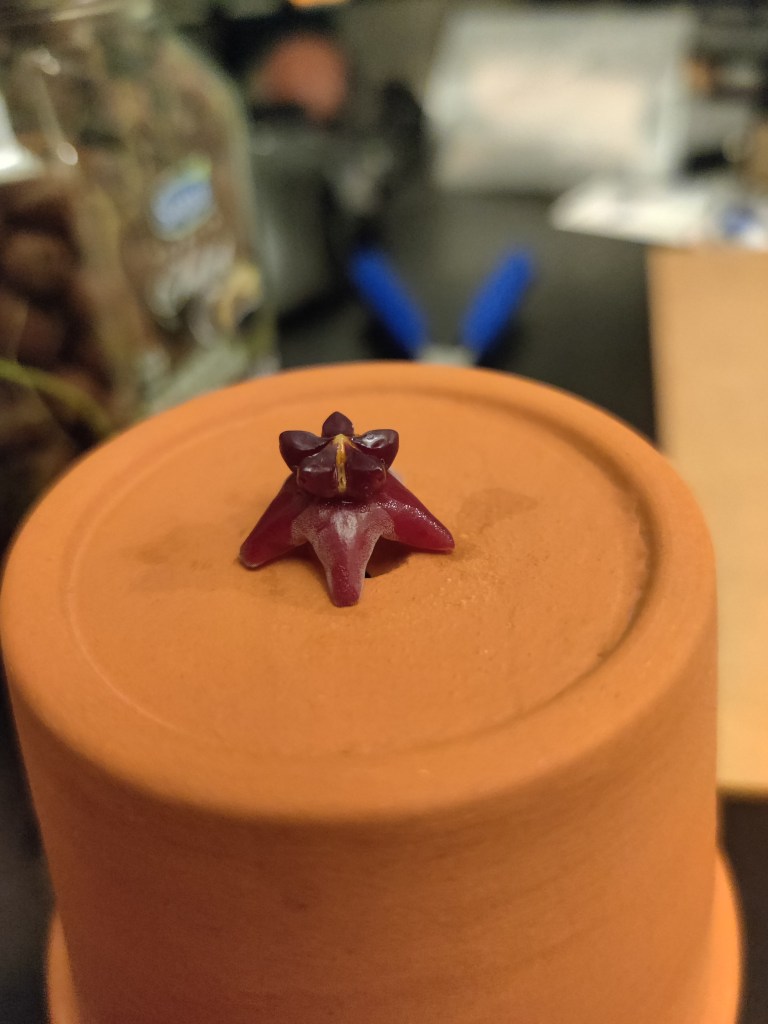
Post insertion Figure 7. Some snippets of the action. The Result
In the end, I managed to repeat the procedure at least 3 times across most of the remaining flowers that were still attached to the main stem. One of the biggest issues I had were the pollinarium not wanting to remain in the lock. They would poke out a bit and I was reasonably confident that the probability for fertilization would be just about zero. Trying to insert things in also caused a lot of damage to both the receptive and insertion components of the flower. Nontheless, I was hopeful.
I waited a few more weeks but the flowers all dropped and dried out. A fun experiment, and one I’ll likely try out again if I get the chance. Preferably at a different hour.
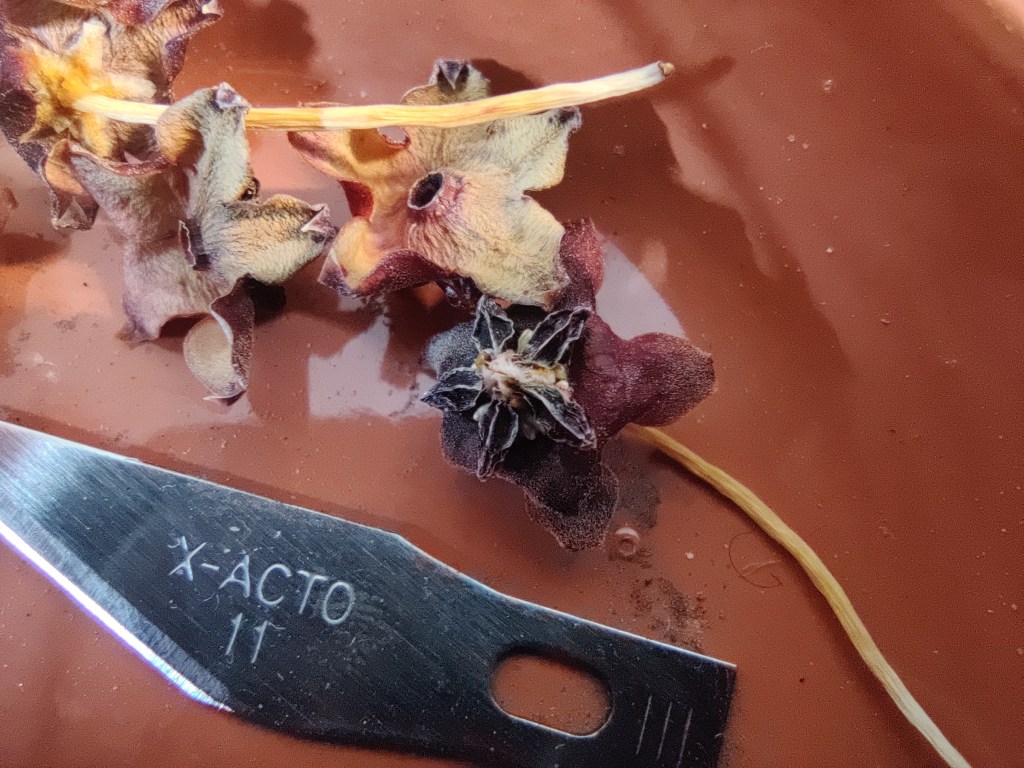
Figure 8. Dried up flowers a month later. You can see how plump the flowers used to be! This may be worth dissecting later to see whether or not the pollina vanished. I’ve also made my own reference diagram I can look at and contribute!
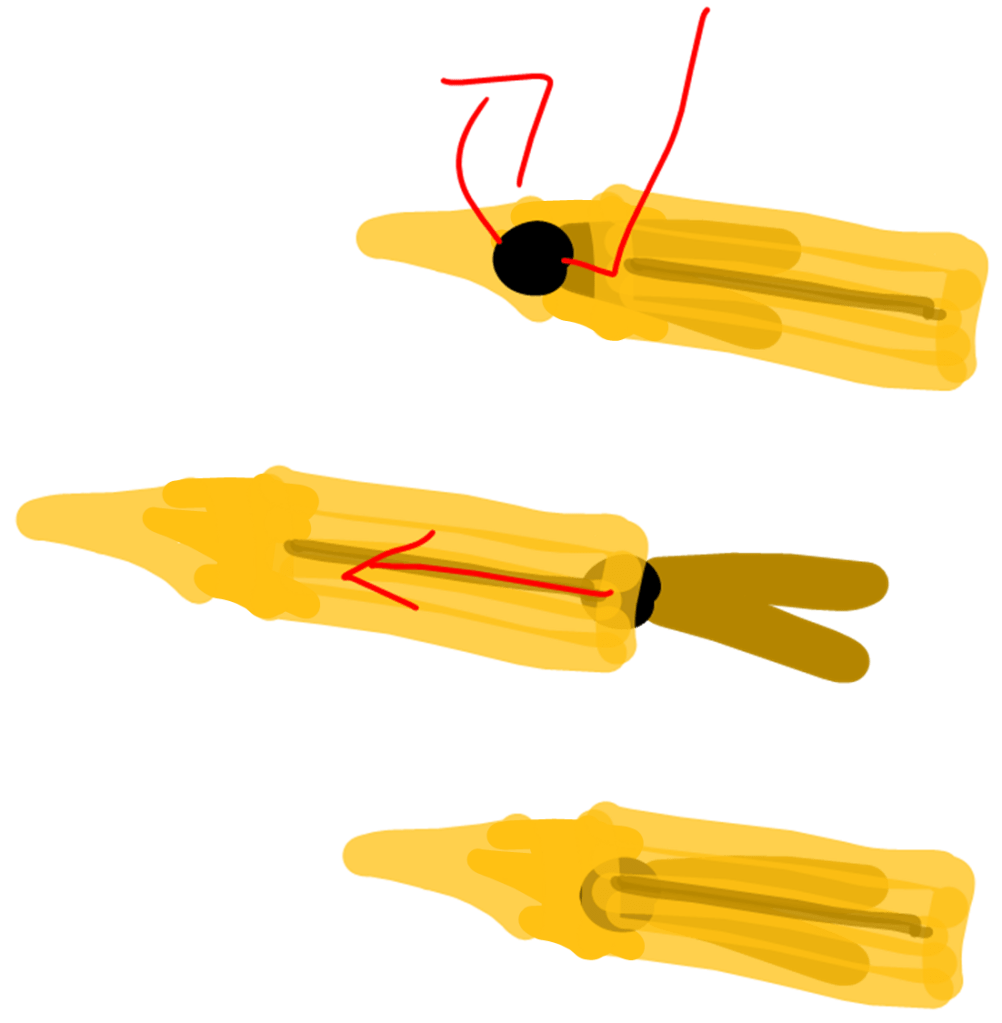
Figure 9. Abstracted diagram for hoya pollination procedure. Find one pollina, remove via corpusculum, insert corpusculum in first through the stigmatic lock, push until pollium contact the inside of the lock. (It is entire possible I got the insertion direction wrong, but I can’t imagine it matters so long as contact is made!) Next Steps
I might try to invert the shape of the pollina next time in case the pollen is on the inside of the wings rather than the outside edge. For this specific plant, it may also be worth waiting an extra day or two to pollinate, since the flowers lasted for quite a while, and I feel like they would naturally be more receptive when the nectar is more actively being produced.
Regrettably, I can’t validate the procedure I detailed because I’m writing this a month later, long after the flowers have dried and dropped off with absolutely no seed pod production. Maybe the sudden increased production in nectar caused the pollina to slide out? Maybe I should harvest some insect legs to try pollinating? Or perhaps self-seeding rates are simply very low to begin with?
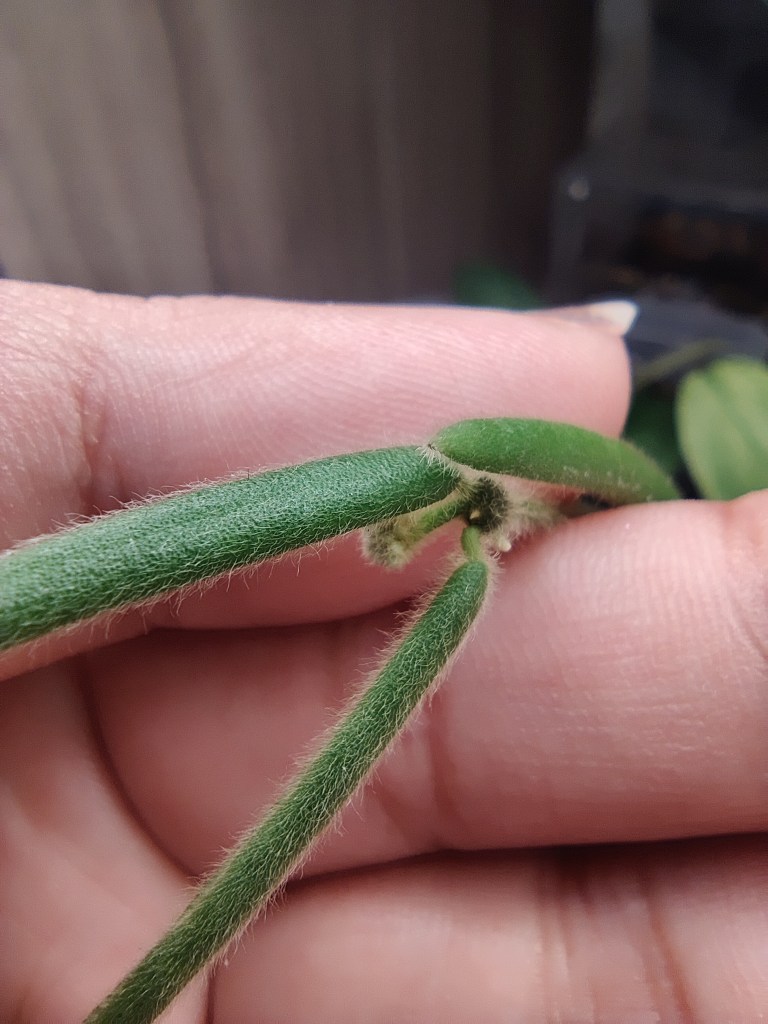
Figure 10. A hopeful Hoya linearis bloom on the way? Check back in a month or so! -
Grad Life: Applying to a Faculty Position with No Context
RE: Faculty Member in the Ornithology Department Opening
To whom it may concern,
I am listing some traits I possess, most suitable for the opening in the Faculty of Ornithology. Several of my publications involve the persistently difficult to consume Tweety Bird, a rare specimen of a canary. I have documented its behaviours extensively and have branched into other similar topics of detailed and immersive research, including that of mice and pigs. My wide-ranging experience and flexibility in the workplace may be suitable for cross-disciplinary opportunities. I also actively participate in service for disadvantaged members, as evidenced by my support of Granny and her knitting hobbies. I am keen to continue my work with a supportive faculty that encourages exploration studies and diversity in the field.
Yours,
Sylvester J. Pussycat Sr.Context: “enrichment” portion of a lab meeting. What would it look like for a cartoon character to apply for a faculty job?
-
Sketchy Science: On the Total Eclipse of 2024
A very special event indeed, what a time to be on strike. As of writing this, I’m still making up some strike pay hours. Nonetheless, I was extremely fortunate to view totality at a relatively clear location some hours away from where I am normally situated.
I went equipped with:
- eclipse glasses
- sandwich materials and some chilled diet coke
- a sweater
- and a lot of patience
We managed to find a park with an available bench to have the pre-eclipse picnic, then started checking through the glasses periodically, trying to find when the first visible blip over the Sun would happen (I had forgotten the specific times, and didn’t feel like looking it up). Here are some photos I took during the progression (Fig. 1).
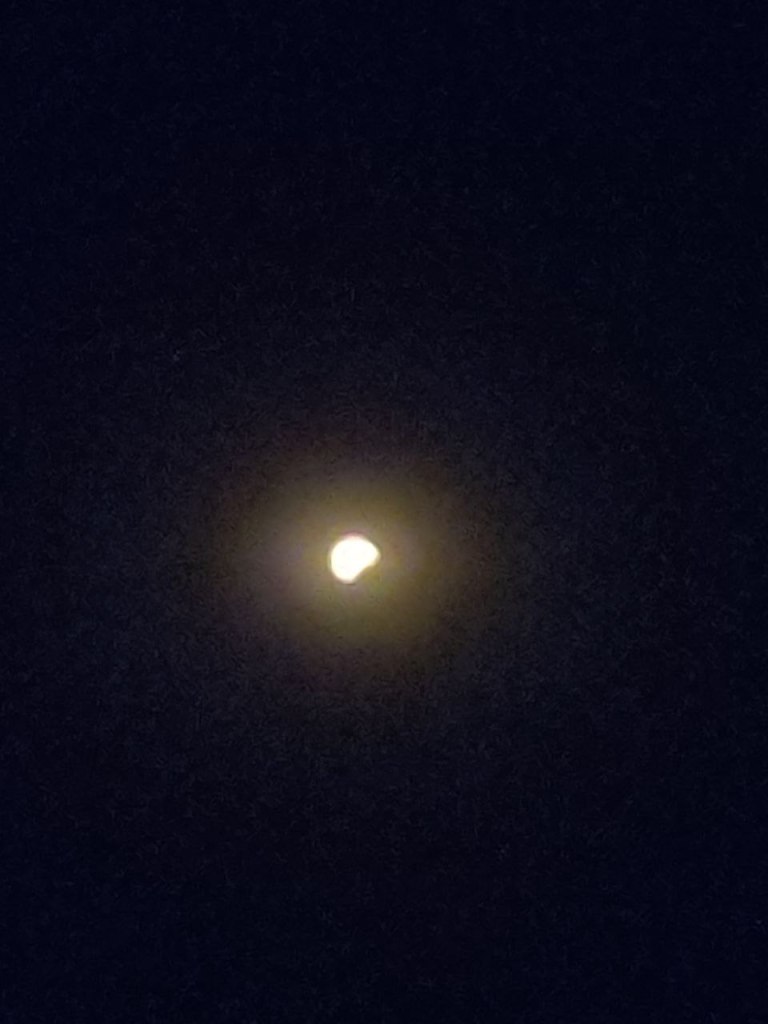
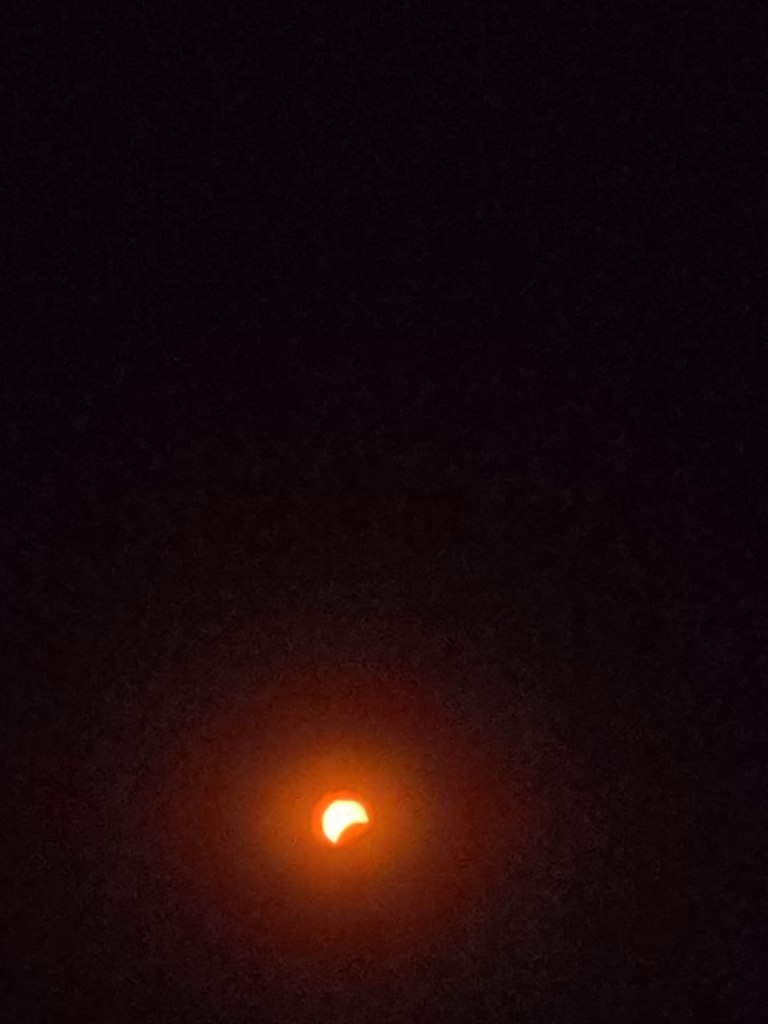



Figure 1. Eclipse progression from left to right, top to bottom. All images where taken with eclipse glasses over cellphone camera. For the most part, I was taking images through my cellphone camera and the glasses. Some branches did get in the way to make it difficult, but it was a fun exercise.
I had a burst of inspiration halfway through the eclipse and pulled out the photometer on my cellphone, laying it flattish along the arm of the bench. It registered around 50k lux around the midway mark. I checked on this periodically, with the value falling off during cloud passage or shadowing (inference, at first I thought it was just the eclipse progressing quickly!). When totality neared, the radiance value plummeted to a few hundred, and dropped further to single digits.
A couple of days later, it occurred to me it might be interesting to plot those values and see what it might look like. On top of that, was there some way I could estimate the incoming flux based on first principles? How accurate were my readings from my phone in comparison to weather stations? Let’s say I didn’t get far, but here is what happened.
Here’s how I tried going about it. The first is getting the total incoming flux at the top of the atmosphere and how much is getting through the ground. I added some values from the typical incoming solar radiation and then some specific incidences at a nearby weather station. Clearly they were quite different from each other (Fig. 2). Nontheless, I also tried fitting the data points I took. I tried a few different curve fits and ended up with mildly ridiculous fits (Fig. 3). Intuitively, I had been expecting something like a sigmoid function to align well, though I received a suggestion for a gaussian fit to align with what we see from transits instead, which in retrospect, makes quite a bit of sense. However, this fell to the backburner and I didn’t get quite anywhere.
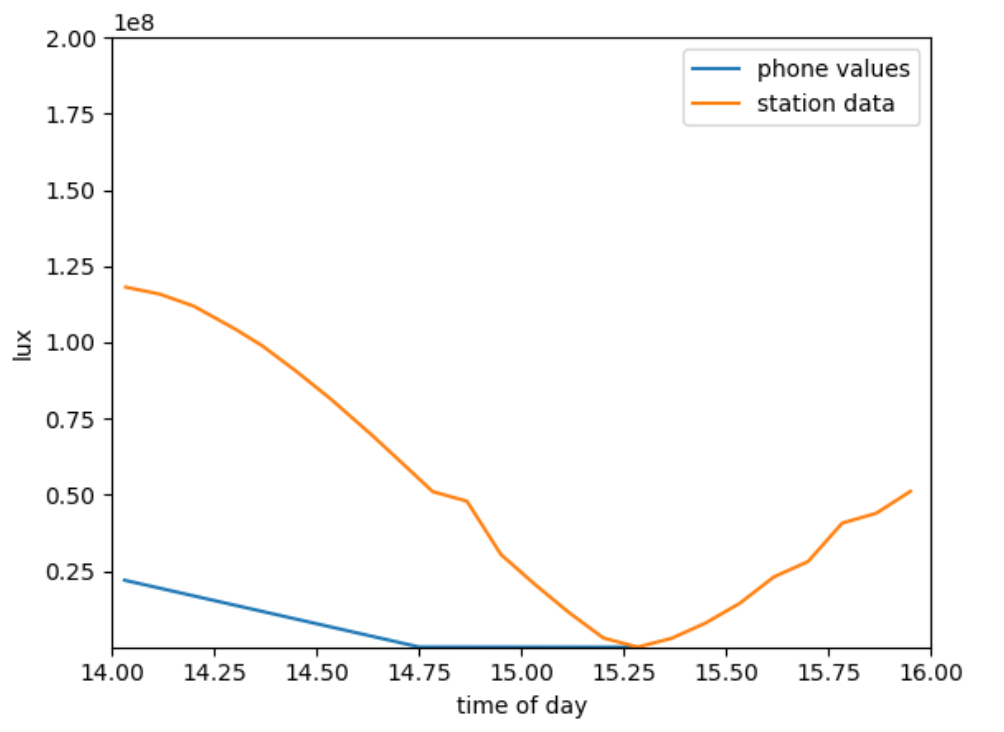
Figure 2. Nearby station data plotted over the 2 data points collected on site. 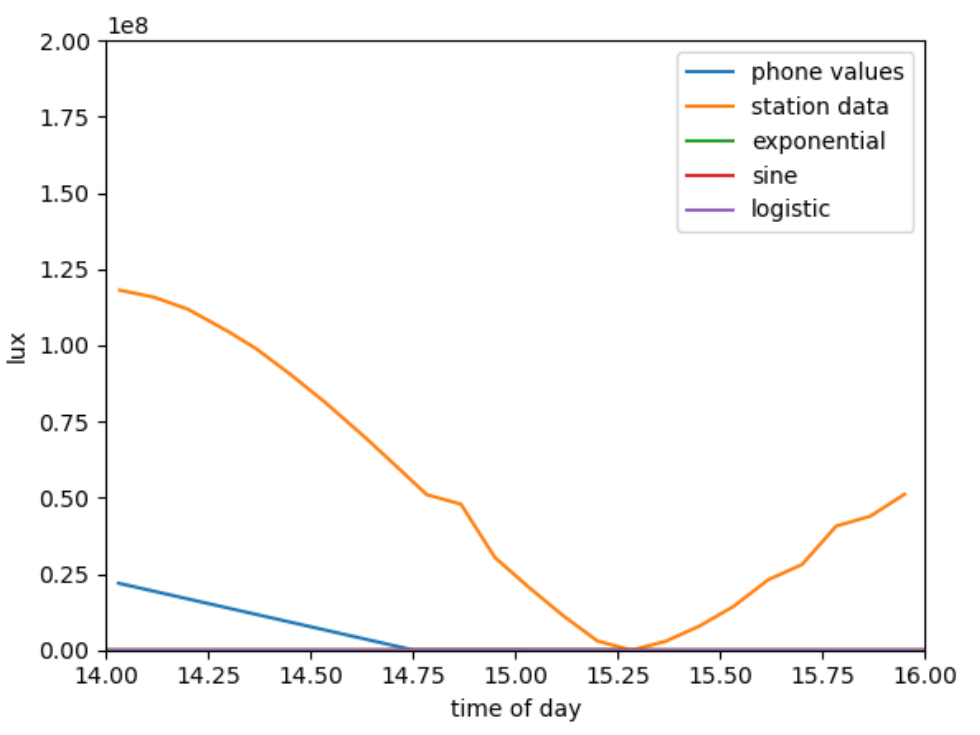
Figure 3. Miscellaneous fits to the site collected data. I don’t have much of a conclusion to this other than, a cellphone probably does not replace a pyrometer, and three data points does not make for a good fit.
-
Sketchy Science: A How-to Guide on Building a Plant Wall
Things can’t be that bad. I counted 17 baby shrimp!
– Elisa, February 2024Prelude
Three-ish months ago (Nov 17, 2023), I set out on an adventure to build a living wall. I had just moved home, and I was thinking of ways to decorate my room and now office space. As it turns out, picture frames for 3 foot long posters are not as readily available at a budget price, even when shopping second hand. I opted for a project I had been wanting to try for a while, putting up my plants on wall. The rational was multi-fold.
Firstly, it has been a life long dream to have a living wall in my own space, with my preferred selection of plants. No fake moss. Secondly, it would take up space on the wall, and should be much cheaper than frames. Thirdly, if I could rig up an automated watering system, this would alleviate the need for leaving my plants unwatered and uncared for during long periods away, or asking someone else to take care of them. All of this sounded entirely sensible to me.
Act I: Making a Watering Wall
So, I sized it out. I knew I needed a waterproof support frame, and some sort of water permeable fabric. I wanted to add a watering system, so I decided to build the frame from PVC pipes, drill holes at the top, and pump water through one end. Dimensions were constrained by the largest garden/landscaping fabric I could find at a reasonable price, 3 feet across. I had been hoping for 5 by 5 feet, as I really wanted it to fill up the space in Zoom calls, but we do what we can. I estimated the maximum head a pump would need to be able to push up to the top of the frame, and multiplied it out by the internal PVC dimensions (I went back and forth inner dimensions, and decided that ½ in pipe would be sturdy enough if I built a central cross feature in the frame). Some quick googling later, I figured I would need a pump that could allegedly do at least 10 ft of head from the main ½ in outlet. I came up with a few configurations, and decided it would make sense to pipe the water out bottom side of the frame.
My shopping list looked something like this:
- 2 10’ lengths of ½ in PVC pipe
- 5 T-joins
- 1 cross join
- 3 elbows
- 3’ width fabric, roll of
- 40 gph pump
- Flexible hosing (to link the pump and frame) and connectors
- PVC cement
- Something to store water in, at least 3’ + a few inches wide to accommodate for the pump connector
I already had a saw and drill with various bits. I purchased the pump a day in advance to look at the outlets and what was needed to join the pump to the frame. Now it was off to Home Hardware. They didn’t have enough T-joins for ½ in pipe. Next step, Home Depot. The folks there were kind enough to ask what kind of project it was. As it turns out, white PVC pipes are necessary when dealing with potable water. For my use case though? Electrical conduit would do just fine at half the cost. Great! They were out of conduit in the dimensions I wanted, so I picked up the PVC connectors before heading on over to the RONA down the street. I finally found the conduit, ½ ‘’ ID and 3’ in length. I purchased 2 10’ lengths and wedged them cautiously into the car. At some point, a trip had been made to Canadian Tire to pick up a giant Rubbermaid tote. It was a ROUGHNECK, and claimed it wouldn’t crack in winter conditions. I had been hoping for a flat bottomed box or planter, but an internet search had revealed that most nicely formed boxes were capped at around 48 inches or less. No matter. I could figure it out later.
One night of staying up working on impromptu projects wasn’t enough (I had built a Corsi-Rosenthal box the previous night and spent far too long perfecting the box fan coverage around the corners). I sawed the pipes to length, using a 30 cm ruler as a guide, sanded the edges down with a rasp, and finished the edges with a coarse grit sand paper. I gingerly put all the pieces together with the connectors and flexed the frame. I felt like it would hold. I cemented the pieces together and let it cure outside. At this point, night had fallen and I took a break for dinner.
The cement had cured by the time I was done, so it was time to do a water test. Holes were drilled and the connectors added. At this point, I realized that the connection point to the frame sat belowthe frame, and not to the side like I had planned. But it was already cemented in. I figured it wasn’t a big deal. We filled a bucket with water, dropped the pump in, and turned it on. It worked! The disbelief on our faces belayed the lack of faith in my online water head calculation. But the drill spacing and flow rate worked perfectly to lift the water to the top of the frame, and distribute the outflow across the drill holes. Naturally, I had to move on to the next step, seeing if the flow would be enough to saturate the garden fabric.
I lugged the frame and the roll of fabric outside and started wrapping it tightly on the frame. I was doing this unsupervised and alone at this hour, and naturally ended up making some impromptu decisions in the dimming light. I decided to make the fabric wall by wrapping around the frame three times. After folding the frame in, I punched some holes through the fabric with the tip of a pair of scissors right by the top of the frame, and zip-tied it in with some spare zip-ties I had found in my bag after some field work. I tested again with water. Slowly but surely, the compressed fabric against the outlet holes of the frame began to take up water. Holding the frame perpendicular to the ground, water dripped through the fabric instead of the air space between the front and back.
I chucked the whole thing into the Rubbermaid tote (Fig. 1). Job well done, I thought.
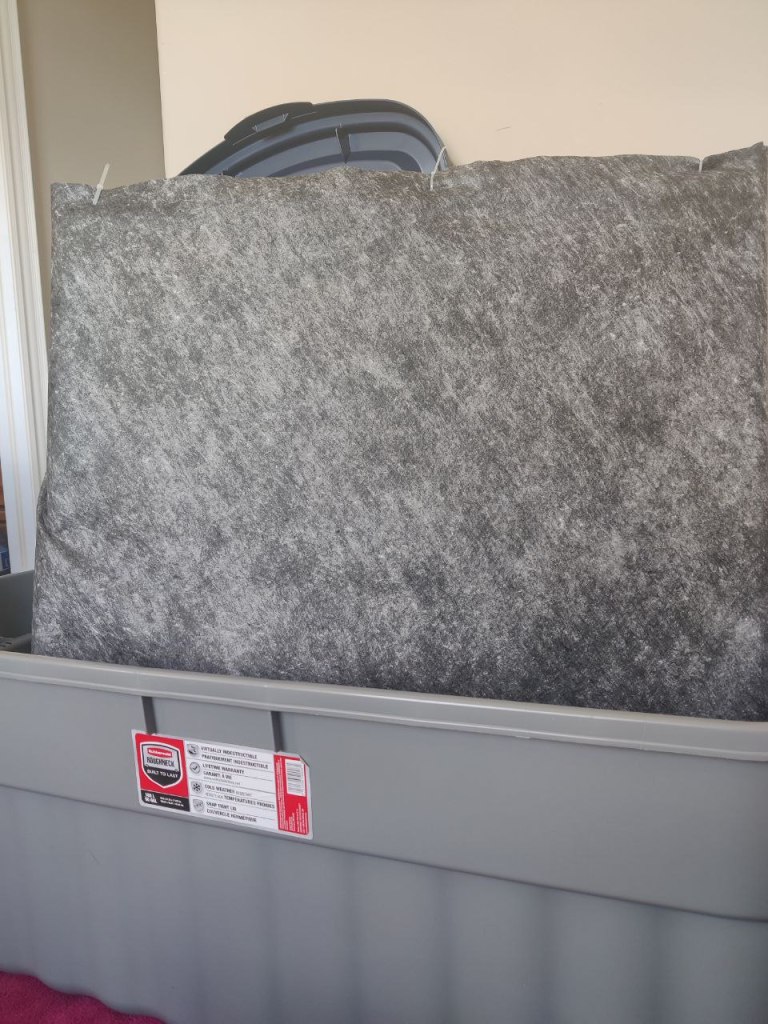
Figure 1. Garden fabric wound around a PVC frame, then chucked into a tote. Intermission: Watering Wall to Living Wall
I lack some clarity on the timeline for the next few parts, but I eventually stitched a few pockets made of cut rectangles from the fabric using fishing line to the “front” side of the wall. I stuffed the pockets with a lower layer of LECA, placed some plant cuttings in, and secured them with more LECA. The tote had been hauled up to my room and propped up against a wall. It had been filled with well over 20 gallons of water, enough to avoid running the pump dry. Over the next few days, I would plug in the pump to “water” my plants (Fig. 2). One issue I knew I would be running into was the stability of the frame. I wanted it to be vertical. With it leaned up against a real wall, there were certain to be mold issues and water damage.
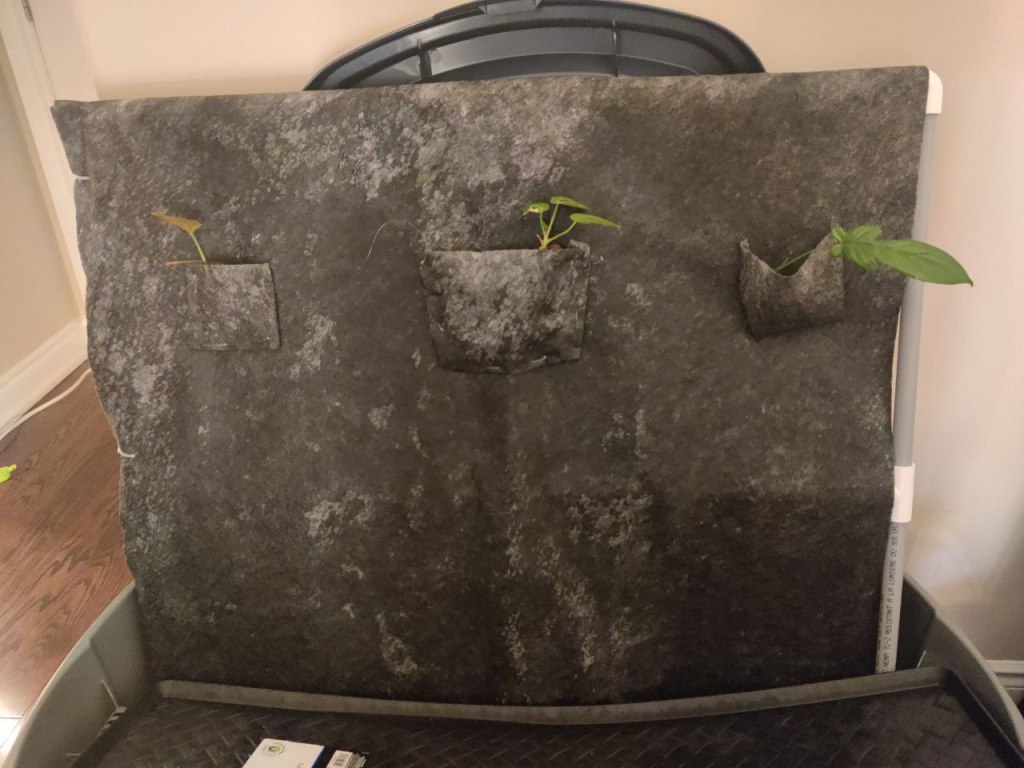
Figure 2. Putting plants on the “wall”. Darkened areas are saturated with water. Notice that the tote’s lid is behind the wall, this was preventing the wet plant wall from contacting the drywall. I tried a few different configurations, including filling the tote with 1 gal bottles to brace it (and limit the total water volume in case the tote cracked), and propping it up on an overturned planted when the awkward angle from the pump connector started really bothering me (Fig. 3). I was hoping that eventually I could get some 3D printed supports in.
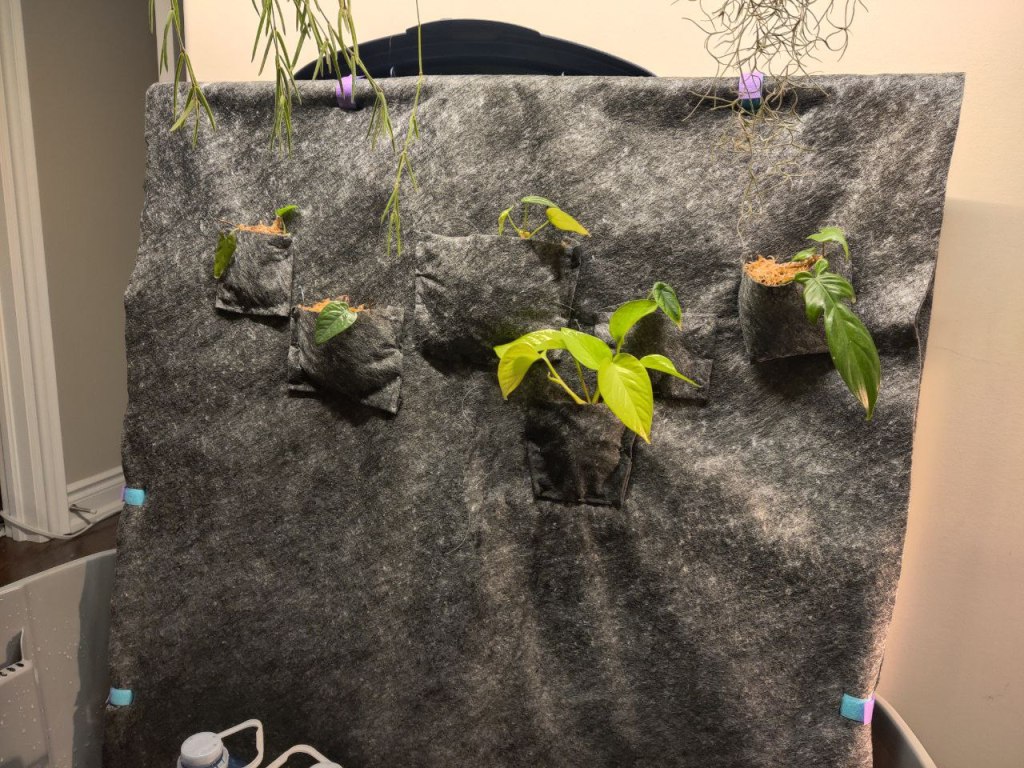
Figure 3. With some added lighting, hanging plants, and sneaking gallon bottles propping up the wall. Act II: Water Quality and the Clean-up Crew
A week later, I discovered that the water in the tote was… unpleasant. It was time to cycle it out. I ran into my first issue here. The frame was now waterlogged and quite unwieldy. Hauling a flexible plastic tote filled with ~80 L of water was also not quite practical (Fig. 4). This resulted in a very silly, slow water drain by repeatedly filling gallon bottles and dumping them out into the bathroom while the frame had been lugged into a bathtub while this was happening. This would not do.
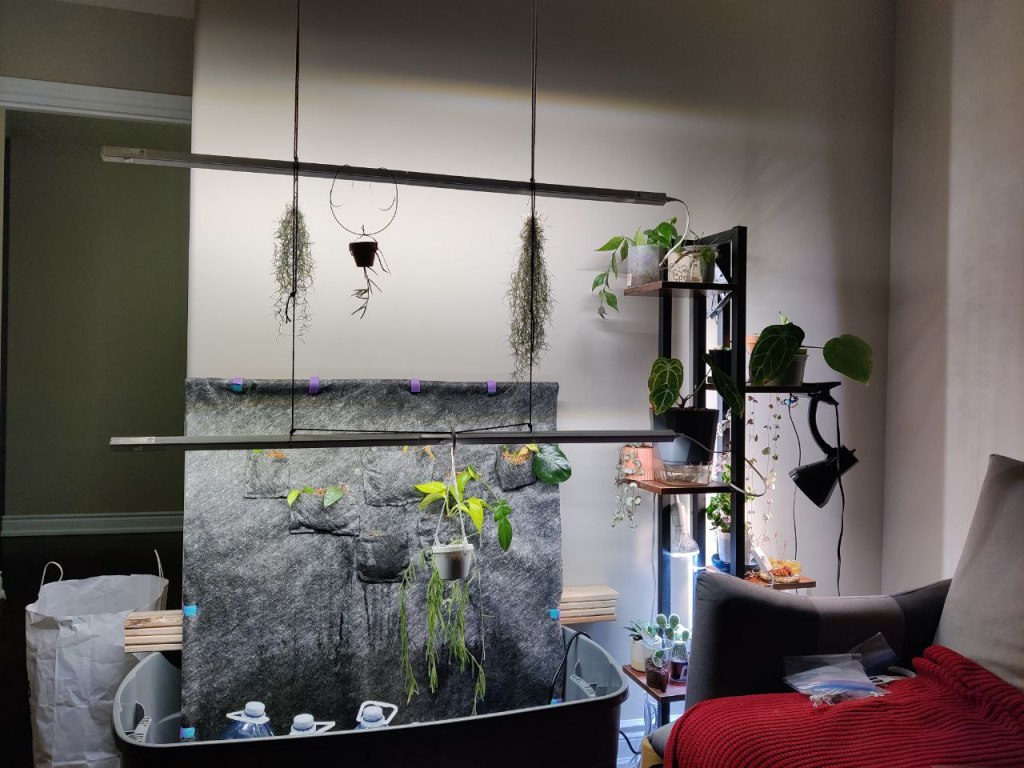
Figure 4. A messy room with plants, and a rubbermaid tote full of water and gallon bottles. Those are rock samples in the ziploc bags… I mulled it over for the next week or so. The second time I had to do the tote lugging and gallon bottle juggling, I decided that I was over it. Either I could disassemble the wall for a later date, or get something to clean up my water. The plants were doing great though, and I didn’t want to disturb them. So I thought, shrimp! Shrimp would be my solution.
Some quick googling later, I found that Amano shrimp were great algae eaters and detritivores, quickly breaking down plant matter. I had decaying leaves in the tote already, and a filter in the pump. Surely it would work out! (For those who do not know, ammonia is a product of decaying matter, and is highly toxic to various organisms. Denitrifying bacteria convert ammonia to nitrite – also toxic, and then to nitrate – less toxic). Just in case though, I would throw in some extra dead leaves and wait another week. The time line becomes even more blurred here. Did I buy the freshwater test kit then? Or did I wait until I first got my shrimp?
I recall being excited to find an aquatics shop in London when I was visiting. We made a quick stop. I asked for 3 Amano shrimp, a marimo moss ball, water wisteria, some pellet fish food in case there wasn’t anything to eat for the shrimp, as I didn’t have any algal issues. I was very tempted to get a few guppies, as I recalled them to be easy to take care of based on a few conversations I had had with a friend, but I decided to take it slow.
I brought the shrimp home, added a mesh beg to my pump to block the inflow of water, and I slowly released them into the tank, thinking that any beneficial bacteria that road along in the water might help. Over the next few days, the shrimp chomped away at the debris building up on the moss ball, and hid under various 3D printed benchys (Fig. 5) scattered throughout the water. All was good (Fig. 6).
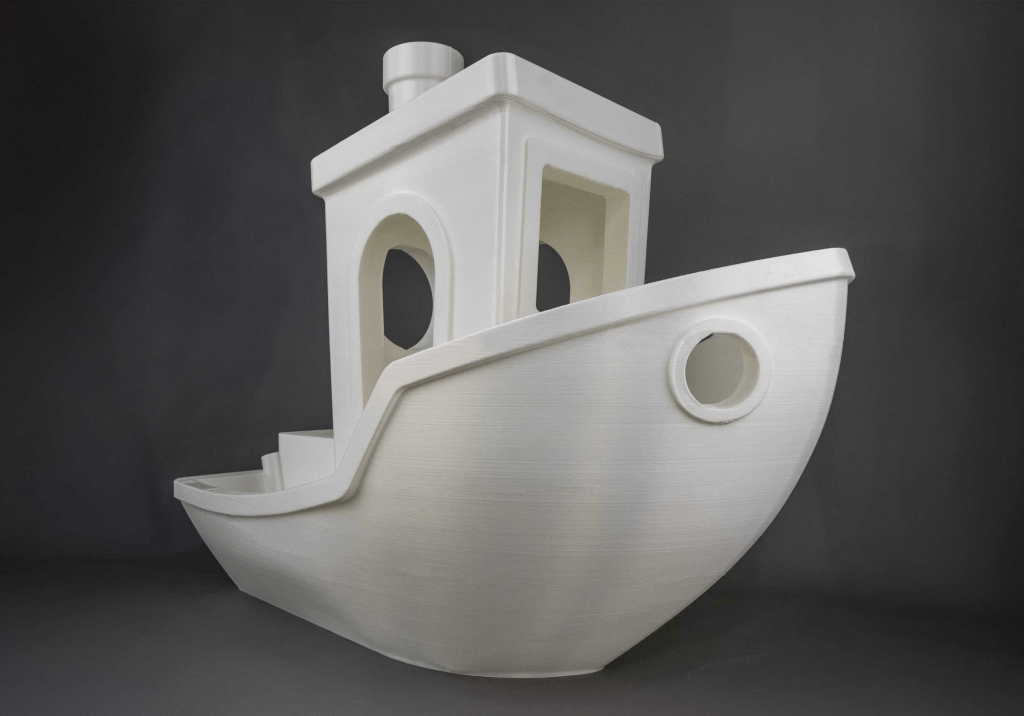
Figure 5. Example of a Benchy – The jolly 3D printing tortune test. Did you know that benchys are top heavy? All of them flipped in the water. The shrimp enjoyed hiding underneath them until duckweed and other aquatic plants got introduced. 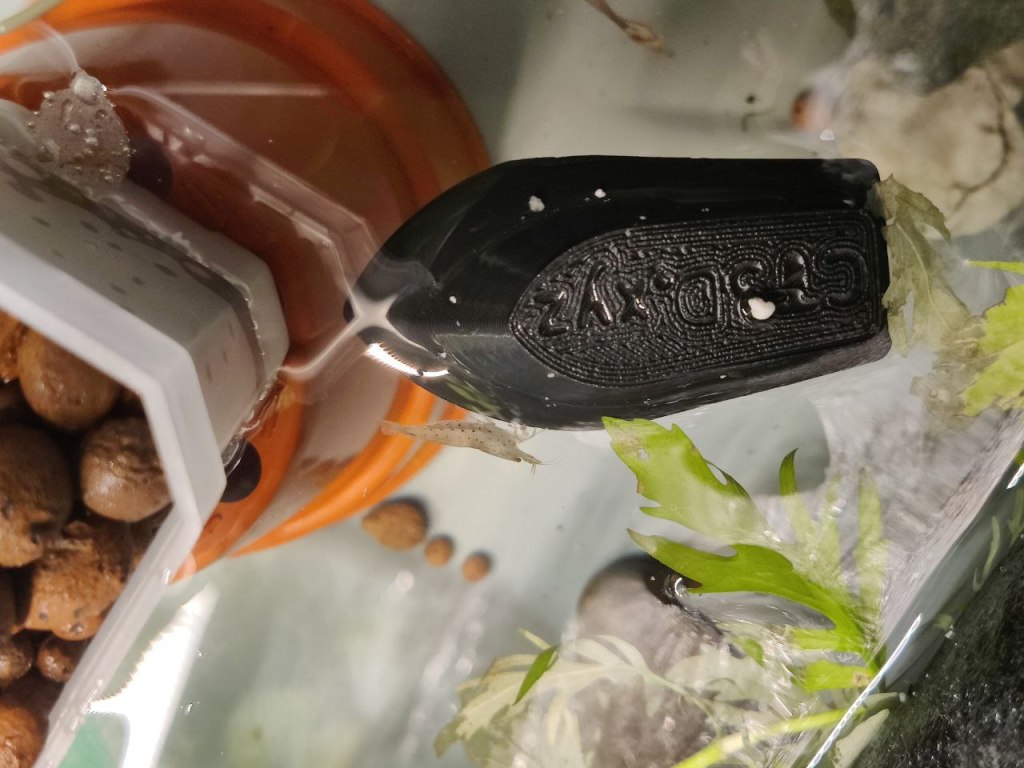
Figure 6. Amano hanging out on an upside down benchy next to some floating plants. I instantly fell in love with the little shrimp clomping around, and decided perhaps I could get a few more. After all, amanos were nearly clear in colour, and I could never find them in the tub. I went and visited a shop I had originally wanted to go to (they were closed for unknown reasons), and explained my situation. They confirmed that I wasn’t really planning on breeding, so amanos, plus whatever fun coloured shrimp I wanted would probably work. This time I ended up with 3 amanos, 3 painted fire reds (neocaridina), and 3 guppies.The red shrimp were on sale, so that made the decision fairly easy for me. The guppies were selected at a ratio of 2:1 female to male, to distribute the male attention between the fish.
This is around the time when things started going wrong. The new shrimp seemed to be fine, but the old ones were listless and would curl up at the bottom of the tub. That was odd. I started doing 30% water changes each day, despite the lugging back and forth. I was testing the water parameters at this time, and saw a clear increase in…nitrite. This happened during a particularly busy time, and I let it run on for far too long. Two shrimp had passed away by the time I did my research on how to address the problems I was seeing. I purchased SeaChem Prime, Stability, and API’s QuickStart after trying to figure out which PetSmarts had both Prime and Stability. I later found out cheaper ways to access these products, but in the meantime, I was following instructions for dosing each day, while doing water changes. Things seemed to be improving other than the loss of 2 of the original shrimp. I chalked it up to the failure to acclimate.
Intermission: A Rescue Mission
Things were going well, so I finally decided it was time to rescue some of the lake minnows in the garage. I kept them separately in another tub for a couple of weeks before adding them into the large tote (Fig. 7).
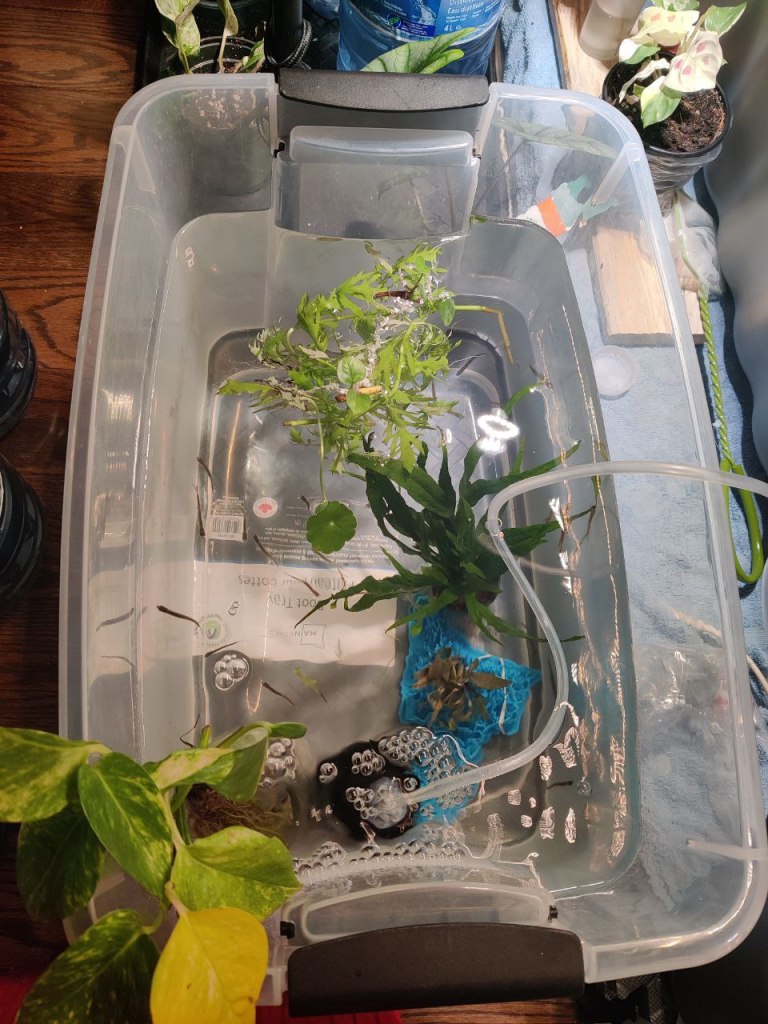
Figure 7. Quarantine tub! The golden pothos is likely doing most of the work keeping the water clean. Act III: Upgrading the Living Wall
The only issue I was having now, was the plant wall itself. With all the time I spent worrying about the living critters in the tote, I had neglected to figure out a solution for adjusting the wall so that it would stand up straight. I had to check on it daily to make sure it was stable, and was knocking around all sorts of things in the tub to do so. Now that things were stable-ish, it was time to upgrade. I had been regularly keeping an eye on aquariums for sale, both from major online retailers and second hand. The prices of a new aquarium were eye watering.
While searching for a reasonably priced aquarium, I also purchased an air pump and sponge filters. I had a feeling the fabric in the frame likely wasn’t doing as much filtration and supporting denitrifying bacteria like I had expected. This way I would have some additional oxygenation and an extra place for bacteria to grow, just in case the filter in the pump wasn’t doing the trick. I also added an additional piece of filter media into my water circulation pump to provide a far denser spongey material and prevent sucking up any shrimp.
Some weeks later… I got it! An aquarium! With a stand! (Did you know how expensive new aquarium stands are? I was looking at tool shelves as an alternative). It was a whopping 72 gallons. Since it was a second hand purchase, bringing it home was its own adventure. It was also immediately determined that it was far too big and would hold far too much water for any of us to feel comfortable with it on the second floor where I had the current setup. Rip my office living wall.
I set it up dry, gave the interior a good wipe down, and took a look at the top of the tank. Yep, as I expected, I would need to elevate the plant wall ABOVE the tank. As it turns out, all tanks with dimensions greater than 48 inches all come with a supporting brace across the top of the tank, presumably to relieve pressure on the glass outwards somehow. I had originally been planning on a support frame anyways, but this meant building a pretty high one, with significant pressure downwards on the glass.
I built the frame (Fig. 8). I’ll bypass the complications here, but it turns out there are multiple brand options when it comes to PVC pipe connectors that inset at different depths. I purchased some weight diffusing egg-crate. I boiled some gravel leftover from a backyard project and weighed it down. I wedged the frame support under the brace and onto the egg crate. I added water. I also purchased some Eco-Complete to weigh it down when it went on sale. There was a questionable trip that involved the back of a warehouse for that one.
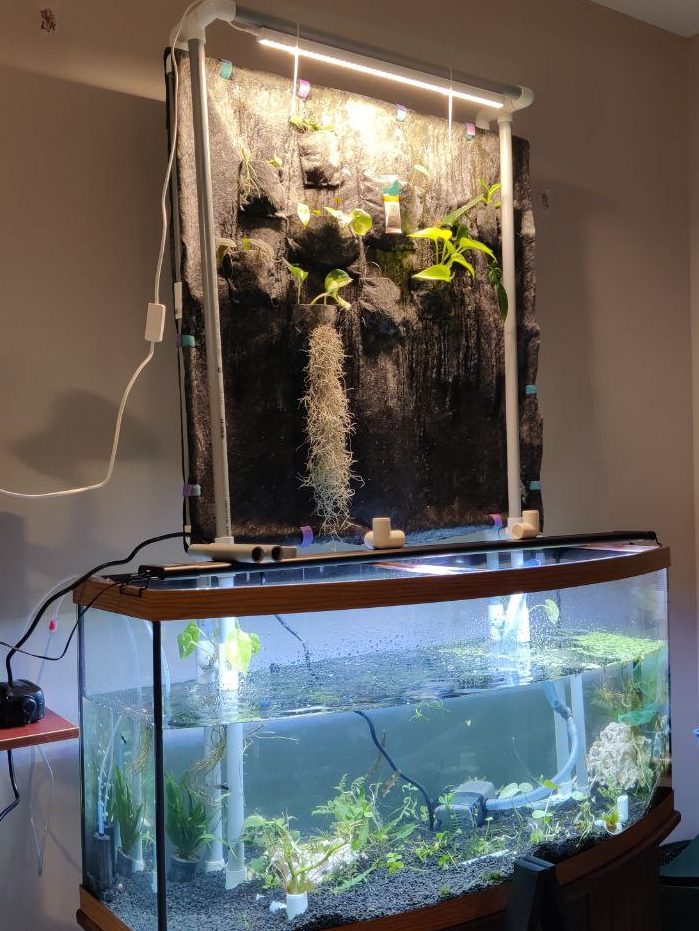
Figure 8. Somewhat of a preview. Bits and bobs leftover from the frame building. It took two iterations to get the light on safely. The tank is a mess of random things. Fear not! I took the java fern out eventually. I let it sit for a while, then transferred all the fish and shrimp over.
The End: Grand Plans
I had grand dreams of building an urban scape filled with miscellaneous ceramic houses from the thrift shops and letting them overgrow with moss, and a mesh “highway” that the shrimp could use to cross the tank, with a giant mountain on the other end. I knew it would take some time to find all the pieces if I wasn’t going to get anything new, or make the parts myself.
The End?
Everything worked like a dream. My shrimp were happily picking away at the substrate and the walls. My fish were swimming around and constantly looking for food. There were little algal growths happening, copepods were showing up, and my fish were starting to get white specks on their bodies.
Wait.
…my fish were starting to get white specks on their bodies???
The Next Adventure
Wherein several tank diseases rip through the aquarium, I acquire multiple tank syndrome, I find several other vendors, the plants start to settle in on the wall, my “budget” plant wall defies the budget, the fungas gnats return, the baby shrimp make their appearance, and I find a local aquatic plant dealer.
-
Sketchy Science: Water in your coffee
I recently was notified by a friend that an interesting article had dropped. Coffee and volcanoes! How exciting is that? I cracked open the article and was initially excited, then increasingly dismayed. Here is the article: Study: Why a spritz of water before grinding coffee yields less waste, tastier espresso. I found very little to be excited about on the first read through, and felt some internal panic welling up. This was for sure going to lead to some poorly thought out, widely spread content. Here is the paper for reference: Moisture-controlled triboelectrification during coffee grinding. All “quotes” are from the paper.
Background
For the past few years that I have been involved with grinding coffee at home and brewing specialty coffee while on a low budget. I have heard that adding in a few drops of water will reduce some of the static electricity in the process whereby the finer coffee grounds stick to the burrs and internals of the grinder. Personally I have never actually tried this, as I find the bits sticking to the surface to be quite useful in removing fines from my overall grind. I’ve just tapped off the fines afterwards and run a finger to dislodge the remainder in the grind receptacle. Seeing the article title, I thought, perhaps someone has finally quantified what the effective static reduction is like!
Seeing also the note about a volcanologist involved in the work, I was hopeful that the analogies would prove meaningful. I read through the article as it meandered along in some of the past work from the lab and found that they had identified two general factors contributing to the charged particles. The article does a reasonable job summarizing the paper, in that the team tested a number of variables and collected a slew of data. This part was surprising. The paper was written such that a regular audience could parse the work and the writers at Ars Technica could summarize each segment. I then took a look at the paper.
Matter
The highlights on the site are fairly straightforward, but the print version is confusing. The paper opens up with what is presumably a visual abstract with some key words overlain an image of some ground coffee on some unidentified mechanism. There is a brief background on the sources of charge (fracture and friction), with reference to some industrial interest in further studies on surprise charge. The authors claim to address three things: coffee parameters affect charge, demonstrating most of the charge is from the fracturing process, and charge is also dependent on moisture content. The introduction ends off with
“In the context of both understanding the fundamentals of triboelectrification and bolstering our efforts toward brewing more reproducible and sustainable coffee, this article offers strategies to control the charging of coffee particles and posits opportunities therefrom.”
The Results and Discussion section broke down those three aspects as follows
- Charge parameters. They demonstrate that beans are charged via contact with typical coffee setup materials. It is unclear why they use the Starbucks Blonde Roast (blend) here. They then claim that coffee must be ground, typically to grain size of 100 nm to 2 mm. I was unable to find their reference here, as I usually grind coarser for a French press. Perhaps it is a reference to espresso grinds only. They skip ahead to state that finer grind sizes resulted in aggregates held together by electrostatic forces. They ground 1 g at a time and found both the net charge, and the charge distribution.
- On origin. They used several Mexican coffees with different roasters and roast levels and found three different net polarities, “But those coffees were roasted by different roasters to different colors, and the data suggest, perhaps unsurprisingly, that origin alone does not dictate the polarity of charge.” I can confirm, this is unsurprising and the point on origin is not meaningful as one farm produces differently than the next, even if they are immediate neighbours.
- They repeated this for 30 coffees and found a weak relationship between Agtron value (roast level) and charge. Instead, they pinpointed the 2% moisture content as the possible culprit (R-squared = 0.41). This runs counter to volcanic ash and an interesting point! It also indicates that they were able to measure moisture content of these coffees.
- Two suggestions were provided. First, dark roast tends to be more brittle, and more associated with negative charge. The second, is that water content plays a role.
- The distribution of negative particles is skewed towards fines and “boulders”. I did not get the same interpretation from the selected figures in the paper. In one of the images, the negative charge has a greater peak in the larger grain size range, but in the other, the two peaks are quite similar. An allusion to ion scavenging is made here. To that note, I wonder what their target grind size was as they later explain different roasts resulted in different size distributions. However, I didn’t see a distribution for neutral grains.
- Roast parameters on charge.
- Moisture. They roasted a 12% moisture green bean to a variety of different final products. They repeated for a 9% moisture green bean and found that the roast parameters were more important than the initial product moisture content for overall charge to mass ratio. The final moisture of the roasts fell between 1 – 3%.
- Grind size. They used a different set of coffees from the moisture test, showing two coffees with net positive/negative charge and found that finer grinds correlated to higher charges. They also did a test using the same grind size across 13 coffees and showed darker roasts typically resulted in smaller mean diameter and more negative charge. “Figure 4C offers one explanation as to why darker coffees may yield slower espresso shots for the same brew parameters. It may not only be the increased volatile content but also the reduced bed permeability.” That is, lower grain size from the same grind is pulling slower shots. Note that your barista should be aware of the properties of their coffee beans that day, and should have each roast dialed in for the day. Because of the grind size difference with the roast levels, they repeated the experiment such that the same size distributions were had for each roast. They still found that negative charges correlated more strongly with darker roasts
- Granular mechanisms. This targets the question of, how does the grind mechanism contribute to electrification? The authors pre-ground the coffee and then put it back through to evaluate the effects of frictional charging from grind interactions and coffee/grinder contact. There was about a 90% reduction in charge after testing on seven coffees by passing through a larger grind setting. Presumably they neutralized the coffee grounds prior to regrinding.
- Addition of water. “Anecdotally, baristas have observed that the incorporation of small amounts of liquid water onto the whole-bean coffee prior to grinding results in seemingly reduced charging. In our hands, it also resulted in near-zero grounds being retained by the grinder, an observation that has implications for reducing waste and increasing quality of beverages. Perhaps we will revisit this in a future study, but for now, we are more interested in whether the addition of water neutralizes the effects of fracto- and triboelectrification or modulates particle aggregation via capillary forces.”
- They found that humidity affected the charge once relative humidity was greater than 60%.
- For seven coffees, they progressively added more water. Increase in water addition took place between 25 – 40% RH. They found that water content of 20 ul/g resulted in close to 0 net charge on the grounds and suggested either a cooling effect, or rapid ion transfer.
- They also tested this with saline solutions to evaluate the effect of ion transfer. They found that the results were similar, so electron transfer in the dry case is more likely the cause of charging.
- Here I find my major issue with the article. “To deduce whether the coffee particles were forming neutral aggregates”. This comes rather out of left field, perhaps they meant to create a new section? It seems that they were trying to answer what the net 0 charge consisted of, but never quite managed to say so. If this plays a significant role with volcanic ash, I feel that it would have helped the reader had they included more content in the Introduction. They found that the size distribution was improved with the addition of water, and found mostly neutral components in comparison to the “dry, field” grind result. The caption does not clarify what “field” and “no field” refer to, likely the method in which they sorted the bins. Water also reduces clumping.
- Then they brewed some espresso using parameters that were unlike any of their prior parameters. 18.0 g dry mass coffee was used to produce 45.0 g liquid coffee extract, ground at setting 1.0, tamped at 196 N, and brewed using 94°C water, kept at 7 bar static water pressure with a 2-s pre-infusion. They found that without added water (unclear how much), the shot took less time and had a slightly lower TDS (total dissolved solids). The first drops enter the cup at the same time (~10s). They then fit a sigmoidal function to a hypothetical situation where the flow will achieve a constant and then looked at the flow rate for 3 samples of wet vs dry ground. “In other words, this is conclusive [bolding by me] evidence to suggest that dry-ground coffee is producing a bed with markedly more porous pathways.” They note that lower pH corresponds with higher S (more acidic coffee is less charged). They speculate on the role of internal moisture prior to roast.
That’s a lot! They went on to note that they made some assumptions about the burrs (in this case, their contribution is fixed, perhaps this is why they didn’t use other machines) and relate the Seebeck coefficient to the amount of charge from fracturing. They state that “Agtron number is proportional to the electronic band gap, both of which are reduced with darker roasts.” Without reference, so I will have to take their word for it. They related this to the Seebeck coefficient and oxidized organic molecules having low-laying orbitals. This seems to be a pretty big addition to the general knowledge of organic molecules, so I am surprised they did not highlight this more in the Introduction.
“Furthermore, light, medium, and dark coffees and their roast profiles can feature markedly different charging regimes, even for coffees with the same Agtron values. This highlights that modern roasting paradigms are highly artisanal and pose fundamental challenges for using commercially sourced coffee in academic settings.”
Alright. This feels like pandering.
“One could imagine the development of in-ground mineralization to make designer brewing water in situ without the risk of damaging boilers in espresso settings.”
I really don’t know where they were going here. Are they suggesting adding/removing heaps of salt and hardness to accommodate for water in advance and pulling shots with distilled? This is an interesting point I wish they elaborated upon.
Methods
I’ll highlight some interesting aspects I saw in the Methods section.
A pipette was used to introduce water onto whole-bean coffee, and the coffee was shaken in a sealed container to ensure homogeneous distribution.
Whole-bean coffee was stored in H2O-impermeable vacuum bags and kept at −20°C. The coffee was allowed to equilibrate to room temperature in the vacuum bag before grinding
I am curious to see how long the coffee was shaken to “ensure homogeneous distribution”. I also see that they didn’t comment on the effects of freezing the coffee prior to use, as freezing beans is quite controversial amongst coffee enthusiasts.
Notably, they did not provide a method to clean the grinder in between experiments, nor is there data indicating the mass loss during the process.
Commentary
“Many commercial coffee roasters treat their roast profiles as proprietary, and it is impossible to back calculate the precise profile from examination of only the roasted whole beans. There is academic value in standardizing roast profiles across the industry, thereby allowing for direct comparisons between coffees. But we are not advocating for this on the industrial scale, as that would sterilize an artisanal aspect of the industry. Instead, we developed our own profiles with the aim of isolating roast through the development of systematically “darker” coffees.”
This segment indicates that the authors care about the artistry of specialty coffee. Unfortunately, this theme runs through much of the paper and I found it to strongly influence how the paper was written. I then wonder, who was this paper written for?
As a consumer and coffee enthusiast, I am left with the following thoughts and questions
- Lack of testing. Only ONE grinder was used during this test. I think they selected a sensible one if they were only going to use one, it’s reasonably accessible to different shops and the settings they used were straightforward. I do imagine perhaps there were complications justifying it on a budget (industry grinders are astoundingly expensive if there was no specific target goal for the research that served direct benefits). This is evident in James Hoffman’s video where he discusses the paper and interview with one of the authors, where he ends with a suggestion that at home brewers should fill in the gap.
- Not understanding the difference between specialty crops and variability between farms that could be adjacent to each other. Given how many external individuals were involved in the work, this should have been caught early on.
- Use of the standard dark/light roast ratings via Agtron was useful, but I wonder if there was the opportunity to develop a new standard for roast levels here. Perhaps based on water content before and after roasting?
- Freezing? This changes how the coffee works. Why did they freeze things? Why did they not evaluate the effect of “resting” coffee? How fresh were the roasts? Why didn’t they roast more of their own sample? Why choose to use a number of different roasts? Was it just a PR stunt? Clearly they had collaborators, going back to the first thought, why not borrow a few grinders for controls?
- I think there is the possibility that this work can be really extended and become useful for your average hobbyist. For example, nailing down the variable effect on extraction or charge scaled to average grind diameter and how variable the results can be if you have an even vs uneven grind
- Who is this paper actually written for? The authors refer to the “artisanal process” a fair amount, and note some complications in terms of getting roast profiles. They also do not use grinders across the hobbyist market, nor test out burrs made of different materials (which should have a notable effect).
My thoughts as someone who attempts to write and share science via papers:
- Absolute statements. The authors make a number of absolute statements that are not understood to be true, even by a regular audience. One such example is, “All coffee is ground”. Coffee beans are typically harvested, dried, then roasted to produce what the consumer sees as “coffee beans”. These can then be further processed by grinding to make a standard “coffee” drink, but can also be coated in chocolate, or have some of the volatiles extracted via CO2.
- Lack of structured testing. Opportunistic testing makes sense when one is in the field, or has limited time/funding/equipment. The authors picked and chose one strand from each of the experiments to continue on with the next step, resulting in very little data. Perhaps there were limited controls on the experiment that they do not address.
- Magical proposals. I am still baffled as to where the idea of “aggregates” comes from. This might be a matter of coming from a very different field, but if it is as intuitive as it seems, then it is surprising it wasn’t proposed earlier in discussion of volcanic ash. The role of neutral aggregates is not elaborated upon in terms of some of the other tests they did. Perhaps this lies somewhere in the realm of volcano science? The concept of aggregates was not surprising in and of itself, but it is unclear what fraction of aggregates were formed, and how they affected the final production when the aggregate ratio decreased. It’s worth noting here that I don’t possess an espresso grinder and perhaps all the “fines” that I’m thinking of are actually the espresso grind size, and the goal was to limit the loss of coffee. Which is a great target! Coffee prices are going up and grams can add up. That said, they could have been clearer in the introduction when mentioning potential industry impacts that this was one of their intentions.
- Awareness. I think this article was actually great in terms of awareness for how one changes one parameter at a time when trying to perfect a coffee brew. The authors are potentially well on their way to changing how the standard espresso at a coffee shop is pulled, but given the sterilization of specialized coffee in recent years, perhaps their target was truly the at home tinkerer.
The only profound thing this article has demonstrated is how easy it is to blow up on the internet if you have the right connections or work on a topic that touches the lives of many. Does anyone remember how science indicated red wine was both good and bad for your health?
Sketchy Science Segment
As an additional Sketchy Science segment, here is my daily brew using a size 2 V60. This uses ~25 g of coffee (pure speculation on my part, it’s been a while since I checked) and ~380 mL of water. I use straight tap water with ~35 mg/L sodium in it with a CaCO3 hardness of 149 mg/L. I couldn’t find the pH on a public site, but a sample test with the Master Freshwater API Test kit indicates I have a water pH of ~7.4 straight from the tap. I have two kettles, one electronic to boil quickly, and one gooseneck for a controlled pour.
- Boil 600 mL of water in an electric kettle to 100 deg C.
- Grind coffee to around ~2 mm while heating water in kettle.
- Transfer 400 mL water into a stovetop gooseneck kettle (this drops the temperature and bypasses the slow and inefficient heating on the stove). This typically drops my temperature to around 85 C.
- Pre-wet filter so it sticks to the plastic V60 (I used to use a ceramic, but had too much heat loss from it). Dump excess water.
- Pour ground coffee into the center of the wet filter, tap sides to even out the coffee bed. (At this stage, I find it most useful for fines to get stuck on the side of my grinder so very little ends up in my pour). Poke a shallow indent in the middle of the coffee bed
- Gently pour from the gooseneck into the indent, and let the water slowly flow over, covering the coffee bed. This takes around 30 – 50 mL of water. Relatively fresh coffee should now “bloom” and release CO2 during this process. The goal is to get all of the grounds somewhat damp for the actual pour. Let sit for around 30 s.
- Pour in a circular motion until you reach just over the half way mark of the size 2 filter. Give a gentle swirl in a clockwise motion to settle the agitated grounds so they funnel along the V60 grooves. Swirling counter to the groove direction will result in a lumpy bed.
- While the water is still in motion, top off the water in a circular motion to ¾ up the filter. Let drain. This uses up around 200 mL
- Walk away and futz around for a minute
- Come back and do a second pour of around 125 – 150 mL. No swirling required. Let drain
- Walk away and pack your bag for work
- Pour ~100 mL. The water should be fairly slow to pass through now as the filter is getting clogged. Wait until you can see the sludge at the top and the filter is very slow to drip.
- Optionally top off with the now ~40 – 50 deg C water and let drain. I heard in passing somewhere that the last little bit is actually the sweetest aspect. I can’t say I disagree when I decant out coffee earlier during the process.
- Swirl the carafe gently to mix, then transfer into your preferred drinking vessel. Put a small amount aside in hopes that someone else will drink and appreciate your work.
Notes: I wanted to compare my water parameters to Third Wave Water, but I was unable find the information easily on their site. My guess is that it’s buried in a video somewhere. Since I first heard of their inception, they seem to have produced a number of water adjusters for multiple types of brews… I did find SCA water standards which their main product is inspired by and found Calcium Hardness 50 – 140 ppm, Alkalinity 40 – 70 ppm, pH 6 – 8 (huge range of acceptable pH, target of 7.0). My water hardness seems quite a bit higher than the standard, which I can certainly taste and experience when drinking water from the tap. https://sca.coffee/heritage-coffee-standards
Disclaimers: I have followed James Hoffman on YouTube for years, and I am really not a fan of his “science” work. I mostly appreciate what a big fan of coffee he is and usually only watch content when I am interested in the idea (clickbait titles). I typically end up disappointed when I see a basic Excel spreadsheet with no error bars or only one test, then avoid watching his content for several weeks in a row. I found his content on how to do coffee cuppings very interesting though, do check that out! I am told that the content is usually quite high quality in terms of robustness, so I must be lucking out. The commentary on AeroPress was quite interesting RE: industry insights however, and it’s still on my list of reading content to check out his Coffee Atlas. As always, check your sources folks. Clearly there is a lack of research in the realm of coffee, perhaps it’s time other scientists start branching out to bring in related ideas.
Conclusions
Here are some questions I would love answered, or perhaps answers are out there and I haven’t stumbled upon them yet.
- Why do we break the crust during cupping? What is the actual goal here?
- What is the perfect number of swirls and swirl motion to get a flat bed during a pourover if we consider grain size distribution, water temperature, and the standard V60 size 2 with Hario filters after the initial bloom?
- Is there a perfect way to age a Coffee Sock? Surely the fabric and weave alter over time.
- What is the most efficient way of cleaning a French Press without dumping grounds into the sink and flooding the garbage with water?
- What’s up with Third Wave Water? What kind of testing did they participate in to develop their water conditioners?
- We never did find out if the espresso was tastier at the end of the paper. Is it time to quantify taste preference in coffee for the average person vs the elitists?
- Charge parameters. They demonstrate that beans are charged via contact with typical coffee setup materials. It is unclear why they use the Starbucks Blonde Roast (blend) here. They then claim that coffee must be ground, typically to grain size of 100 nm to 2 mm. I was unable to find their reference here, as I usually grind coarser for a French press. Perhaps it is a reference to espresso grinds only. They skip ahead to state that finer grind sizes resulted in aggregates held together by electrostatic forces. They ground 1 g at a time and found both the net charge, and the charge distribution.
-
Sketchy Science: Plant Prep for 3+ Weeks of Travel
I had the opportunity to do some field work for an extended period of time this summer. Logistics of field work, travel, insurance, and other field related prep work aside, I also had a large number of plants that needed to be taken care of. I had to make plans for said plants.
What ended up happening was roping in a few people to check in on my plants during my absence, and distributing them so no one person was saddled with watering 50 + plants with very particular needs. Instructions were, water when the soil looks and feels dry, approximately once every 10 days or so for the larger plants, and once a week for the smaller ones.
Had I been a little more prepared and had more time to plan, here are the things I would have done. The following information has been compiled from my past experience with leaving plants with roommates for just under 2 weeks, and typically being entirely absent during the holiday season. The good news is, we can test out these ideas soon! I’ve put off this post for so long that it aligns with my departure for 2 weeks, perfect to test out some of my ideas and rescue any plants that did not fare well in between. Its worth noting that there are some complicating factors that I didn’t account for, such as the change in seasonality, living in a drier environment than before, use of artificial lighting, plantlets recently released from their humid propagation boxes, blooms on the way, etc. And I might have pests. Woohoo.
Tl;dr
- get plants in semi-hydroponics used to a higher water reservoir as to maximize fill before departure
- stick plants in soil over large jar of water (without touching) as to provide moisture
- minimize light sources (reduce plant growth/activity/water uptake)
- keep cuttings in water vessels with narrow mouths
- cluster similar plants together
Let’s talk about why I came up with these points. Plants require a few things to live (and grow). Water, light (also heat), and nutrients. Of these, water and light (Fig. 1) are the critical ones for indoor plants when it is not the growing season. Additionally, the balance between water and light is very important and ideally mimics the plant’s native environment or initial growing conditions. Nutrients are not considered for shorter term absences.

Figure 1. “Full spectrum light” as shown in the barrina T5 listing. x-axis shows wavelength, y-axis shows..a fraction of? Irradiance? Note the blue and red peaks, these are generally considered the important wavelengths for plant health and growth. Compare this to https://en.wikipedia.org/wiki/Sunlight#/media/File:Solar_spectrum_en.svg Bottom humidity – fancy bottom watering
Watering without being present sounds like an easy thing to do. Just stick a bulb in or set up a drip system. This might work for some plants, but in my case, I predominantly have aroids and semi-succulents. These plants typically want to be watered in cycles of being fully soaked and then subsequently dried out until the next watering cycle. Nonetheless, most of my plants enjoy more moisture than the internet leads me to believe and typically live in a slightly more moisture rich environment in lieu of full desiccation. Thus, to maintain access to water without the ability to drench it from time to time (typically around 1 week’s time) can be a little difficult.
My solution is to stick all of my small pots over clean Classico mason jars after I use up all the sauce. The jars are filled about half way, and I pop the small nursery pots into the jar lid a couple of days after watering, so it maintains some moisture and will not fully dry out due to the nearly enclosed environment. This only works for my plants in pots of 2.5” diameter or smaller. For larger plants, self-watering pots are also an option, though I have typically found they are very finicky and require some calibration to prevent oversaturation of the base soil layer.
Hydroponics
Alternatively, I can provide endless amounts of water instead. This would be putting my plants into water directly, with or without additional media, but definitely not with soil. This method requires far more time to set up, but it is certainly doable. There are a few benefits of doing this. A deep water reservoir, precise control over nutrients, minimal pests… The trick is that it doesn’t work for every plant and it takes some time for plants previously living in soil to switch into water. Some I have cuttings fully growing out in just water, and some I have supported in a soil-less medium that wicks up water with strong root growth (this also adds aeration, very important to prevent a hypoxic environment!). The biggest complication with this method is cost – time and dollars. The second is that not all plants survive the transition, and it requires careful maintenance during that time.
For larger plants, transitioning into semi-hydro and filling up the jars as much as possible is ideal. If that is not an option, then the plant will simply not be watered during my absence. Plants in large containers tend to have more established root systems and reservoirs for instances of drought. Tropicals will not love this, but succulents will do just fine if they are large enough.
No sun or little sun
For the plants where I can’t set up water access via a large pool beneath the pot, I remove the water entirely. This leads to the plant missing a key ingredient for growth. In which case, perhaps the plant should not grow at all.
If there is no light, then there is no strong reason for water uptake. Most of my plants are suitable for “bright, indirect” sunlight. This is a cryptic statement that many a plant owner struggles with. What it tends to translate to is, most of my plants prefer as much sunlight as I can give them, so long as I bump them slowly into the sun. On the flip side, limiting sunlight will limit and slow growth. Less growth also means less water uptake and might set it off on a hibernation mode. Which is perfect if you can’t water your plants.
Grouping
Why group plants together? For context, my groupings are roughly: semi-succulent, semi-epiphytic, problem plants, and one-offs. These groupings are by water/light requirement, and care. The semi-succulents will need next to no care while I am gone. The semi-epiphytic plants and aroids would like some care. The problem plants need to be regularly checked on (these have pests, and I am not opposed to having them die-off entirely). And the one-offs are those that need to be watered, or left alone entirely. This just makes positioning my plants and making sure none get left out if there is someone checking in on them easier.
Survival of the fittest
Naturally, the plants might still be unhappy or die off while I’m gone. So what survives, survives. That’s a useful indicator for future trips what kinds of plants will do okay. In the chance I have to leave for an extended period of time again, then I’m all set with what did alright last time. Alternatively, if I really want plants around, cheap and robust plants are the way to go.
3+ weeks of travel
Things that actually happened during the field season: I split up some plants to pass along to others to take care of. At least one was on death’s door (it shriveled up, and the other similarly sad looking plant now has 1.5 leaves). I had a pet pass away during this time as well, I have no real thoughts on how to improve this situation for extended periods away other than living with someone else that is equally bonded to the animals. The rest of the plants are doing alright, though upon return, they did acquire some unwanted critters that were slowly killing them off.
Post field season thoughts: So that’s plants. What about the person travelling? I’ve been left with some thoughts after the last round of field work, and having just returned from a conference last week. One. Showers are nice. Two. I should start setting up a “recovery” station for myself when I return, especially if there is a big change in climate. Three. I want to find some time for myself to mull over what it means to be attached to various possessions, and how that affects me when I am absent or when I return after an extended period.
NEW: 2 week trial
Prepping for 2 weeks away, I’d like to avoid throwing my plants into hibernation. Stopping the growth of the young plants would simply lead to their death, or a tricky care situation on my return. Just about all of my smaller plants are in hydroponics or still suitable for a humid container. These will be under timed grow lights to compensate for the loss of sunlight with the change of seasons. The larger plants not in a reservoir will be going entirely unwatered, with two exceptions that are newer to my grouping of plants. Two smaller plants will also need to be watered during my absence, one is in the middle of slowly putting out flowers and requires the dry/wet cycle, and the other is entirely epiphytic in nature and does not possess functional roots. I have a few rooted cuttings, some will be staying in water, and some are being transitioned to semi-hydro and need to be topped off until the roots extend further. I was vaguely aware of needing to prepare them for my departure if I wanted healthy plants about 10 days pre-departure. During those 10 days, I purchased multiple grow lights and automatic timers, pulled out all the plants from propagation (except for one experimental box), informed my brother how to take care of my carnivorous plant (keep it flooded with rain water), and scattered hopefully live nematodes over all my potentially thrippy plants. I do still have some plants on campus, where they will be watered once during my absence. I may have written an entire spreadsheet with watering instructions and tips.
Expectations: All plants will be alive, and either slightly underwatered or overwatered when I get back. My calathea ornate (has spider mites currently and previously died down to a singular leaf) will likely go back to having one leaf. The corm only state oxalis may return from their hibernation and start putting out new leaves. The anthurium forgetii might be crispy. The propagations will not have made significant progress rooting. I will lose the hoya blooms on my linearis. If there are to be any casualties, I expect them to be amongst the newly propagated and the hoya I have had for weeks that have shown zero signs of growth (I think they had root rot before they even made it to my hands). Lastly, I might have aphids. I really hope this is not the case, but I have been side eyeing some of the leaf damage on my anthurium, and it is not looking promising.
Setup:
- X2 barrina T5s – “full spectrum”
- X1 barrina T5 – “full spectrum”
- X1 sansi 15 W bulb – “full spectrum”
- X1 barrina T5 (not shown)
- X2 GE automatic timers with two outlets set to turn on from 7:30 am to 10:30 pm ET (not shown)
- X3 misc coolermaster laptop fans (not shown)
- 4L of rainwater (not shown)
I purchased noma bulbs (8 W) sometime last year and also purchased a clamp lamp holder for it. I’ve been using it for nearly a year as a regular light bulb as well, and it has generally been focused on my carnivorous plants. I purchased the sansi bulb as an experiment when I moved home, with the intent of hanging them via pendant lamp bulb holders (since returned due to overheating). It now lives in the clamp lamp. All noma bulbs are currently inactive. They provided the lowest intensity light and had a tendency to heat up more than I would have liked. Once I find holders that are better at dissipating heat, they will likely make it back into regular use. I later purchased a set of 8 barrina T5s (yellow).
In the meantime, I have a vertical plant stand next to a window (Fig. 2). The plants on the stand above the window sill receive no additional artificial lighting other than those under the sansi bulb. There is one plant at a lower level that has heavy leaves, so it’s on the ground in case it topples. That one receives an off axis barrina light since it does not need high light intensity. These two are linked to one timer.
Figure 2. Light sources include the window, sansi light bulb (clamped onto plant stand), and barrina T5 (attached to the plant stand and standing vertically, LED lights are facing parallel to the stand, not towards the plant). Sampling of spectra were taken for the sansi light from the closest platform, from the “base” – flush to the platform, and incrementally upwards from the locations marked with an “x”. Sampling for the barrina T5 was done at a diagonal by placing a ruler on the plant pot and away from the light. Sampling for the window stool plants was taken behind the stool, ~3 inches above the stool. Sampling of spectra for the stingray plant was taken at the base of the plant. There are two barrinas linked together in the “closet” area, with the lights generally facing downwards about 5 – 20 inches away from the plant tops (Fig. 3). Another one is linked to the same timer and is focused on my previously “bathroom” plants (not shown in images). There are three fans in the closet, since I spotted some fluffy mold growing in the three days I had been gone. Ew. That’s probably what I get for no airflow and using rain water that has been sitting in a bucket of decaying leaves.
Figure 3. Light sources include the window, and two barrina T5s hooked onto closet bars facing downwards. Not shown (and not relevant) is another barrina T5 closer to the ground. The forgetii sampling is marked by a downwards facing teardrop, with samples starting at the base of the pot moving upwards. The hoya linearis is in a hanging pot and is much closer to the barrina T5. Sampling started from the top of the pot upwards. The hoya cluster is indicated by a group of 6 pots and is quite a ways from both artificial and natural light (> 1 m). The window sill plants receive natural light. Various other plants are scattered about, in the hopes that natural lighting and overflow from growlights will be sufficient. To get a baseline, I decided to borrow – with permission! – a couple of spectrometers from the lab covering the UV and NIR range, and a cosine corrector. Samples were taken between 2:40 pm to 3:15 pm ET at 100 ms per sample and averaging over 10 samples. What I should be expecting to see is a curve similar to that provided by the barrina T5 listing (Fig. 1).
It looks like the Sansi bulb is doing a lot of heavy lifting, even on the far side of the stand. The “full spectrum”-ness seems to be covered reasonably well, though it certainly is not a smooth slope as otherwise shown in the images. The “oneoffs” show the light coming in from a window on a cloudy day. Both the stingray alocasia and hoya cluster are quite far from the window (~2m and 1m respectively), but the hoya cluster may additionally be receiving some light from the barrinas in the closet. That said, you can see the fall off from the barrina lights if they are not angled correctly from the dragonscale alocasia readings. The window stool may also be receiving some light from the sansi bulb, and is located about 40 cm away from the window sill. Even at this distance, the light intensity falls off quite a bit in comparison to spectra taken at the window sill.
The spectra looks as it should, based on the marketing images for the barrina lights. Though it is worth pointing out the apparent fall off around the 570 nm wavelength may be a function of the spectrometer rather than a lack of light in that wavelength. We can say that the sansi light bulb did a better job of outputting in the relevant spectrum than the natural light right by the window sill. It also does not have the red wavelength “peak”, and is more focused towards the blue light. Natural light coming in from the windows falls off very quickly, but the results might be different had it been a sunny day outside.
Conclusion: TBA
-
Subscribe
Subscribed
Have a WordPress.com account? Log in now.


